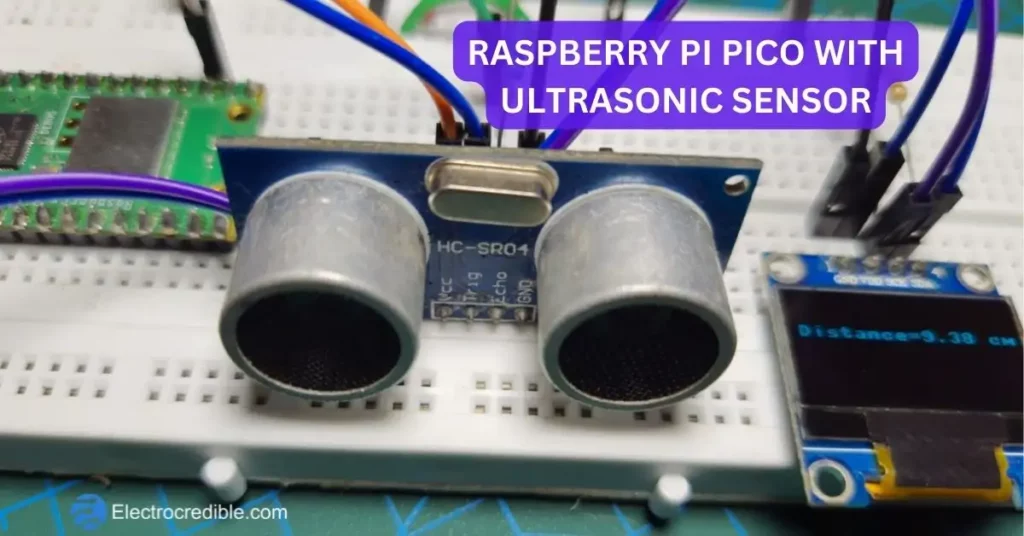
This guide will demonstrate how to measure distance using Raspberry Pi Pico and HC-SR04 ultrasonic ranging module. First, we will display the distance of an obstacle in the shell of Thonny IDE. At the end of the article, we will interface an OLED module to show the distance of an obstacle from the ultrasonic sensor.
HC-SR04 is a cheap and easily available ultrasonic sensor that can measure obstacles up to 4 meters. Raspberry Pi Pico is a development board based on the RP2040 microcontroller, which is a dual-core Arm Cortex M0+ processor, with 264kB on-chip SRAM and 2MB of flash memory. In this tutorial, the code to measure distance with Raspberry Pi Pico is written in MicroPython.
Overview Of Ultrasonic Distance Sensor
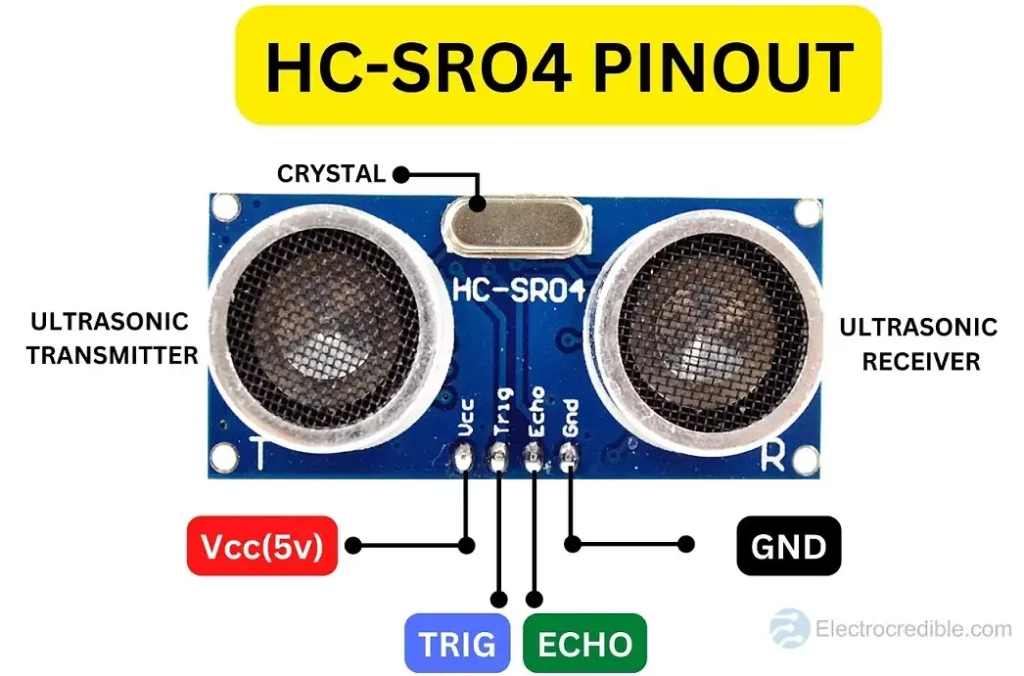
The HC-SR04 is an ultrasonic sensor module that consists of two transducers for transmitting and receiving ultrasound, and circuitry to convert distance data to an electronic pulse signal. The module has 4 pins, two of which are used to communicate with a microcontroller, and the other 2 pins are used to provide power to the module. The diagram below illustrates the front view and pinout of HC-SR04.
On the other side of the module, we have various ICs and components that work together to sense obstacles. The ICs MAX2323 and LM324 are detailed in the diagram below. Also, an EMP78P153S microcontroller works as the brain of the module. Besides these, there are other components in the HC-SR04 module such as NPN and PNP transistors, capacitors, resistors, etc.

You can read the datasheet of HC-SR04 or view its schematic to learn more about the sensor.
HC-SR04 Specifications:
| Supply Voltage | 5V DC |
| Measurement Angle | 30° |
| Resolution | 0.3 cm |
| Maximum Range | 400 cm |
| Minimum Range | 2 cm |
How Distance Measuring Ultrasonic Sensors Work?
Two similar-looking transducers in the ultrasonic sensor module work together to estimate the distance of an object. One transducer sends out ultrasonic waves and the other receives the reflected waves. The sensor circuitry calculates the time the reflected sound wave takes and a microcontroller can read this calculated value.

To initiate the distance measurement procedure, we need to send a TTL pulse of at least 10 microseconds to the Trig pin of HC-SR04. Upon receiving this pulse, the ultrasonic sensor module automatically transmits 8 bursts of ultrasonic pulses at a frequency of 40KHz. This ultrasound will reflect off of any object in front of the sensor, within a conical range of 30°.

The Echo pin then outputs a TTL pulse, whose duration is equal to the time taken for the reflected wave to arrive. This TTL pulse can be read by a microcontroller to estimate the distance of an object from the sensor. If there is no obstacle in front of the sensor, the Echo pin will give a pulse with a duration of 38ms. Also, note that there must be at least a 50ms interval between two consecutive measurements.
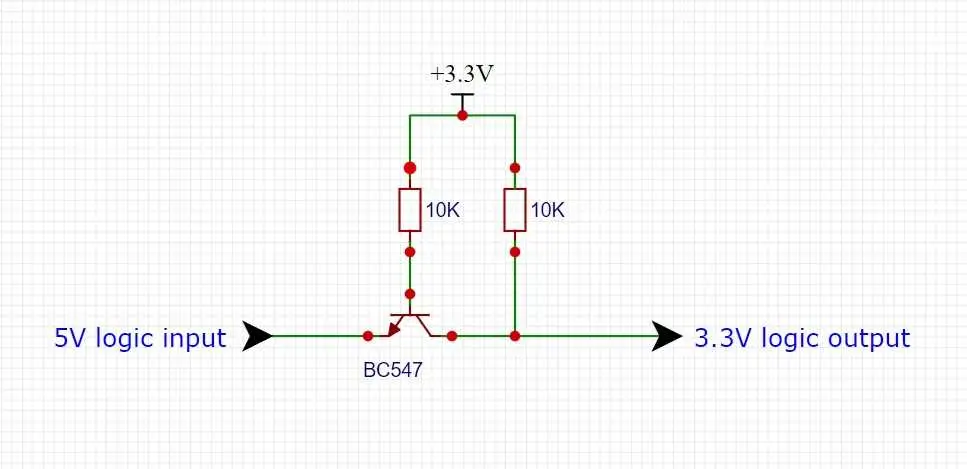
ⓘ TTL signal can be up to 5V for logic ‘1’. As the inputs in Raspberry Pi Pico can tolerate up to 3.3V, we need to bring down the voltage by using a voltage divider or logic level converter. Some HC-SR04 models can operate with a supply voltage of 3.3V. However, if you are unsure, it is safer to bring down the voltage from the Echo pin to 3.3V to prevent damage to your Raspberry Pi Pico.
Raspberry Pi Pico Distance Sensor Wiring Diagram
Connect your Raspberry Pi Pico or Pico W to the HC-SR04 ultrasonic sensor as shown in the diagram below.

You can refer to the Raspberry Pi Pico pinout diagram for visual aid. The signal from the Echo pin of HC-SR04 is fed into a voltage divider consisting of two resistors of values 1 kiloohm and 2.2 kiloohms. At the junction of the two resistors, we get a voltage of around 3.44 V (if the Echo pin voltage is at 5 V). This is almost close to 3.3 V, which is compatible with RPi Pico.

I used 2.2 KΩ resistor as it was available for me. You can use a 2 KΩ resistor instead of a 2.2 KΩ, as it will give the voltage output as 3.33 V which is closer to the desired 3.3 V.
Alternatively, you can use a unidirectional logic level converter as shown in the circuit below. The use of this circuit is detailed in our article Raspberry Pi Pico Flow Sensor Interfacing Guide.
Another way to step down the 5v to 3v is to use a logic level shifter, which is discussed in-depth in our article – Logic Level Converter and how it works.

Raspberry Pi Pico Ultrasonic Sensor Interfacing Code
If you are unfamiliar with programming Raspberry Pi Pico RP2040 with MicroPython, you can visit our guide Getting Started With Raspberry Pi Pico & Raspberry Pi Pico W Using MicroPython where we discuss how to upload programs to Pi Pico using Thonny IDE or uPyCraft IDE. The steps that follow are explained using Thonny IDE.
- With all connections done, connect the Pico to your computer. Open Thonny IDE, and paste the following code in a blank project.
#Source: Electrocredible.com, Language: MicroPython
from machine import Pin
import time
trigger_pin=4
echo_pin=5
trigger=Pin(trigger_pin, Pin.OUT)
echo=Pin(echo_pin, Pin.IN)

while True:
    trigger.high()
    time.sleep_us(11)
    trigger.low()
    while (echo.value()==0):
        pass #wait for echo
    lastreadtime=time.ticks_us() # record the time when signal went HIGH
    while (echo.value()==1):
        pass #wait for echo to finish
    echotime=time.ticks_us()-lastreadtime
    if echotime>37000:
        print("No obstacle detected")
    else:
        distance = (echotime * 0.034) / 2
        print("Obstace distance= {}cm".format(distance))
time.sleep(1)Code language: Python (python)- Run your code by pressing F5 or by clicking the Run icon.

- Save the script to your Raspberry Pi Pico.

- Save the file with a ‘.py’ filename extension such as distanceSensor.py.
You should now see the output on the Shell window of Thonny, as shown in the image below

Ultrasonic Sensor MicroPython Code Explained
First of all, we import the Pin class to set input and output pins, and the time library to set delays in our code.
from machine import Pin
import timeCode language: Python (python)
Next, we specify the pins that will be used to communicate with HC-SR04. Pin GP4 is set as output which will send a trigger to the Trig pin. Pin GP5 will act as input to read data from the Echo pin.
trigger_pin=4
echo_pin=5
trigger=Pin(trigger_pin, Pin.OUT)
echo=Pin(echo_pin, Pin.IN)Code language: Python (python)
Inside the while loop, we send the trigger signal that will last for 11 microseconds. The datasheet recommends a signal of at least 10microseconds.
    trigger.high()
    time.sleep_us(11)
    trigger.low()Code language: Python (python)
In the following lines of code, we read the pulse sent by the HC-SR04 ultrasonic ranging module. A while loop runs as long as the voltage at the Echo pin is LOW. As soon as this voltage turns HIGH, the current time is stored in a variable called lastreadtime. The function time.ticks_us() returns an increasing microsecond counter value. The program will again wait for the HIGH signal to turn LOW. As soon as the signal gets LOW, the time for the echo to arrive is calculated by subtracting the present time and the time stored in the lastreadtime variable. You can refer to the timing diagram of HC-SR04 to understand this part of the code.
    while (echo.value()==0):
        pass #wait for echo
    lastreadtime=time.ticks_us() # record the time when signal went HIGH
    while (echo.value()==1):
        pass #wait for echo to finish
    echotime=time.ticks_us()-lastreadtimeCode language: Python (python)
The datasheet of HC-SR04 informs that if no object is detected, the Echo pin sends out a 38ms pulse. So we print “no obstacle detected” if the echo time is more than 37ms(37000us). If not, the distance is calculated by using the simple formula Distance= Time*Speed.
    if echotime>37000:
        print("No obstacle detected")
    else:
        distance = (echotime * 0.034) / 2
        print("Obstace distance= {}cm".format(distance))Code language: Python (python)
The speed of sound depends on temperature, humidity, and some other parameters. For our calculations, we can assume the speed of sound as 343 meters per second. Since our echo time is in microseconds, and we desire the output of distance in the centimeter unit, we need to convert the unit of speed of sound to centimeters/microsecond. The speed of sound for our purpose can be thus taken as 0.034centimeters/microsecond.
The value of distance we get from the product (echotime * 0.034) is the distance covered by the ultrasonic wave from the source to the obstacle and back to the source after reflection. So, to get the distance between the source and the obstacle, we divide the distance by 2.
Finally, we add a delay of one second by using the function time.sleep(1), which will insert a delay of 1 second to the code. As mentioned earlier, the datasheet of HC-SR04 recommends at least a 50ms interval between consecutive distance readings. Here, 1 second of delay is inserted for better readability of the output.
Interface An OLED Display
Let us now learn how to interface an OLED display with our existing project using I2C communication protocol. This demonstration uses an SSD1306 OLED display with a resolution of 128×64 pixels. Connect all the components as shown in the diagram below.

To use the SSD1306 OLED display, we need a MicroPython library. All the steps required to interface an OLED display are described thoroughly in our tutorial to Interface OLED Display With Raspberry Pi Pico. Briefly, here are the steps to install the SSD1306 library.
- Connect Raspberry Pi Pico to your computer using a USB cable.
- Open Thonny IDE. On the bottom right corner of your IDE, ensure that the interpreter is set to MicroPython(Raspberry Pi Pico).
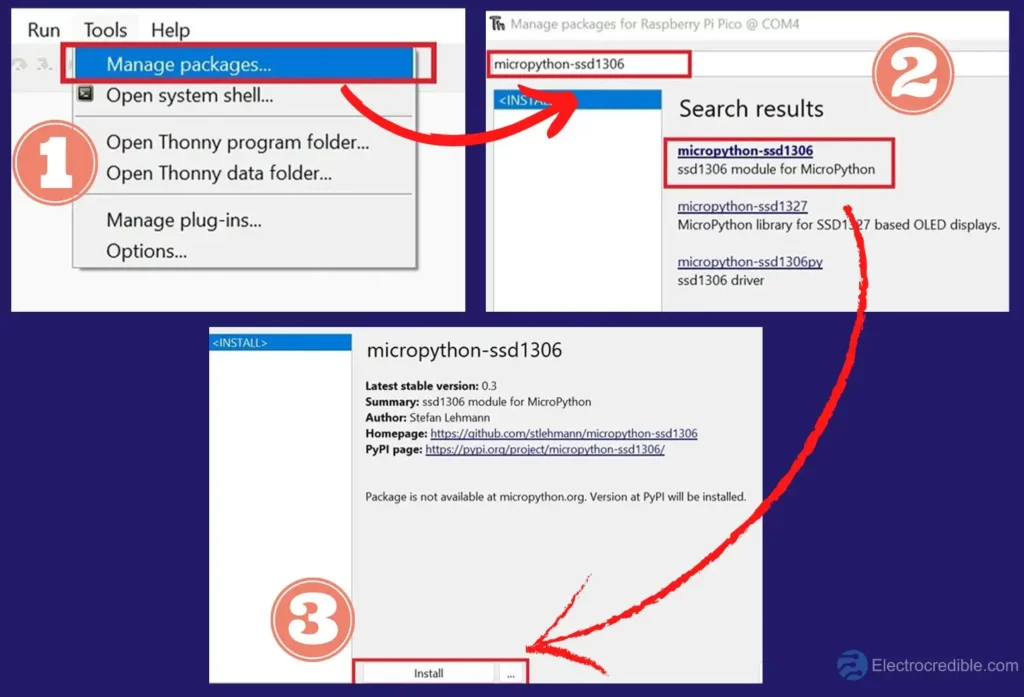
- On the top toolbar of the IDE, click on Tools>Manage Packages.
- Type “micropython-ssd1306” on the search bar and press Enter. From the search results, click on the library that you searched for.
- In the next window, you can view some details of the library. The author of this library is Stefan Lehmann. Click on Install.
With the library installed, upload the following code to your Pi Pico and save it with a filename with ‘.py’ extension.
#Source: Electrocredible.com, Language: MicroPython
from machine import Pin, I2C
from ssd1306 import SSD1306_I2C
import time
trigger_pin=4
echo_pin=5

trigger=Pin(trigger_pin, Pin.OUT)
echo=Pin(echo_pin, Pin.IN)

WIDTH =128
HEIGHT= 64
i2c=I2C(0,scl=Pin(1),sda=Pin(0),freq=200000)
oled = SSD1306_I2C(WIDTH,HEIGHT,i2c)

while True:
    trigger.high()
    time.sleep_us(11)
    trigger.low()
    while (echo.value()==0):
        pass #wait for echo
    lastreadtime=time.ticks_us() # record the time when signal went HIGH
    while (echo.value()==1):
        pass #wait for echo to finish
    echotime=time.ticks_us()-lastreadtime
    if echotime>37000:
        print("No obstacle detected")
        oled.text("No obstacle detected", 0, 10)
        oled.show()
    else:
        distance = (echotime * 0.034) / 2
        print("Obstace distance= {}cm".format(distance))
        oled.text("Distance=", 0, 20)
        oled.text(str(round(distance,2)), 72, 20)
        oled.text("cm", 112, 20)
        oled.show()
    time.sleep(1)
    oled.fill(0)
Code language: Python (python)Code Explanation:
Some additional code have been added that will be explained in this section. We import the I2C class from the machine module and the SSD1306_I2C class from the library that we installed.
from machine import Pin, I2C
from ssd1306 import SSD1306_I2CCode language: Python profile (profile)
The OLED display is specified with its width and height in pixels. An object called i2c of the I2C is created with Peripheral ID as 0, GP0 is set as SDA pin, GP1 set as SCL pin and with a clock frequency of 200Khz. Our article on I2C communication in Rpi Pico discusses about I2C in depth.
WIDTH =128
HEIGHT= 64
i2c=I2C(0,scl=Pin(1),sda=Pin(0),freq=200000)
oled = SSD1306_I2C(WIDTH,HEIGHT,i2c)Code language: Python (python)
The lines of code below display the ultrasonic distance sensor value in an OLED display. The function oled.text() takes 3 parameters- the String to be displayed, the value of the starting x-axis pixel, and the value of the y-axis pixel. The distance value is rounded off to two digits after decimal and then converted to a string by str(round(distance,2)). Finally, oled.show() prints the data on the OLED display.
        print("Obstace distance= {}cm".format(distance))
        oled.text("Distance=", 0, 20)
        oled.text(str(round(distance,2)), 72, 20)
        oled.text("cm", 112, 20)
        oled.show()Code language: Python (python)
Remember to include oled.fill(0) as it clears the display every loop. Without this piece of code, the characters will overlap.
Wrapping Up
To improve the accuracy of the ultrasonic sensor, the temperature of your surroundings can be taken into consideration. Air temperature is the most influential parameter that affects the speed of sound. You can use the formula (331+(0.6) x Temperature) to calculate the velocity of sound. The temperature can be sensed using the onboard temperature sensor in Raspberry Pi Pico, environmental sensors such as BMP280 and BME280, or the cheaply available modules such DHT22 and DHT11. All these methods can be accessed by clicking the respective links. You can read this Wikipedia article on speed of sound for additional information. Thank you for reading.
Post Tags
Leave a Reply