In this guide, learn how to control GPIOs and read sensor data remotely using a MicroPython web server. Examples here are explained using Raspberry Pi Pico W and ESP32 development boards. The web server code discussed here is robust and can automatically make reconnection attempts in case of connection failure. The code can be easily adapted for other development boards such as the ESP8266.
Your microcontroller has to be connected to the same network as your computer or mobile phone to access the web server from a browser.
This article explains a synchronous web server. To create an asynchronous web server, visit our guide – Raspberry Pi Pico W Asynchronous Web Server – MicroPython Code.
Brief Overview of a Web Server
In the context of embedded systems and IoT, a web server is a specialized software application running on a microcontroller or microprocessor that enables the device to respond to HTTP (Hypertext Transfer Protocol) requests. HTTP is a protocol used for transmitting data on the World Wide Web.
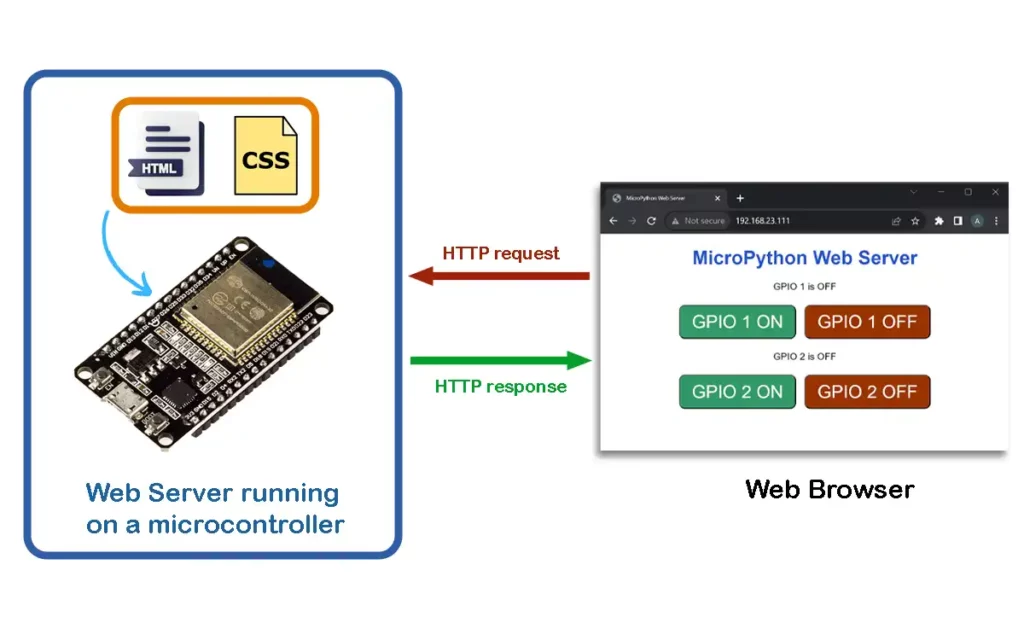
So, a web server running on a microcontroller helps to communicate and exchange information with other devices, typically through a web browser. This can be used for remote monitoring and control. For example, you might access the settings of a smart thermostat or a network-connected sensor through a web browser. Behind the scenes, a web server will handle the communication and serve the requested web pages.
Prerequisites
The following components will be used in this guide:
- Raspberry Pi Pico W development board.
- ESP32 development board. ESP-WROOM-32 is used here, but you can select any alternative.
- LEDs and current limiting resistors.
You will also have to flash MicroPython firmware on your development board. If you are using ESP32, read these guides:
- Getting Started: MicroPython On ESP32 Using uPyCraft IDE.
- How-To: MicroPython On ESP32 Using Thonny IDE (Flash/Upload).
To flash and run MicroPython firmware on Raspberry Pi Pico / Pico W, read:
MicroPython Web Server Example 1: Control GPIOs in ESP32
This web server example will display a graphical user interface (GUI) in a browser which will give control of the GPIOs of ESP32.
The schematic below shows how to connect two LEDs to the GPIOs of ESP32. I have used an ESP-WROOM-32 board in this tutorial, but any other ESP32 board will also work.
Connect two LEDs to ESP32 as shown:
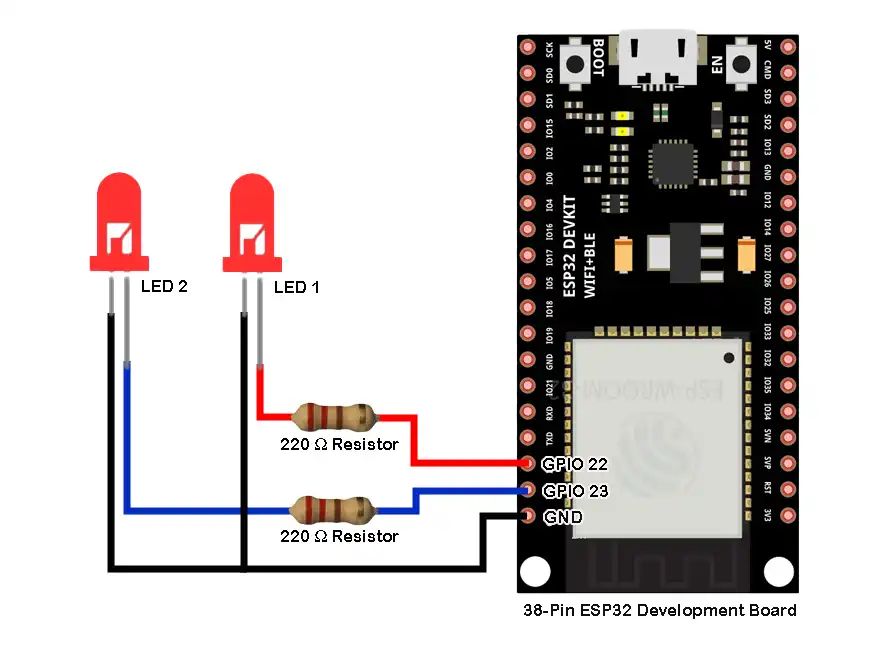
Make sure to use proper current limiting resistors with the LEDs.
Uploading Code – ESP32 MicroPython Web Server
After the connections are done and the MicroPython .bin file has been uploaded to ESP32, you can proceed with uploading the code to ESP32. The code will run a web server in ESP32 and listen for HTTP requests from clients.
The steps below explain how to upload web server MicroPython code to ESP32 using Thonny IDE.
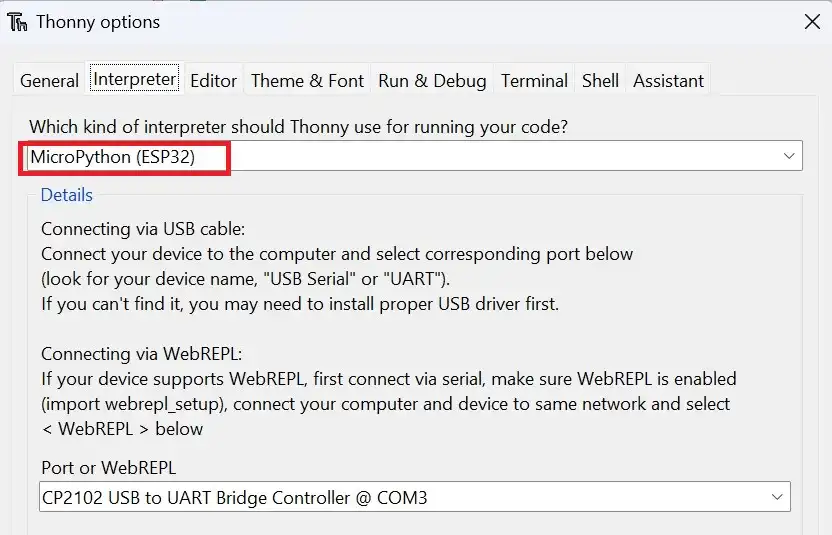
In Thonny IDE, set the interpreter to ESP32 by navigating to Tools>Options>Interpreter.
Create a new file by clicking on File>New and paste the following MicroPython code for the web server.
from machine import Pin
import network
import socket
import time

# Define GPIO pins
GPIO1 = Pin(22, Pin.OUT)
GPIO2 = Pin(23, Pin.OUT)

# Initialize GPIO states
GPIO1.value(0)  # OFF
GPIO2.value(0)  # OFF

GPIO1_state = "GPIO 1 is OFF"
GPIO2_state = "GPIO 2 is OFF"

#WiFi credentials
ssid = 'YOUR_SSID'
password = 'YOUR_PASSWORD'

wlan = network.WLAN(network.STA_IF)

#function to connect to Wi-Fi network
def cnctWifi():
    wlan.active(True)
    print('Attempting to connect to the network...')
    wlan.connect(ssid, password)
    max_wait = 10
    while max_wait > 0 and not wlan.isconnected():
        max_wait -= 1
        print('waiting for connection...')
        time.sleep(1)

    # Manage connection errors
    if not wlan.isconnected():
        print('Network Connection has failed')
    else:
        print('Connected to the network successfully.')
        status = wlan.ifconfig()
        print( 'Enter this address in browser = ' + status[0] )

#HTML + CSS for webpage
html = """<!DOCTYPE html>
<html lang="en">
<head>
  <meta charset="UTF-8">
  <meta name="viewport" content="width=device-width, initial-scale=1">
  <title>MicroPython Web Server</title>
  <style>
    html {
      font-family: Arial;
      display: inline-block;
      margin: 0px auto;
      text-align: center;
    }

    h1 {
      font-family: Arial;
      color: #2551cc;
    }

    .button1,
    .button2 {
      -webkit-border-radius: 10;
      -moz-border-radius: 10;
      border-radius: 10px;
      font-family: Arial;
      color: #ffffff;
      font-size: 30px;
      padding: 10px 20px 10px 20px;
      text-decoration: none;
      display: inline-block;
      margin: 5px;
    }

    .button1 {
      background: #339966;
    }

    .button2 {
      background: #993300;
    }
  </style>
</head>

<body>
  <h1>MicroPython Web Server</h1>
  <p>%s</p>
  <p>
    <a href="/GPIO1/on"><button class="button1">GPIO 1 ON</button></a>
    <a href="/GPIO1/off"><button class="button2">GPIO 1 OFF</button></a>
  </p>
  <p>%s</p>
  <p>
    <a href="/GPIO2/on"><button class="button1">GPIO 2 ON</button></a>
    <a href="/GPIO2/off"><button class="button2">GPIO 2 OFF</button></a>
  </p>
</body>
</html>
"""
# Connect to Wi-Fi
cnctWifi()

# Set up socket for web server
addr = socket.getaddrinfo('0.0.0.0', 80)[0][-1]
s = socket.socket()
s.setblocking(0)
s.bind(addr)
s.listen(1)

print('listening on', addr)

# Main loop for handling client requests
while True:
    if not wlan.isconnected():
        print("Connection failed. Trying to reconnect")
        wlan.disconnect()
        cnctWifi()
    if wlan.isconnected():
        try:
            cl, addr = s.accept()
            print('client connected from', addr)
            request = cl.recv(1024)
            print(request)

            request = str(request)
            GPIO1_on = request.find('/GPIO1/on')
            GPIO1_off = request.find('/GPIO1/off')
            GPIO2_on = request.find('/GPIO2/on')
            GPIO2_off = request.find('/GPIO2/off')

            if GPIO1_on == 6:
                print("GPIO 1 is on")
                GPIO1.value(1)
                GPIO1_state = "GPIO 1 is ON"

            if GPIO1_off == 6:
                print("GPIO 1 is off")
                GPIO1.value(0)
                GPIO1_state = "GPIO 1 is OFF"

            if GPIO2_on == 6:
                print("GPIO 2 is on")
                GPIO2.value(1)
                GPIO2_state = "GPIO 2 is ON"

            if GPIO2_off == 6:
                print("GPIO 2 is off")
                GPIO2.value(0)
                GPIO2_state = "GPIO 2 is OFF"

            response = html % (GPIO1_state, GPIO2_state)
            cl.send('HTTP/1.0 200 OK\r\nContent-type: text/html\r\n\r\n')
            cl.send(response)
            cl.close()

        except:
            pass
    time.sleep(0.1)
Code language: Python (python)
The code is explained shortly below. You will have to change the Wi-Fi credentials to your own in the code by replacing YOUR_SSID and YOUR_PASSWORD.
ssid = 'YOUR_SSID'
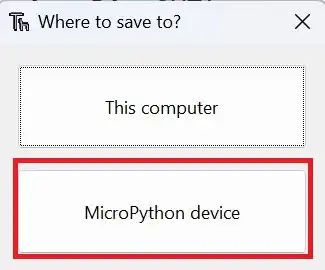
password = 'YOUR_PASSWORD'Code language: JavaScript (javascript)Save the file by clicking on File>Save as or by using the shortcut Ctrl+Shift+S. Select MicroPython Device on the window that appears to save the code to ESP32.
Set the filename as webserver.py in the next dialog box. You can save it as main.py if you wish your code to run automatically when ESP32 boots.
Control GPIOs from any Browser
In Thonny IDE, click the shortcut F5 or the Run button to run the web server script that you saved to ESP32.

If you face an error while running the script, refer to the troubleshooting section below.
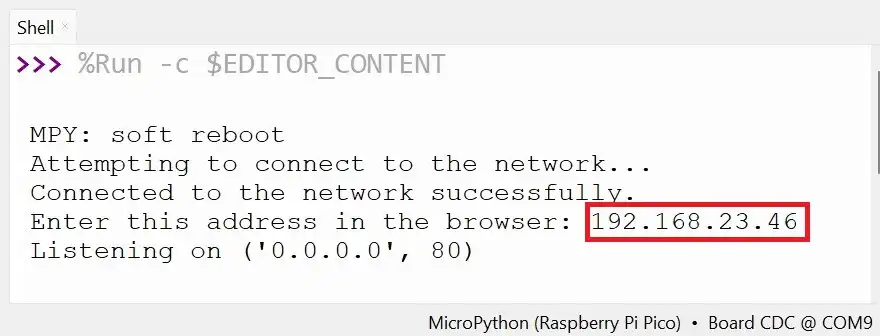
Thereafter, you must see some information in the shell of Thonny IDE. The output messages will help you to know if a proper connection is established.

When a connection is successfully established, you will be presented with an IP address. This IP address has to be entered in a browser connected to the same network.
When you enter the IP address in a browser, you should see the webpage as shown below.

When we click a button on the webpage, an HTTP request will be made. For example, if we click the button to switch on GPIO1, the request will be like – 192.168.xx.xx//GPIO1/on. This can be seen below in the screenshot taken after clicking on the button ‘GPIO 1 ON’.
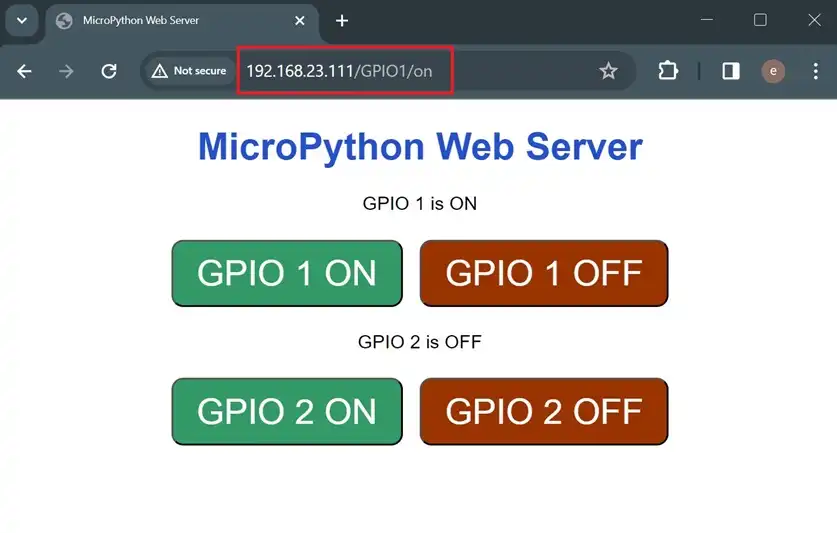
Similarly, each button click will send a unique request, and in response, the status of the toggled GPIO will also be displayed on the webpage.
MicroPython Code Explanation
Firstly, import the necessary libraries/modules The Pin class from the machine module is used to interact with GPIO. The network module provides functionality related to network connections via Wi-Fi. The socket module is used for working with sockets, which facilitate the sending and receiving of data over a network. The time module is used for introducing delays in the code.
from machine import Pin
import network
import socket
import timeCode language: JavaScript (javascript)
We then initialize two GPIO pins GPIO1 and GPIO2 with ESP32 PINs 22 and 23, respectively. Both pins are configured for output (Pin.OUT). The initial state of both pins is set to “OFF” (logic level 0), and corresponding state variables (GPIO1_state and GPIO2_state) are defined with their initial states as strings.
# Define GPIO pins
GPIO1 = Pin(22, Pin.OUT)
GPIO2 = Pin(23, Pin.OUT)

# Initialize GPIO states
GPIO1.value(0)  # OFF
GPIO2.value(0)  # OFF

GPIO1_state = "GPIO 1 is OFF"
GPIO2_state = "GPIO 2 is OFF"Code language: PHP (php)
You should replace YOUR_SSID with the actual name of your Wi-Fi network and YOUR_PASSWORD with the actual password for that network. These credentials are necessary for the device to successfully connect to the Wi-Fi network.
ssid = 'YOUR_SSID'
password = 'YOUR_PASSWORD'Code language: JavaScript (javascript)
The next line of code creates a WLAN interface in Station mode (STA_IF) and assigning it to the variable wlan
wlan = network.WLAN(network.STA_IF)There are two Wi-Fi interfaces available: one for the station and one for the access point. In station mode, ESP32 can connect to a Wi-Fi router. In the Access Point mode, it can act as a WiFi hotspot.
Connecting to Wi-Fi
Next, define a function cnctWifi() to make robust connections to the Wi-Fi network. The function can make multiple attempts to connect and print an IP address which can be used to access the web server.
def cnctWifi():
    wlan.active(True)
    print('Attempting to connect to the network...')
    wlan.connect(ssid, password)
    max_wait = 5
    while max_wait > 0 and not wlan.isconnected():
        max_wait -= 1
        print('waiting for connection...')
        time.sleep(1)

    # Manage connection errors
    if not wlan.isconnected():
        print('Network Connection has failed')
    else:
        print('Connected to the network successfully.')
        status = wlan.ifconfig()
        print( 'Enter this address in browser = ' + status[0] )Code language: Python (python)
Thereafter, define a multiline string (html) containing both HTML and CSS code to create a simple web page. The code contains the HTML structure, CSS styling, Buttons with hyperlinks, and placeholders for dynamic content. The %s within code acts as a placeholder for dynamic content that will be inserted at those positions. The dynamic content here is the status of the GPIOs that will be changed.
Socket Setup
A socket is one endpoint of two-way communication. We set up a basic server socket with the following lines of code.
addr = socket.getaddrinfo('0.0.0.0', 80)[0][-1]
s = socket.socket()
s.setblocking(0)
s.bind(addr)
s.listen(1)Code language: JavaScript (javascript)
Here is a brief explanation:
addr = socket.getaddrinfo('0.0.0.0', 80)[0][-1]:- Retrieves address information for ‘0.0.0.0’ (which typically means listen on all available interfaces) on port 80 and stores it in the
addrvariable.
- Retrieves address information for ‘0.0.0.0’ (which typically means listen on all available interfaces) on port 80 and stores it in the
s = socket.socket():- Creates a new socket and assigns it to the variable
s.
- Creates a new socket and assigns it to the variable
s.setblocking(0):- Sets the socket to non-blocking mode, meaning it won’t block the program’s execution while waiting for operations.
s.bind(addr):- Binds the socket to the address specified in the
addrvariable (in this case, ‘0.0.0.0’ on port 80).
- Binds the socket to the address specified in the
s.listen(1):- Configures the socket to listen for incoming connections with a backlog of 1, allowing the server to accept one connection at a time.
An infinite while loop maintains a connection to Wi-Fi and does client request handling. Each time the loop runs, it first checks if the Wi-Fi connection is active. If not, it makes attempts to reconnect.
if not wlan.isconnected():
        print("Connection failed. Trying to reconnect")
        wlan.disconnect()
        cnctWifi()Code language: Python (python)
In a try block, the code handles incoming client requests, interprets them to control GPIO pins, and sends back an HTTP response. Let’s break down the key parts:
Accept a Client Connection
        cl, addr = s.accept()
print('client connected from', addr)Code language: PHP (php)- Accepts an incoming connection (
s.accept()). clis a new socket object representing the connection.addris the address of the client.
Receive and Process Request
        request = cl.recv(1024)
        print(request)Code language: PHP (php)
Receives the client’s request data (up to 1024 bytes) and prints it in the shell of the IDE.
Parsing the Request for GPIO Control
        request = str(request)
        GPIO1_on = request.find('/GPIO1/on')
        GPIO1_off = request.find('/GPIO1/off')
        GPIO2_on = request.find('/GPIO2/on')
GPIO2_off = request.find('/GPIO2/off')Code language: JavaScript (javascript)- Converts the request to a string.
- Uses the
findmethod to locate specific patterns in the request string, indicating GPIO control commands.
GPIO State Changes
        if GPIO1_on == 6:
            print("GPIO 1 is on")
            GPIO1.value(1)
            GPIO1_state = "GPIO 1 is ON"
# ... (similar blocks for other GPIO states)Code language: PHP (php)- Checks if specific patterns indicating GPIO state changes are found.
- If found, it prints a corresponding message, updates the GPIO states, and sets state-related variables.
Preparing an HTTP Response
response = html % (GPIO1_state, GPIO2_state)
cl.send('HTTP/1.0 200 OK\r\nContent-type: text/html\r\n\r\n')
cl.send(response)
Code language: JavaScript (javascript)- Prepares an HTTP response using the HTML template (
html) with dynamic content replaced by GPIO states. These variables will update the%splaceholders as discussed earlier. - Sends an HTTP header indicating a successful response and the content to the client.
Closing the Connection
Finally, cl.close() closes the connection after processing the client’s request. A delay of 0.1 seconds ( time.sleep(0.1) ) is added at the end of the loop to prevent high CPU usage and to ensure stability while working with an IDE.

MicroPython Web Server Example 2: Read Sensor using Raspberry Pi Pico W
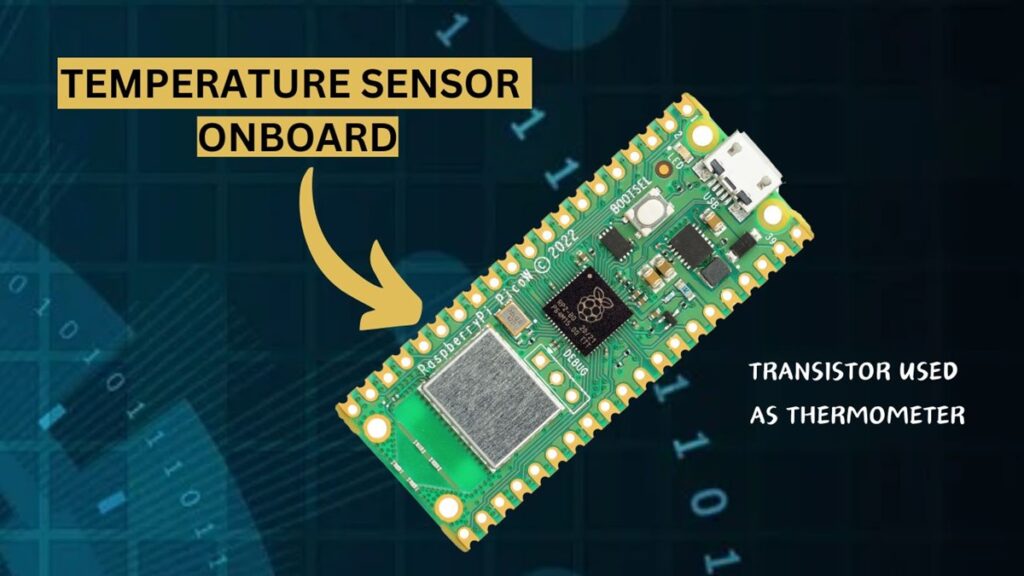
In the first example, we learned how to control GPIOs and view their status via a browser. In this example, the internal temperature sensor in Raspberry Pi Pico W is monitored using a MicroPython web server.
Upload Web Server Code to Raspberry Pi Pico W
The steps to upload code are explained using Thonny IDE.
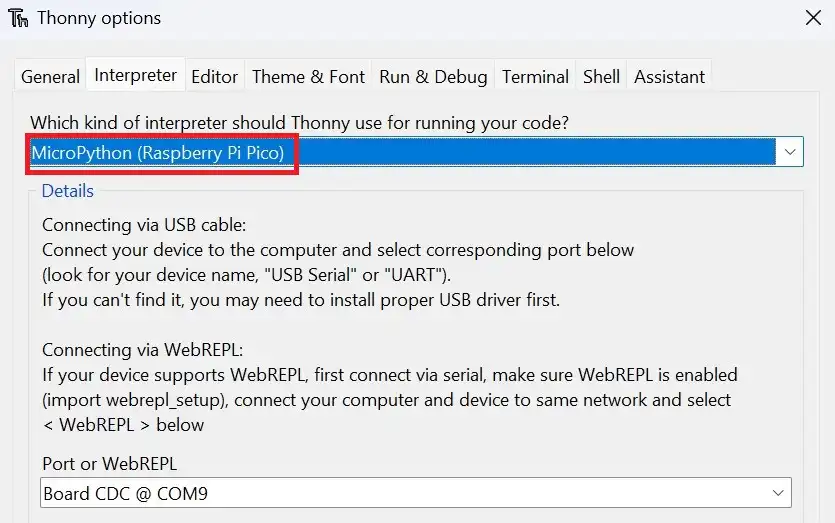
Connect Raspberry Pi Pico W to the computer. Open Thonny IDE and set the interpreter to Raspberry Pi Pico by navigating to Tools>Options>Interpreter.
Create a new file by clicking on File>New and paste the following MicroPython code for the web server.
from machine import ADC
import network
import socket
import time
# WiFi credentials
ssid = 'YOUR_SSID'
password = 'YOUR_PASSWORD'
wlan = network.WLAN(network.STA_IF)
adc = ADC(4) # ADC pin on Pico W for internal temperature sensor
# Function to connect to Wi-Fi network
#function to connect to Wi-Fi network
def cnctWifi():
wlan.active(True)
print('Attempting to connect to the network...')
wlan.connect(ssid, password)
max_wait = 10
while max_wait > 0:
if wlan.isconnected():
break
max_wait -= 1
print('waiting for connection...')
time.sleep(1)
# Manage connection errors
if not wlan.isconnected():
print('Network Connection has failed')
else:
print('Connected to the network successfully.')
status = wlan.ifconfig()
print( 'Enter this address in browser = ' + status[0] )
# HTML + CSS for webpage
html = """<!DOCTYPE html>
<html lang="en">
<head>
<meta charset="UTF-8">
<meta name="viewport" content="width=device-width, initial-scale=1">
<title>MicroPython Web Server</title>
<style>
html {
font-family: Arial;
display: inline-block;
margin: 0px auto;
text-align: center;
}
h1 {
font-family: Arial;
color: #2551cc;
}
</style>
</head>
<body>
<h1>MicroPython Web Server</h1>
<p>Temperature:</p>
<p> %s ℃ </p>
<p> %s ℉ </p>
</body>
</html>
"""
# Connect to Wi-Fi
cnctWifi()
# Set up socket for web server
addr = socket.getaddrinfo('0.0.0.0', 80)[0][-1]
s = socket.socket()
s.settimeout(0.5)
s.bind(addr)
s.listen(1)
print('Listening on', addr)
# Main loop for handling client requests
while True:
if not wlan.isconnected():
print("Connection failed. Trying to reconnect")
wlan.disconnect()
cnctWifi()
try:
cl, addr = s.accept()
print('Client connected from', addr)
request = cl.recv(1024)
print(request)
ADC_voltage = adc.read_u16() * (3.3 / (65535)) # Convert ADC reading to voltage
temp_celcius = 27 - (ADC_voltage - 0.706)/0.001721 # Convert voltage to temperature
temp_celcius= round(temp_celcius, 2)
temp_celcius=temp_celcius-15
temp_fahrenheit=32+(1.8*temp_celcius)
response = html % (temp_celcius, temp_fahrenheit)
cl.send('HTTP/1.0 200 OK\r\nContent-type: text/html\r\n\r\n')
cl.send(response)
cl.close()
except:
pass
time.sleep(0.1)Code language: Python (python)You will have to change the Wi-Fi credentials to your own in the code by replacing YOUR_SSID and YOUR_PASSWORD. The code is almost similar to our previous MicroPython web server example with a few modifications.
We create an adc instance to read the voltage from the fifth ADC channel of Raspberry Pi Pico W (ADC4 refers to the fifth channel).
adc = ADC(4)The following code reads the ADC voltage and converts it into temperature data.
        ADC_voltage = adc.read_u16() * (3.3 / (65535))  # Convert ADC reading to voltage
        temp_celcius = 27 - (ADC_voltage - 0.706)/0.001721  # Convert voltage to temperature
        temp_celcius= round(temp_celcius, 2)
        temp_celcius=temp_celcius-15
        temp_fahrenheit=32+(1.8*temp_celcius)Code language: PHP (php)
There is a temperature sensor in the Raspberry Pi Pico W connected to the 5th ADC channel. You can learn more by reading:
Save the web server MicroPython file by clicking on File>Save as or using the shortcut Ctrl+Shift+S. Select Raspberry Pi Pico on the dialog box that appears to save the code to your Pico W.

Set the filename as webserver.py in the next dialog box. You can save it as main.py if you wish your code to run automatically when Pico W boots.
Read Temperature Sensor Data on Browser
In Thonny IDE, click the shortcut F5 or the Run button to run the web server script that you saved to Raspberry Pi Pico W.
If you face any error while running the script, refer to the troubleshooting section below.
Some information will be printed in the shell of the IDE to assist you in determining whether a proper connection has been made. You will be shown an IP address after a connection is successfully made, which you must enter into a browser that is also connected to the same network.
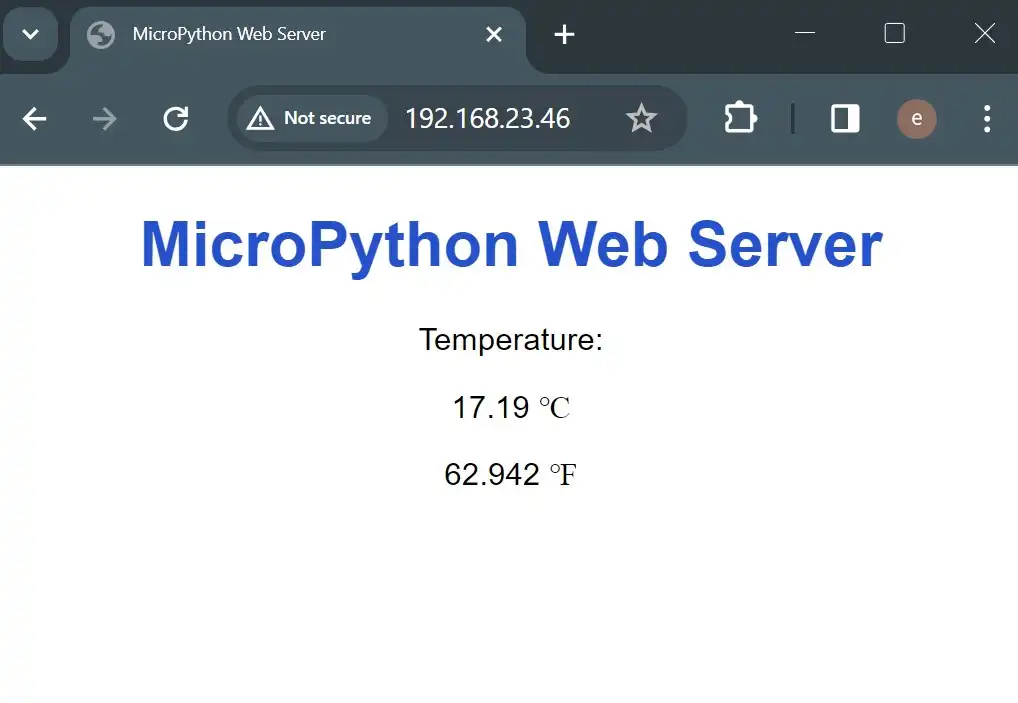
When you enter the IP address, you should see the webpage below. The webpage should display the temperature data in the Celcius and Fahrenheit scale.
Troubleshooting: “OSError: [Errno 98] EADDRINUSE” & Others
In some instances such as re-running the web server script shortly after stopping it, you may be presented with an error such as “OSError: [Errno 98] EADDRINUSE”. The image below shows the error screenshot in the shell of Thonny IDE.

This is due to how TCP/IP network stack connections are managed. A socket is a combination of an IP address and a port number. There is a timeout of around 30 and 120 seconds for reuse of a particular socket. This helps in keeping the connection robust to mitigate packet-related problems. You can read more about this error in this thread in the MicroPython forum.
When this error shows up, you can try to reset Raspberry Pi Pico or ESP32(by pressing the reset button), or disconnect and reconnect the USB cable physically.
After entering the IP address in a browser, if you do not see any webpage, then recheck that you are connected to the same network on both devices.
Wrapping Up
In this guide, we discussed two examples of creating a MicroPython web server. An ESP32 MicroPython web server to control GPIOS was demonstrated. Using Raspberry Pi Pico W, we saw how we can monitor sensors remotely via a web browser. Connecting to the web server from anywhere via the internet requires “port forwarding” and is out of the scope of this article.
You can further experiment by displaying the IP address in an OLED display so that you can easily connect to the web server. Instead of the internal temperature sensor in Raspberry Pi Pico, you can use sensors such as the BME280, BMP280, DHT22, or DS18B20.
I hope you found this tutorial helpful. Please leave your queries and suggestions in the comments below.
Also read: Control relays using a web server on Raspberry Pi Pico W
Leave a Reply