In this tutorial, we will interface Raspberry Pi Pico with the DHT22 sensor module using MicroPython. We will first display the sensor values using serial communication on the shell of Thonny IDE. The code and the circuit diagram will be explained in detail. In the last part of the article, we shall see how we can easily display the values on an external display such as an OLED display.
Prerequisites
- A Raspberry Pi Pico running MicroPython.
- DHT22 sensor.
- Breadboard and connecting wires.
- USB cable(Micro-B).
- OLED display(Optional).
Your Raspberry Pi Pico needs to be preloaded with a MicroPython UF2 file to program it in MicroPython. You can read our getting started guide for Raspberry Pi Pico where we show all the steps required to start programming Raspberry Pi Pico & Pico W
If you are using macOS, follow our guide to program Raspberry Pi Pico on macOS using Thonny IDE.
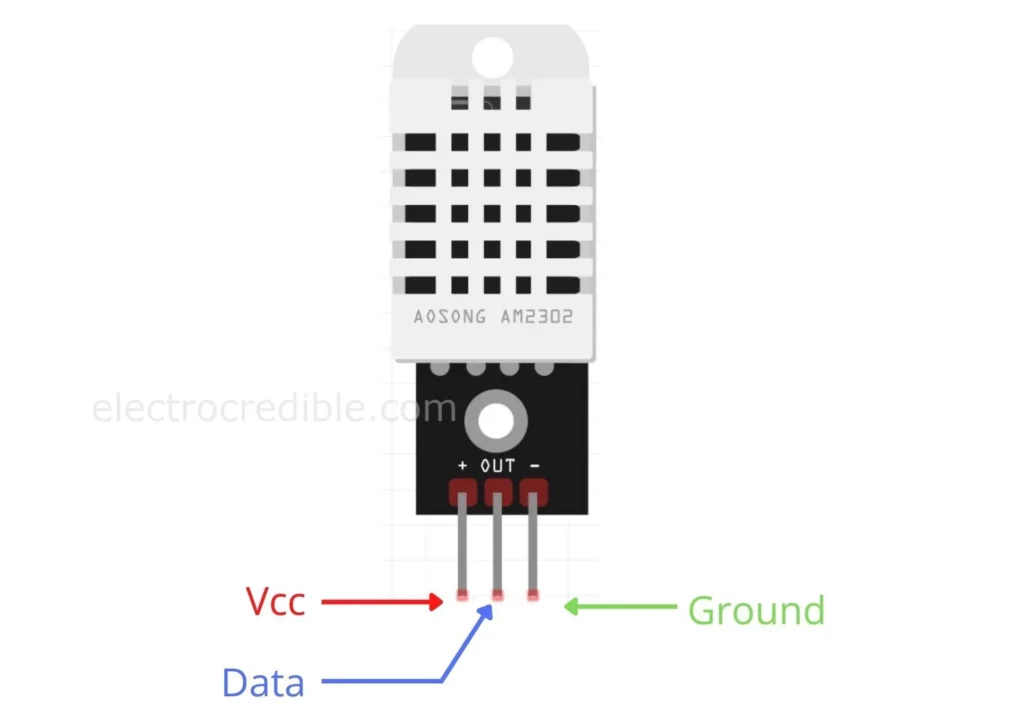
DHT22 Module Overview & Pinout
DHT22 is a popular module that consists of a temperature sensor and a humidity sensor. The temperature sensor is based on a thermistor while a capacitive humidity sensor gives the Relative Humidity(RH). Below is the pinout of a commonly found DHT22(AM2302) module.
Features Of DHT22:
| Operating Voltage | 3.3V-5.5V |
| Humidity Range | 0-100%(RH) |
| Humidity Accuracy | ±2% typical, ±5% maximum |
| Temperature Range | -40 to +80 degrees Celcius |
| Temperature Accuracy | ±0.5 degree Celcius |
There is an internal 8-bit processor inside DHT22 that gives us a serial bit-stream of data gathered from the sensors. So interfacing becomes easier with only 3 pins. Each data packet from the module consists of 40 bits of information. The first 16 bits contain data about humidity, the next 16 bits contain data about temperature, and the remaining 8 bits contain checksum data to minimize transmission errors.
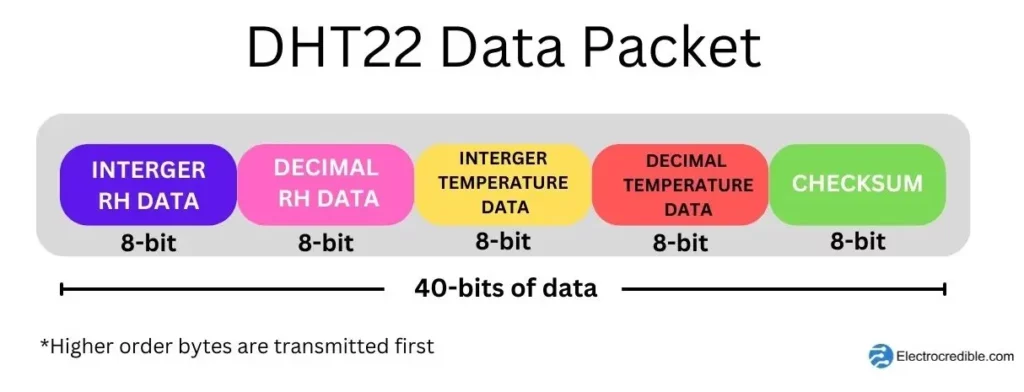
DHT22 takes 5ms for transmission of data using a single wire. The data is sent out with higher-order bytes first. So, the integer Relative Humidity data arrives first at a microcontroller communicating with DHT22. The sampling rate of the module is 0.5Hz i.e. it takes 2 seconds to sample the sensor data. To know more about the sensor, you can read the datasheet of DHT22.
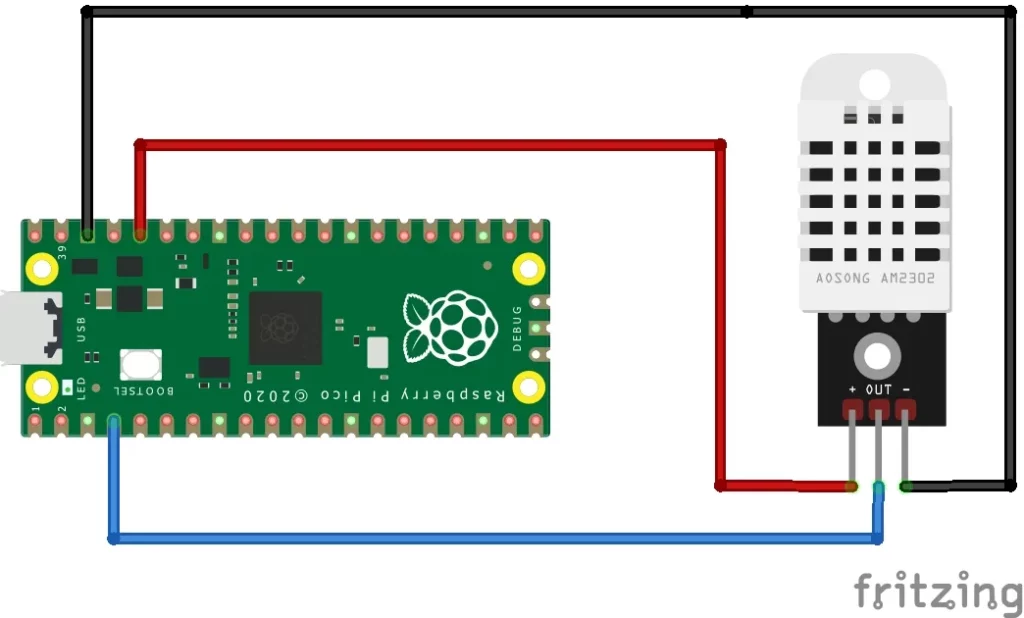
Schematic: Raspberry Pi Pico DHT22
In this project, we will use Pin 4(GP2) of Pico to get data from DHT22(AM2302). You can use any other pin you like with appropriate changes in the code. Connect your Pico to DHT22 as shown in the diagram below.
Raspberry Pi Pico RP2040 comes with 26 GPIO pins that can be easily interfaced. You can use any one of them according to your convenience. Here is the pin diagram of Raspberry Pi Pico for reference.


MicroPython Code To Read DHT22
The following steps are demonstrated using Thonny IDE but you can use any IDE of your choice.
- On Thonny IDE create a new project. Click File>New and paste the following MicroPython script into the main editor.
from machine import Pin
import time
import dht

dSensor = dht.DHT22(Pin(2))

def readDHT():
    try:
        dSensor.measure()
        temp = dSensor.temperature()
        temp_f = (temp * (9/5)) + 32.0
        hum = dSensor.humidity()
        print('Temperature= {} C, {} F'.format(temp, temp_f))
        print('Humidity= {} '.format(hum))
    except OSError as e:
        print('Failed to read data from DHT sensor')

while True:
    readDHT()
time.sleep(2)Code language: JavaScript (javascript)- Click the Run icon or press F5.

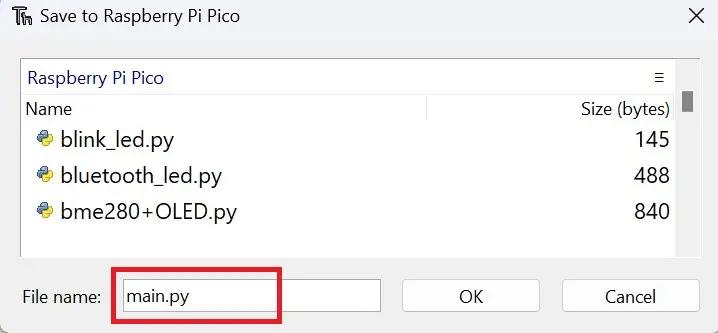
- Save into your Raspberry Pi Pico.

- Save the script as main.py or with any other name with a “.py” filename extension.
You should now see the temperature and humidity values as shown below. You can understand how the code works by reading the code comments.

DHT22 MicroPython Code Explained
We first import the Pin module to interface with the Pins of Pico, dht module that has the necessary functions to read the DHT22 sensor and the time module to introduce delays in our code.
from machine import Pin
from DHT22 import DHT22
import timeCode language: JavaScript (javascript)
We then create an instance called dSensor and specify GPIO2 as an input pin for the DHT22. You can use any other GPIO. (Read: Raspberry Pi Pico & Pico W Pinout Guide – All Pins Explained)
dSensor = dht.DHT22(Pin(2))Inside a function called readDHT(), we use try and except blocks. The code in the try block reads the data from DHT22 and prints the result. If any problem occurs while reading the sensor, the except block prints a message.
We need to call the measure() method for getting data from DHT22. Then we can use dSensor.temperature() to get temperature in Celcius and dSensor.humidity() to get humidity as a percent of relative humidity. The temperature is converted to Fahrenheit using the conversion formula of Celcius to Fahrenheit.
        dSensor.measure()
        temp = dSensor.temperature()
        temp_f = (temp * (9/5)) + 32.0
        hum = dSensor.humidity()
The values of temperature and humidity obtained are printed on the Thonny shell.
        print('Temperature= {} C, {} F'.format(temp, temp_f))
        print('Humidity= {} '.format(hum))Code language: PHP (php)
Inside a while loop, the readDHT() function is called indefinitely with an interval of 2 seconds between calls. DHT22 has a sampling rate of 0.5Hz i.e. we can read it once every two seconds to get reliable data.
while True:
    readDHT()
    time.sleep(2)Code language: PHP (php)
Display Temperature & Humidity On OLED Display
Let’s display the values we obtained from DHT22 on a 128×64 OLED display. Connect your Pico, DHT22, and OLED display as shown in the following diagram.
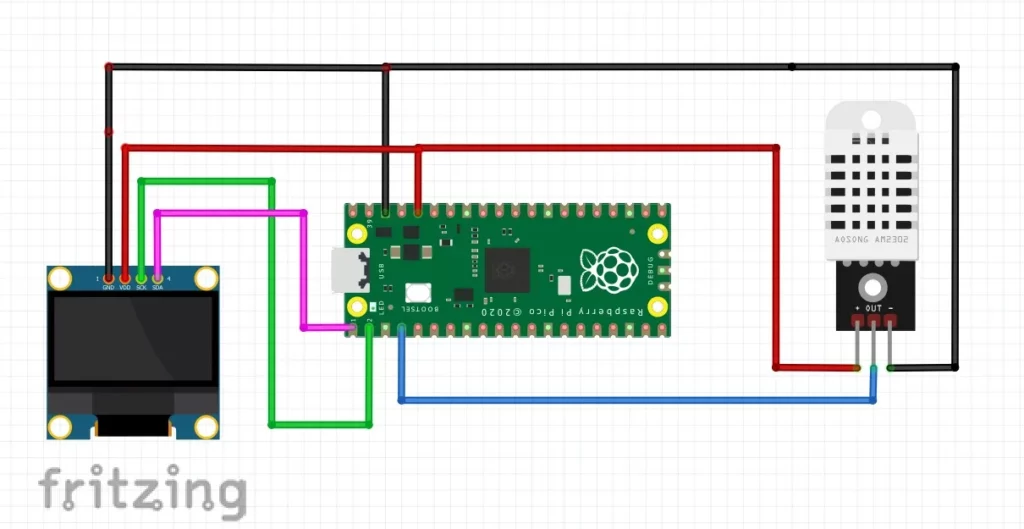
Inter-connection details:
| Raspberry Pi Pico Pin | Connected To |
| 1(GP0) | SDA pin of OLED display |
| 2(GP1) | SCL pin of OLED display |
| 4(GP2) | OUT pin of DHT22 |
| 36(3.3V) | Vdd pin of OLED and +ve pin of DHT22 |
| 38(GND) | GND pin of OLED and -ve pin of DHT22 |
Installation Of MicroPython OLED Library
- With your Pi Picoconnected via USB, open Thonny IDE. On the bottom right corner of your IDE, ensure that the interpreter is set to MicroPthon(Raspberry Pi Pico).
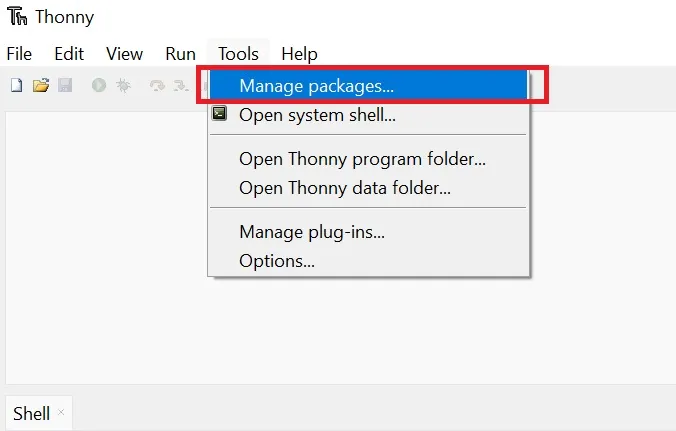
- On the top toolbar of Thonny, click on Tools>Manage Packages.
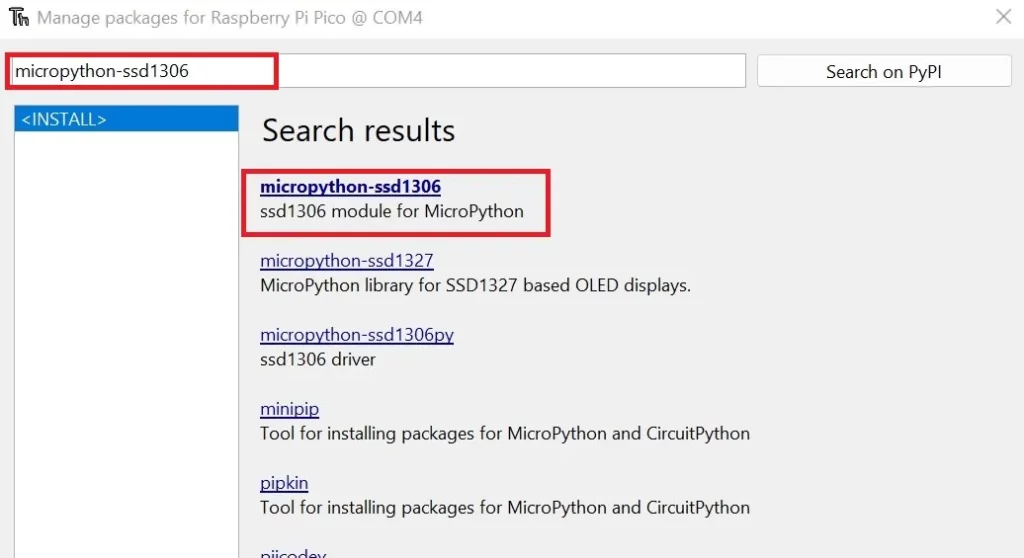
- Type “micropython-ssd1306” on the search bar and press Enter. Click on the library that you searched for.
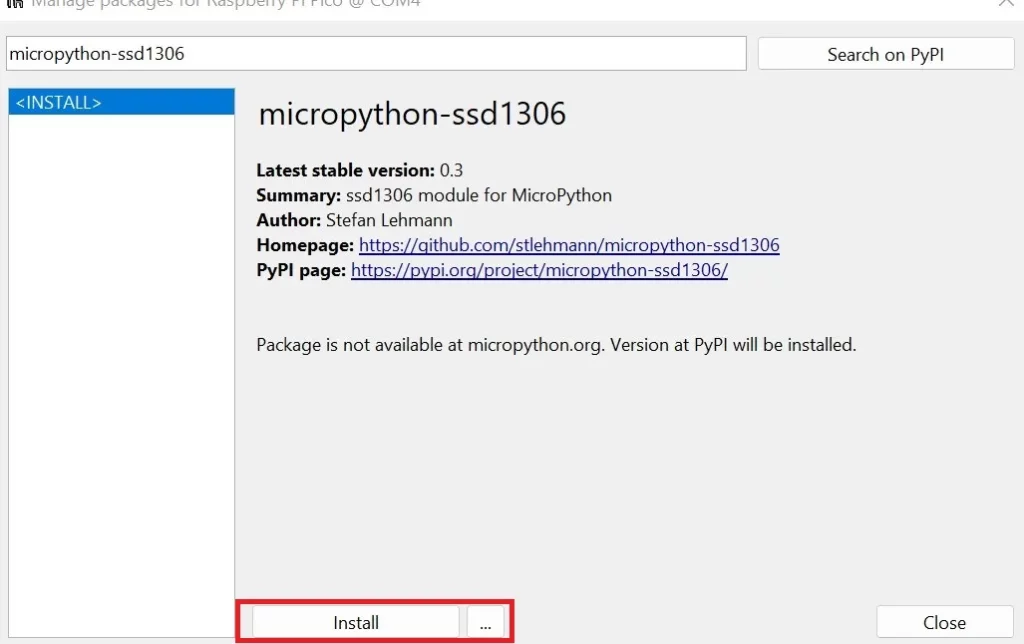
- The library is written by Stefan Lehmann. Click on Install. The library must be saved to your Pi Pico.
Script to Display Data
With the SSD1306 MicroPython library installed, paste the following script on Thonny IDE:
#Code and circuit tutorial on Electrocredible.com

from machine import Pin, I2C
from ssd1306 import SSD1306_I2C
import time
import dht

dSensor = dht.DHT22(Pin(2))

WIDTH =128
HEIGHT= 64
i2c=I2C(0,scl=Pin(1),sda=Pin(0),freq=200000)
oled = SSD1306_I2C(WIDTH,HEIGHT,i2c)

def readDHT():
    try:
        dSensor.measure()
        temp = dSensor.temperature()
        temp_f = (temp * (9/5)) + 32.0
        hum = dSensor.humidity()
        print('Temperature= {} C, {} F'.format(temp, temp_f))
        print('Humidity= {} '.format(hum))
        return temp, hum
    except OSError as e:
        print('Failed to read data from DHT sensor')

def printDhtData():
    oled.fill(0)
    temp, hum= readDHT()
    oled.text("Temp:", 0, 10)
    oled.text(str(int(temp)), 80, 10)
    oled.text("C", 96, 10)
    oled.text("Humidity:", 0, 30)
    oled.text(str(int(hum)), 80, 30)
    oled.text("%", 96, 30)
    oled.show()

while True:
    printDhtData()
    time.sleep(2)


Code language: Python (python)
Save the script on Raspberry Pi Pico, name the file with a “.py” filename extension, and run it. Save it as “main.py” if you want the script to run when Pico powers up.
The OLED display must show the values of temperature and humidity as shown in the image below.

Code explained
Let us discuss the changes in code for this part of the project.
We import the I2C class from the machine module and also import the necessary ssd1306 module for easily interfacing the OLED display.
from machine import Pin, I2C
from ssd1306 import SSD1306_I2CCode language: JavaScript (javascript)
We specify the width (128 pixels) and height (64 pixels) of the OLED display, designate the I2C pins for the display, set the I2C communication frequency as 200000 Hz, and initialize an oled object.
WIDTH =128
HEIGHT= 64
i2c=I2C(0,scl=Pin(1),sda=Pin(0),freq=200000)
oled = SSD1306_I2C(WIDTH,HEIGHT,i2c)
A method called printDhtData() is used to display data on the OLED display. Inside this method, we called oled.fill(0) to clear the display each time this function is called.
oled.fill(0)
Then, we store the temperature and humidity returned by the readDHT() method.
temp, hum= readDHT()The oled.text() function is used to allocate a string of text to be displayed at a particular position on the OLED display. Its parameters are the string to be displayed, the X-position pixel, and the Y-position pixel respectively. The following line of code displays the word “Temp” starting at X-pixel position 0 and Y-pixel position 10.
oled.text("Temp:", 0, 10)Code language: CSS (css)In the next line of code, (str(int(temp)) first converts the temperature value to an integer and then converts the integer value to a string. The value of temperature will be displayed at X-pixel position 80 and Y-pixel position 10.
oled.text(str(int(temp)), 80, 10)Code language: CSS (css)Similarly, the other parameters are displayed using the subsequent lines of code. Finally oled.show() displays the characters on the screen.
Final Thoughts On DHT22 Raspberry Pi Pico Interfacing
DHT11 is a cheaper alternative to DHT22, although its humidity measuring range is less, and is also less accurate. To interface the DHT11 sensor, read my article Raspberry Pi Pico DHT11 MicroPython – Easy Interfacing Guide. If you encounter any problems while following this tutorial, please leave your comments below.
BME280 and BMP280 are more accurate atmospheric sensors than DHT11, with a wider range of operating conditions. BMP280 can sense temperature and pressure, while BME280 can sense temperature, pressure, and humidity. You can read about these sensors in our articles:
Leave a Reply