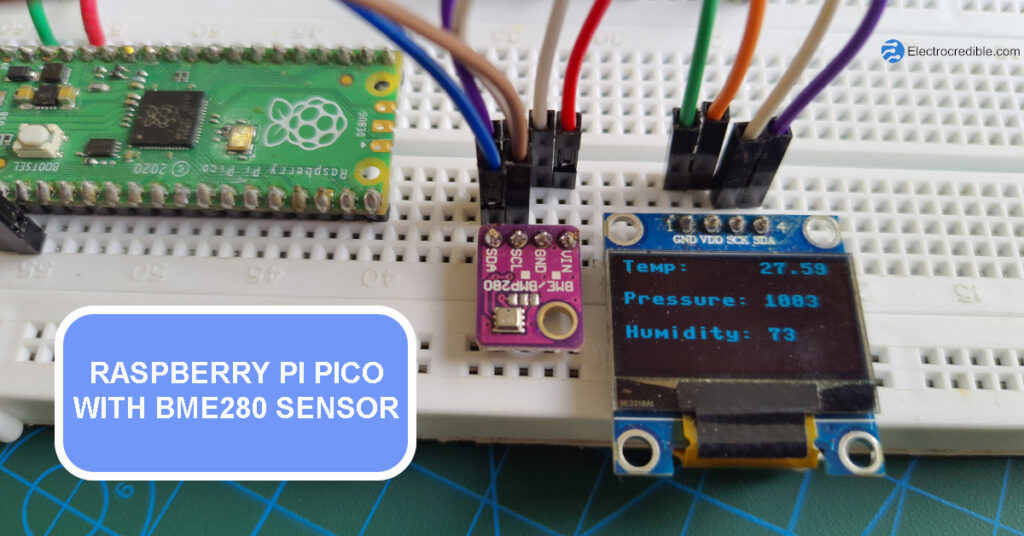
This tutorial will guide you to easily interface the BME280 environment sensor with Raspberry Pi Pico using MicroPython. We will communicate with BME280 using I2C communication and upload a simple script using the Thonny IDE. The connection diagram and code are explained thoroughly in this article. Towards the end, we also learn to interface an OLED display to view the data from BME280.
Components For BME280 Raspberry Pi Pico Interfacing
- A Raspberry Pi Pico running MicroPython.
- BME280 sensor module.
- A Breadboard.
- Connecting wires(jumper/DuPont wires).
- USB cable(Micro-B).
- OLED display(Optional).
Your Raspberry Pi Pico needs to be preloaded with a MicroPython UF2 file to program it in MicroPython. You can read our getting started guide for Raspberry Pi Pico where we show all the steps required to start programming Raspberry Pi Pico & Pico W.If you are using macOS, follow our guide to program Raspberry Pi Pico on macOS using Thonny IDE.
Overview Of The GY-BME280 Sensor Module
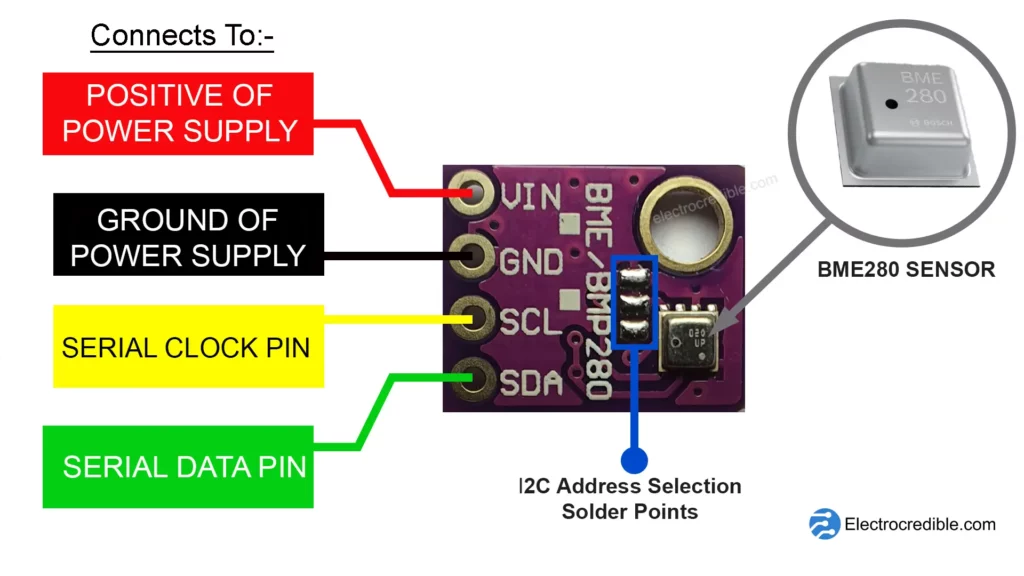
The Bosch BME280 is a three-in-one environmental sensor. It generates digital data containing information on humidity, pressure, and temperature. Its performance is comparable to the temperature and pressure sensor BMP280. The sensor can be used in a wide array of applications such as indoor climate control, indoor navigation, smart irrigation, elevator floor change detection, etc. The pinout and board description are shown in the images below.
BME280 Pinout Diagram
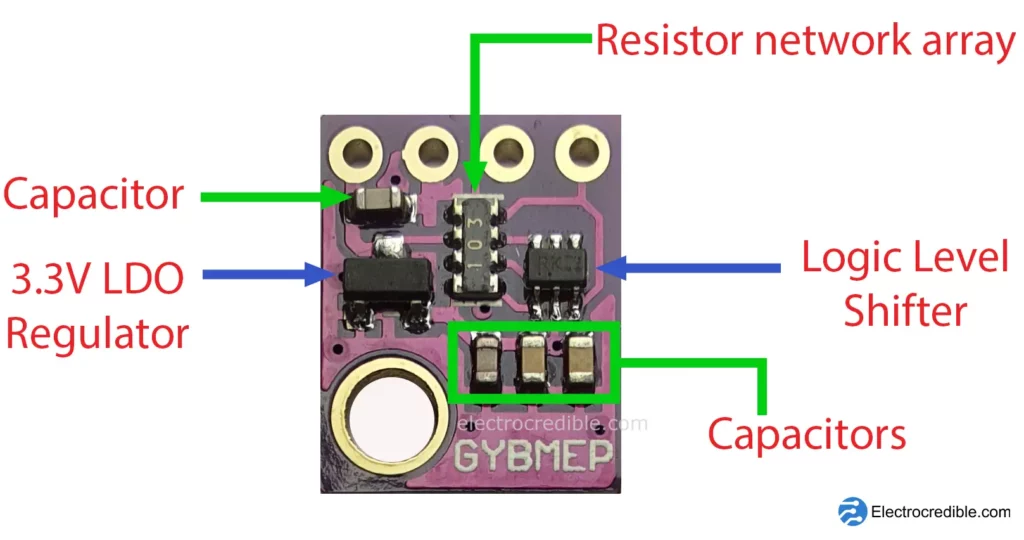
GY-BME280 Breakout Board Layout
BME280 Specifications
Here are some details about the temperature, humidity, and pressure sensor onboard the BME280 module.
| Humidity | Temperature | Pressure | |
| Accuracy | ±3% (at 25°C) | ±1.0 °C from 0 to 65 °C | ±1.0 hPa from 0 to 65 °C |
| Range | 0 to 100% | 0 to 65 °C | 300 to 1100 hPa |
| Resolution | 0.008 %RH | 0.01 °C | 0.18 Pa |
ⓘ If you need additional details, you can refer to our article BME280 Pinout, Specs & Applications, where you will also find the pinout and specifications of other similar BME280 modules. The article also talks about how to change the I2C address of BME280.
You can also access the datasheet of BME280 here.
Also read: BME280 Arduino Interfacing Guide
Steps To Read BME280 Using Raspberry Pi Pico
- Connect the BME280 to Pi Pico using wires and a breadboard.
- Upload the BME280 MicroPython library to Raspberry Pi Pico.
- Upload an example sketch to read the sensor values.
Each of these steps is explained in detail below.

How To Connect Raspberry Pi Pico With BME280
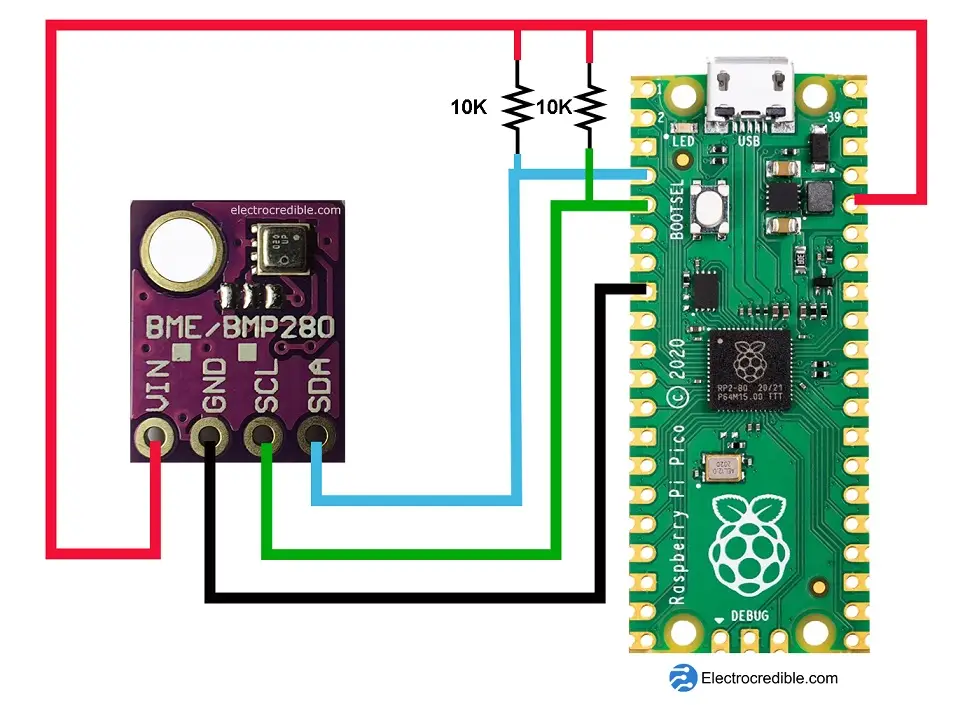
Connect Raspberry Pi Pico to BME280 as shown in the diagram above. You can omit the 10-kiloohm resistors. But I would recommend you use them as it improves I2C data transfer. Also, such resistors become mandatory when your communicating wires are long.
Connection Details:
| Raspberry Pi Pico Pin | BME280 Pin |
| Pin 4(GP2) | SDA |
| Pin 5(GP3) | SCL |
| Pin 36(3V3OUT) | VIN |
| Pin 8 | GND |
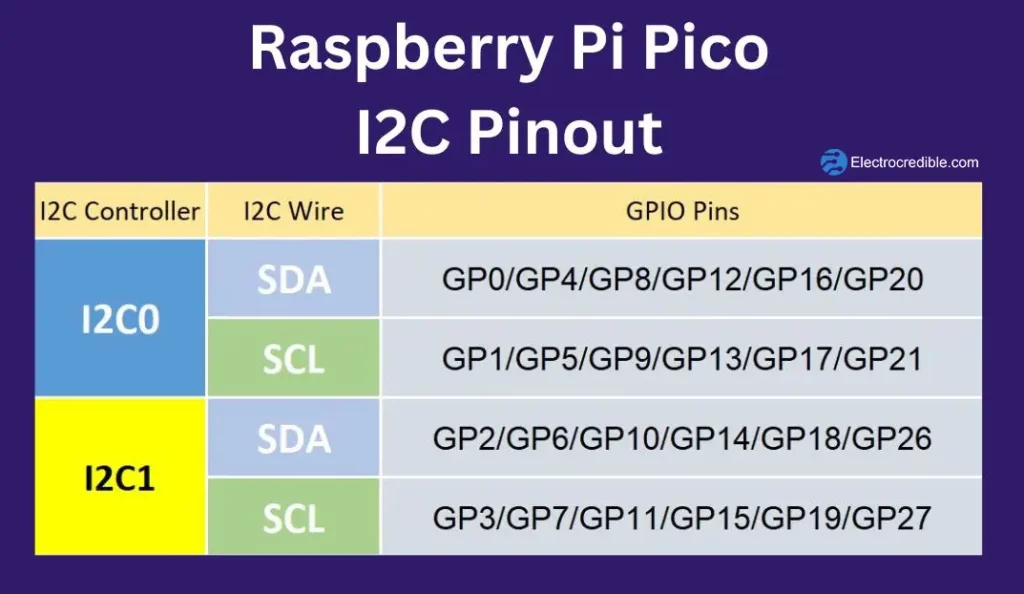
Note that you can use any of the Pico ground pins you like(Pins- 3/8/13/23/28/38). You can also use any pair of SCL and SDA pins. Below is the pin diagram of Raspberry Pi Pico for reference. You may need to change the i2c id in the code when using different pins.

To learn more about using I2C with Rpi Pico, you can refer to our article Raspberry Pi Pico I2C Communication Guide With Examples.
Installation Of BME280 MicroPython Library
- On Thonny IDE, click on Tools>Manage Packages.

- On the new window that pops up, search for “micropython bme280” and click on the search button. Then click on the micropython-bme280 option from the search results.

- Click on the Install button on the next window to download and install the library.

Close the window when installation is finished and return to Thonny IDE. The module can be accessed here on Github. Although the module was written for ESP8266, it is compatible with Raspberry Pi Pico.
You can also view the library by clicking on File>Open>Raspberry Pi Pico, and then navigating to the lib folder.
Alternative Way To Install BME280 Library
Alternatively, you can copy the code the following code and save it as a new script with the filename bme280.py into your Pi Pico.
# Authors: Paul Cunnane 2016, Peter Dahlebrg 2016
#
# This module borrows from the Adafruit BME280 Python library. Original
# Copyright notices are reproduced below.
#
# Those libraries were written for the Raspberry Pi. This modification is
# intended for the MicroPython and esp8266 boards.
#
# Copyright (c) 2014 Adafruit Industries
# Author: Tony DiCola
#
# Based on the BMP280 driver with BME280 changes provided by
# David J Taylor, Edinburgh (www.satsignal.eu)
#
# Based on Adafruit_I2C.py created by Kevin Townsend.
#
# Permission is hereby granted, free of charge, to any person obtaining a copy
# of this software and associated documentation files (the "Software"), to deal
# in the Software without restriction, including without limitation the rights
# to use, copy, modify, merge, publish, distribute, sublicense, and/or sell
# copies of the Software, and to permit persons to whom the Software is
# furnished to do so, subject to the following conditions:
#
# The above copyright notice and this permission notice shall be included in
# all copies or substantial portions of the Software.
#
# THE SOFTWARE IS PROVIDED "AS IS", WITHOUT WARRANTY OF ANY KIND, EXPRESS OR
# IMPLIED, INCLUDING BUT NOT LIMITED TO THE WARRANTIES OF MERCHANTABILITY,
# FITNESS FOR A PARTICULAR PURPOSE AND NONINFRINGEMENT. IN NO EVENT SHALL THE
# AUTHORS OR COPYRIGHT HOLDERS BE LIABLE FOR ANY CLAIM, DAMAGES OR OTHER
# LIABILITY, WHETHER IN AN ACTION OF CONTRACT, TORT OR OTHERWISE, ARISING FROM,
# OUT OF OR IN CONNECTION WITH THE SOFTWARE OR THE USE OR OTHER DEALINGS IN
# THE SOFTWARE.

import time
from ustruct import unpack, unpack_from
from array import array

# BME280 default address.
BME280_I2CADDR = 0x76

# Operating Modes
BME280_OSAMPLE_1 = 1
BME280_OSAMPLE_2 = 2
BME280_OSAMPLE_4 = 3
BME280_OSAMPLE_8 = 4
BME280_OSAMPLE_16 = 5

BME280_REGISTER_CONTROL_HUM = 0xF2
BME280_REGISTER_CONTROL = 0xF4


class BME280:

    def __init__(self,
                 mode=BME280_OSAMPLE_1,
                 address=BME280_I2CADDR,
                 i2c=None,
                 **kwargs):
        # Check that mode is valid.
        if mode not in [BME280_OSAMPLE_1, BME280_OSAMPLE_2, BME280_OSAMPLE_4,
                        BME280_OSAMPLE_8, BME280_OSAMPLE_16]:
            raise ValueError(
                'Unexpected mode value {0}. Set mode to one of '
                'BME280_ULTRALOWPOWER, BME280_STANDARD, BME280_HIGHRES, or '
                'BME280_ULTRAHIGHRES'.format(mode))
        self._mode = mode
        self.address = address
        if i2c is None:
            raise ValueError('An I2C object is required.')
        self.i2c = i2c

        # load calibration data
        dig_88_a1 = self.i2c.readfrom_mem(self.address, 0x88, 26)
        dig_e1_e7 = self.i2c.readfrom_mem(self.address, 0xE1, 7)
        self.dig_T1, self.dig_T2, self.dig_T3, self.dig_P1, \
            self.dig_P2, self.dig_P3, self.dig_P4, self.dig_P5, \
            self.dig_P6, self.dig_P7, self.dig_P8, self.dig_P9, \
            _, self.dig_H1 = unpack("<HhhHhhhhhhhhBB", dig_88_a1)

        self.dig_H2, self.dig_H3 = unpack("<hB", dig_e1_e7)
        e4_sign = unpack_from("<b", dig_e1_e7, 3)[0]
        self.dig_H4 = (e4_sign << 4) | (dig_e1_e7[4] & 0xF)

        e6_sign = unpack_from("<b", dig_e1_e7, 5)[0]
        self.dig_H5 = (e6_sign << 4) | (dig_e1_e7[4] >> 4)

        self.dig_H6 = unpack_from("<b", dig_e1_e7, 6)[0]

        self.i2c.writeto_mem(self.address, BME280_REGISTER_CONTROL,
                             bytearray([0x3F]))
        self.t_fine = 0

        # temporary data holders which stay allocated
        self._l1_barray = bytearray(1)
        self._l8_barray = bytearray(8)
        self._l3_resultarray = array("i", [0, 0, 0])

    def read_raw_data(self, result):
        """ Reads the raw (uncompensated) data from the sensor.

            Args:
                result: array of length 3 or alike where the result will be
                stored, in temperature, pressure, humidity order
            Returns:
                None
        """

        self._l1_barray[0] = self._mode
        self.i2c.writeto_mem(self.address, BME280_REGISTER_CONTROL_HUM,
                             self._l1_barray)
        self._l1_barray[0] = self._mode << 5 | self._mode << 2 | 1
        self.i2c.writeto_mem(self.address, BME280_REGISTER_CONTROL,
                             self._l1_barray)

        sleep_time = 1250 + 2300 * (1 << self._mode)
        sleep_time = sleep_time + 2300 * (1 << self._mode) + 575
        sleep_time = sleep_time + 2300 * (1 << self._mode) + 575
        time.sleep_us(sleep_time)  # Wait the required time

        # burst readout from 0xF7 to 0xFE, recommended by datasheet
        self.i2c.readfrom_mem_into(self.address, 0xF7, self._l8_barray)
        readout = self._l8_barray
        # pressure(0xF7): ((msb << 16) | (lsb << 8) | xlsb) >> 4
        raw_press = ((readout[0] << 16) | (readout[1] << 8) | readout[2]) >> 4
        # temperature(0xFA): ((msb << 16) | (lsb << 8) | xlsb) >> 4
        raw_temp = ((readout[3] << 16) | (readout[4] << 8) | readout[5]) >> 4
        # humidity(0xFD): (msb << 8) | lsb
        raw_hum = (readout[6] << 8) | readout[7]

        result[0] = raw_temp
        result[1] = raw_press
        result[2] = raw_hum

    def read_compensated_data(self, result=None):
        """ Reads the data from the sensor and returns the compensated data.

            Args:
                result: array of length 3 or alike where the result will be
                stored, in temperature, pressure, humidity order. You may use
                this to read out the sensor without allocating heap memory

            Returns:
                array with temperature, pressure, humidity. Will be the one from
                the result parameter if not None
        """
        self.read_raw_data(self._l3_resultarray)
        raw_temp, raw_press, raw_hum = self._l3_resultarray
        # temperature
        var1 = ((raw_temp >> 3) - (self.dig_T1 << 1)) * (self.dig_T2 >> 11)
        var2 = (((((raw_temp >> 4) - self.dig_T1) *
                  ((raw_temp >> 4) - self.dig_T1)) >> 12) * self.dig_T3) >> 14
        self.t_fine = var1 + var2
        temp = (self.t_fine * 5 + 128) >> 8

        # pressure
        var1 = self.t_fine - 128000
        var2 = var1 * var1 * self.dig_P6
        var2 = var2 + ((var1 * self.dig_P5) << 17)
        var2 = var2 + (self.dig_P4 << 35)
        var1 = (((var1 * var1 * self.dig_P3) >> 8) +
                ((var1 * self.dig_P2) << 12))
        var1 = (((1 << 47) + var1) * self.dig_P1) >> 33
        if var1 == 0:
            pressure = 0
        else:
            p = 1048576 - raw_press
            p = (((p << 31) - var2) * 3125) // var1
            var1 = (self.dig_P9 * (p >> 13) * (p >> 13)) >> 25
            var2 = (self.dig_P8 * p) >> 19
            pressure = ((p + var1 + var2) >> 8) + (self.dig_P7 << 4)

        # humidity
        h = self.t_fine - 76800
        h = (((((raw_hum << 14) - (self.dig_H4 << 20) -
                (self.dig_H5 * h)) + 16384)
              >> 15) * (((((((h * self.dig_H6) >> 10) *
                            (((h * self.dig_H3) >> 11) + 32768)) >> 10) +
                          2097152) * self.dig_H2 + 8192) >> 14))
        h = h - (((((h >> 15) * (h >> 15)) >> 7) * self.dig_H1) >> 4)
        h = 0 if h < 0 else h
        h = 419430400 if h > 419430400 else h
        humidity = h >> 12

        if result:
            result[0] = temp
            result[1] = pressure
            result[2] = humidity
            return result

        return array("i", (temp, pressure, humidity))

    @property
    def values(self):
        """ human readable values """

        t, p, h = self.read_compensated_data()

        p = p // 256
        pi = p // 100
        pd = p - pi * 100

        hi = h // 1024
        hd = h * 100 // 1024 - hi * 100
        return ("{}C".format(t / 100), "{}.{:02d}hPa".format(pi, pd),
                "{}.{:02d}%".format(hi, hd))Code language: Python (python)
View the raw code here.
Raspberry Pi Pico BME280 MicroPython Example Code
If the BME280 library was uploaded successfully, we can now write and upload a MicroPython script to read BME280 sensor values using the I2C communication protocol.
# Source: Electrocredible.com, Language: MicroPython
import machine
import time
import bme280
sdaPIN=machine.Pin(2)
sclPIN=machine.Pin(3)
i2c=machine.I2C(1,sda=sdaPIN, scl=sclPIN, freq=400000)
bme = bme280.BME280(i2c=i2c)
while True:
time.sleep(1)
t, p, h = bme.read_compensated_data()
temperature=t/100
p = p // 256
pressure = p // 100
hi = h // 1024
hd = h * 100 // 1024 - hi * 100
print ("{}C".format(temperature), "{}hPa".format(pressure),
"{}.{:02d}%".format(hi, hd))
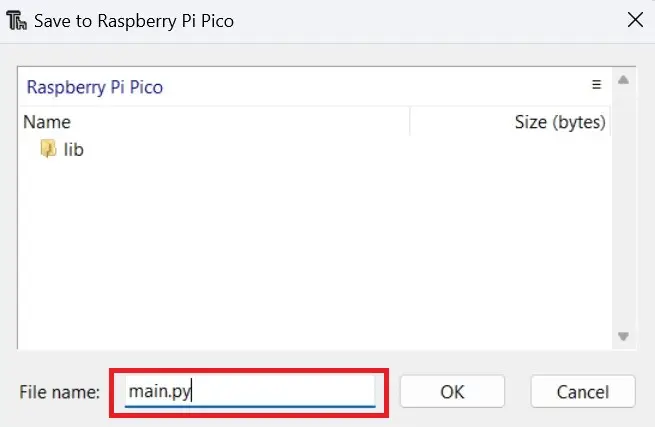
Code language: Python (python)Save the code by pressing the F5 or the Run icon. On the pop-up that appears select ‘Raspberry Pi Pico’ so that the code is saved into the RP2040 microcontroller in your Pi Pico.

Set the filename as main.py.
When you run the code, the shell window must display the output from BME280 as shown in the image below.

MicroPython BME280 Example Code Explained
We first import the necessary modules. The machine module helps us to send commands to the pins, the time module is used to set delays in code execution, and the bme280 module contains all the functions to interact with the sensor.
import machine
import time
import bme280Code language: JavaScript (javascript)
Then we specify the pins and parameters used for I2c communication. In this example, we use GP2 and GP3 as SDA and SCL respectively. An i2c object is created of the machine.I2c class with id as 1, SDA & SCL pins 2 & 3, and frequency as 400kHz.
sdaPIN=machine.Pin(2)
sclPIN=machine.Pin(3)
i2c=machine.I2C(1,sda=sdaPIN, scl=sclPIN, freq=400000)Code language: Python (python)
An object called bme is created of the BME280 class with the i2c parameters we defined.
bme = bme280.BME280(i2c=i2c)Code language: Python (python)We first introduce a delay of 1 second using the time.sleep() function. This is done to ensure a time gap between subsequent readings. Then we initialize three parameters t,p, and h which fetch the raw data of temperature, pressure, and humidity using the read_compensated_data() function.
time.sleep(1)
t, p, h = bme.read_compensated_data()Code language: Python (python)
Some calculations are performed on the raw sensor data to convert it to easily readable decimal numbers. Finally, we print the values to view them on a Serial Monitor.
 p = p // 256
 pressure = p // 100
 hi = h // 1024
 hd = h * 100 // 1024 - hi * 100
 print ("{}C".format(temperature), "{}hPa".format(pressure),
            "{}.{:02d}%".format(hi, hd))Code language: Python (python)
BME280 Data On OLED Display Using MicroPython
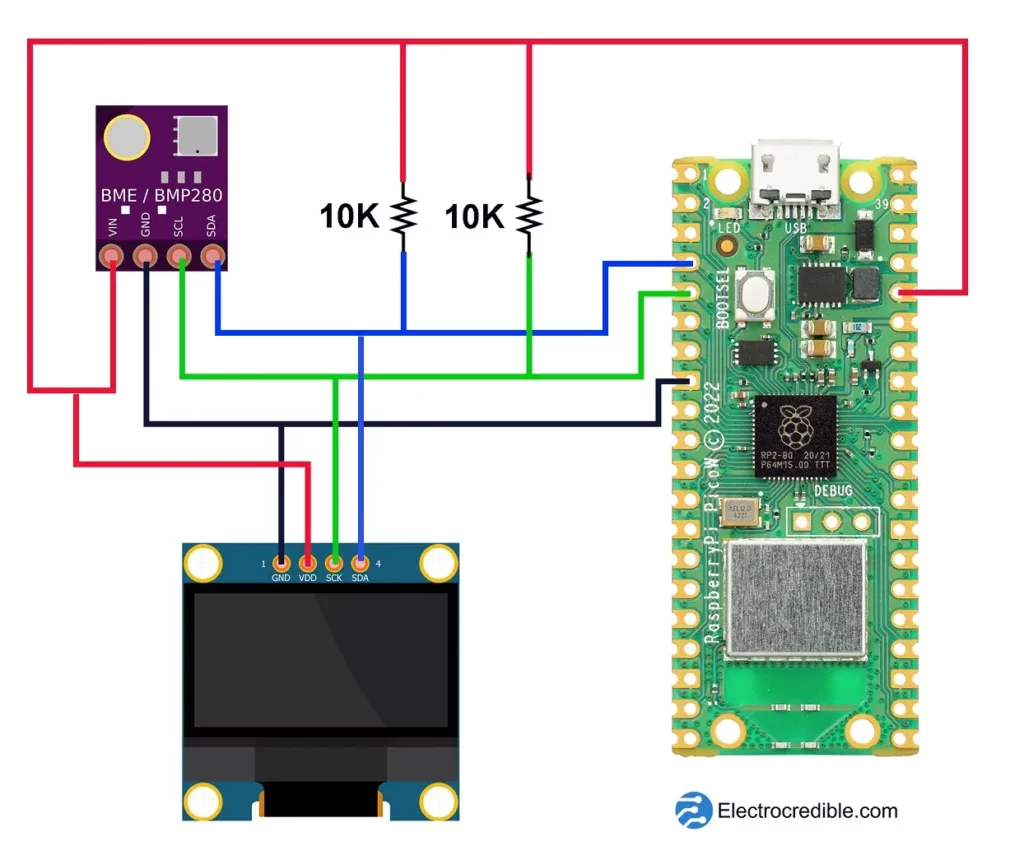
If you are making a weather station, you need a display to view the live data. Let us see how we can connect and view our sensor data on an OLED display. The OLED display used in this project has dimensions of 128×64 pixels, and it communicates via I2C. We can use the same I2C pins that we used for the BME280 or use other pins. Here, I decided to use to same pins.
Connect your Raspberry Pi Pico, BME280, and OLED display as shown in the diagram below.
Now upload the following MicroPython code to your Pico using Thonny IDE.
from machine import Pin, I2C
from ssd1306 import SSD1306_I2C
import time
import bme280
sdaPIN=Pin(2)
sclPIN=Pin(3)
i2c=machine.I2C(1,sda=sdaPIN, scl=sclPIN, freq=400000)
bme = bme280.BME280(i2c=i2c)
WIDTH =128
HEIGHT= 64
oled = SSD1306_I2C(WIDTH,HEIGHT,i2c)
while True:
    t, p, h = bme.read_compensated_data()
    temperature=t/100
    p = p // 256
    pressure = p // 100
    hi = h // 1024
    hd = h * 100 // 1024 - hi * 100
    print ("{}C".format(temperature), "{}hPa".format(pressure),
            "{}.{:02d}%".format(hi, hd))
    oled.text("Temp:", 0, 0)
    oled.text(str(temperature), 80, 0)
    oled.text("Pressure:", 0, 20)
    oled.text(str(pressure), 80, 20)
    oled.text("Humidity:", 0, 40)
    oled.text(str(hi), 80, 40)
    oled.show()
    time.sleep(1)
    oled.fill(0)
Code language: Python (python)
GitHub link for the code.
Save the script as bme280project.py or any other filename with a “.py” filename extension. If you want the script to run on startup, name it as “main.py”.
You can read our article on interfacing OLED displays with Raspberry Pi Pico to learn more on this topic.
Code Explanation:
We set the width and height of the OLED display and also created an oled object with I2C parameters.
WIDTH =128
HEIGHT= 64
i2c=I2C(0,scl=Pin(1),sda=Pin(0),freq=200000)
oled = SSD1306_I2C(WIDTH,HEIGHT,i2c)Code language: Python (python)
The oled.text() function takes 3 parameters: string, x-position & y-position. We print the temperature, pressure, and humidity on different lines using this function. The str(temperature) function converts the temperature value to a string.
oled.text("Temp:", 0, 0)
oled.text(str(temperature), 80, 0)Code language: Python (python)
The function oled.show() prints the contents on the display. After an interval of 1 second, oled.fill(0) function clears the display so that the next reading can be shown.
oled.show()
time.sleep(1)
oled.fill(0)Code language: Python (python)
Wrapping Up BME280 Raspberry Pi Pico Guide
If you would like to use BME280 to make a portable weather station, read our guide on powering Raspberry Pi Pico with batteries.
We hope you found this guide on Raspberry Pi Pico BME280 interfacing helpful. Similar to BME280, there are other sensors that can give us the temperature, pressure, and humidity data. BMP280 is one such sensor that can read temperature and pressure which is discussed in our article about interfacing Raspberry Pi Pico with BMP280. Unlike BME280, BMP280 does not have humidity sensing capability, but other features are more or less the same.
DHT22 is a popular temperature and humidity sensor explained in our article Raspberry Pi Pico DHT22(AM2302) Interfacing Tutorial.
Please leave your feedback or queries in the comments below. Thank you for reading.
Leave a Reply