The GY-BME280 is a 3-in-one environmental sensor by Bosch Sensortech. It outputs digital data containing information about temperature, pressure, and humidity. It is performance compatible with the BMP280 sensor which can sense temperature & atmospheric pressure. The sensor comes in a breakout board for easy interfacing on a breadboard.
BME280 Pinout & Module Details
The GY-BME280 module comes with 4 pins for connection. Their details are shown in the image below.
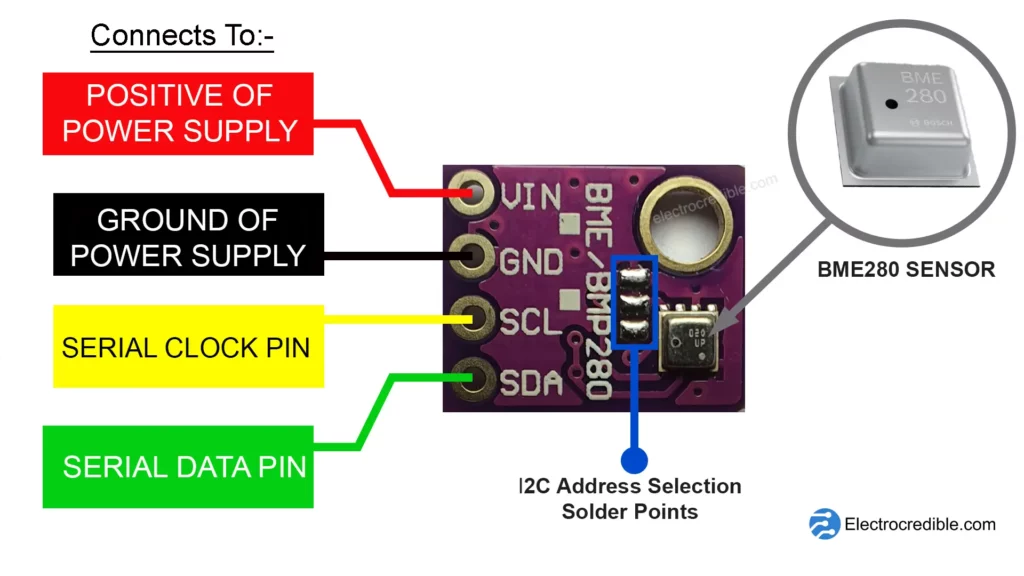
On one side of the module, we find 3 pads for soldering. These can be used for changing the I2C address, which will be discussed shortly in this article. The BME280 sensor is also located on this side of the module, inside which the actual sensing elements are located.
Pinout Details:
| Pin | Details |
| VIN | Connect to a 3.3V to 5V Power supply positive. |
| GND | Connects to Ground of Power supply. |
| SCL | Serial Clock Pin for I2C communication. |
| SDA | Serial Data Pin for I2C communication. |
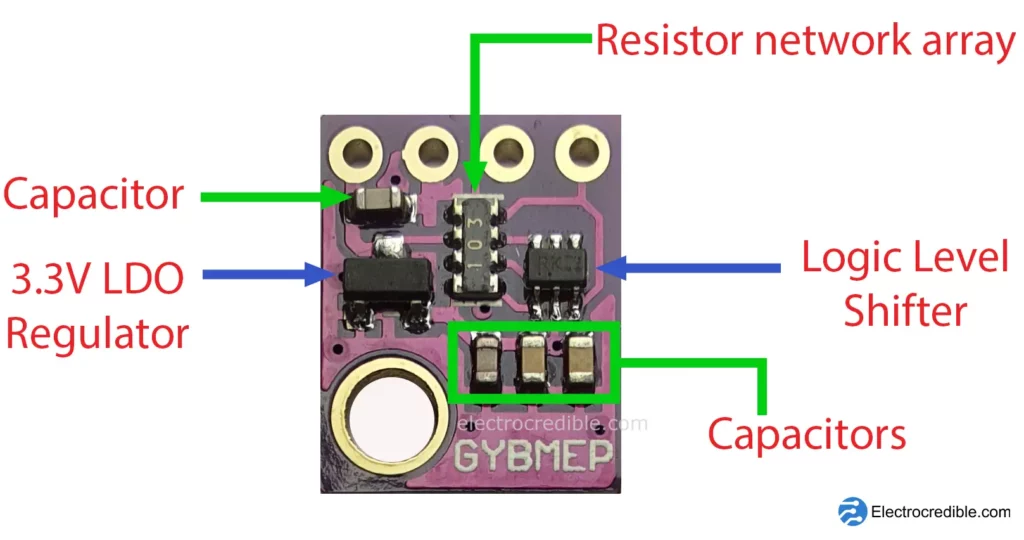
On the other side of the module, we find a 3.3V LDO regulator, a bunch of DC smoothing capacitors, a 10K resistor network array, and a logic level shifter. These components work together to provide stable voltage to the BME280 sensor chip and help in communication with other devices.
There are also alternatives to the BME280 module shown above. The image below shows a BME280 module that is meant for interfacing with microcontrollers that run on 3.3V such as the Raspberry Pi Pico or ESP32.
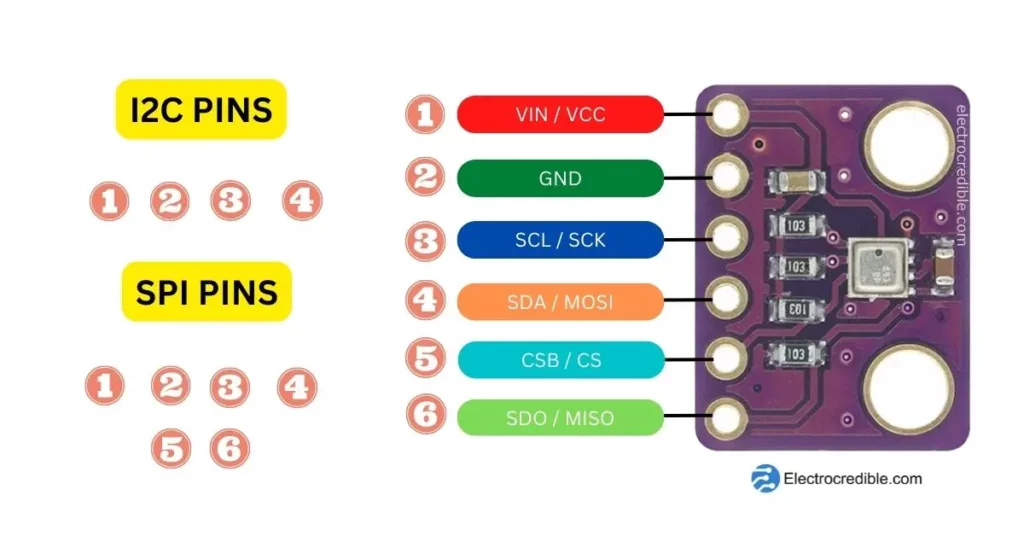
Unlike the previous module, this sensor module has 6 pins for interfacing. One side of the module has four 1-kiloohm resistors, two capacitors, and the BME280 chip, while the other side does not have any components. Only 4 pins are used for I2C communication and 6 pins will be required for SPI communication. One disadvantage of this module is the absence of an LDO regulator as we saw in the previous module. So interfacing this module with a 5V development board like Arduino UNO will require an additional logic level shifter circuit.
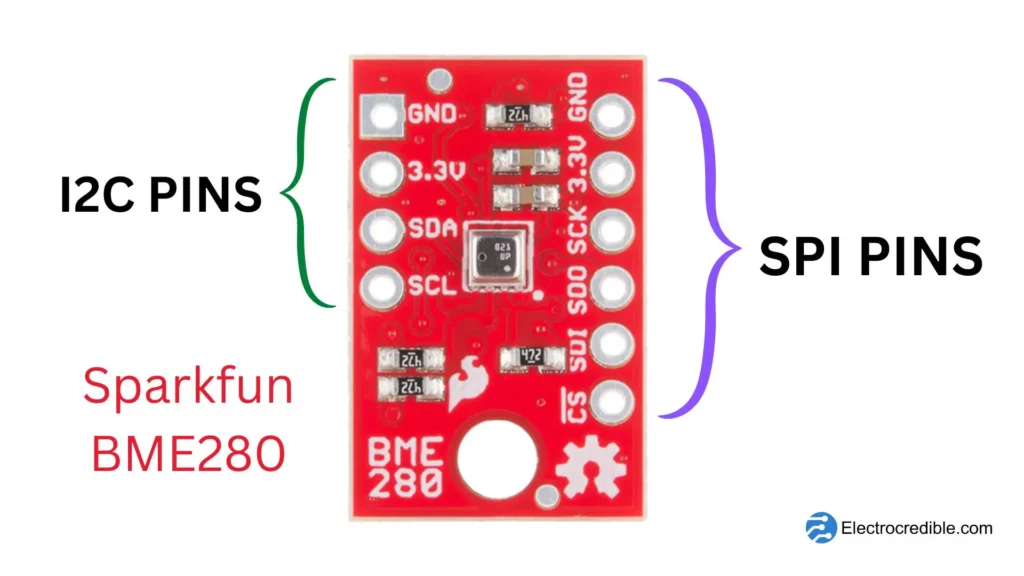
SparkFun Electronics produces a BME280 breakout board with 10 pins. 6 pins are dedicated for only SPI communication and 4 pins are provided for I2C communication. Below is the pinout of the Sparkfun BME280 sensor.
BME280 Specifications
Let us go into detail about the temperature, humidity, and pressure sensor onboard the BME280 module.
Humidity Sensor Specifications
The humidity sensor inside BME280 is a Relative Humidity (%RH) sensor that is fast and accurate. Here are its specs:
- Response time: 1sec (at 25°C).
- Accuracy: ±3% (at 25°C).
- Operating temperature range: -40 °C to 85 °C but with a limited measuring range in the extremes. Can detect 0 to 100% Relative Humidity when operating from 0 °C to 60 °C.
- Maximum current consumption by the sensor: 2.8 µA.
- Resolution= 0.008 %RH
Temperature Sensor Specifications
- Accurate measuring range: 0 to 65 °C.
- Current consumption: 1 µA.
- Accuracy: ±1.0 °C from 0 to 65 °C.
- Resolution: 0.01 °C.
Pressure Sensor Specifications
- Operating range for accurate measurements: 0 to 65 °C.
- Operating pressure range: 300 to 1100 hPa.
- Maximum current consumption by the sensor: 4.2 µA.
- Highest Resolution: 0.18 Pa.
ⓘ Accuracy denotes the closeness of a measured value to the true or actual value. Resolution is the smallest change in measurement that can be measured by a sensor.
Power Supply Details
As the BME280 module comes with a 3.3 V LDO voltage regulator, it can be powered with either 3.3 V or 5 V. This makes it easier to interface with commercially available development boards such as Arduino or Raspberry Pi Pico.
The module is claimed to consume a maximum sleep current of only 0.3 µA. The startup time of the sensor is only 2millisecond.
How To Use BME280?
BME280 can be easily interfaced with any microcontroller that supports I2C or SPI communication interface. It requires 4 wires for interfacing- 2 wires for powering up the sensor, and 2 wires for I2C communication. Multiple sensors can be wired up using the same data lines. In such a case, the BME280 sensors must be set up with different I2C addresses.

Change I2C Address in BME280
BME280 can be easily interfaced with any microcontroller using I2C. The advantage of using I2C is that we can connect many sensors to the same bus. The module has the option to change the I2C address so that two BME280 sensors can be connected to the same bus.
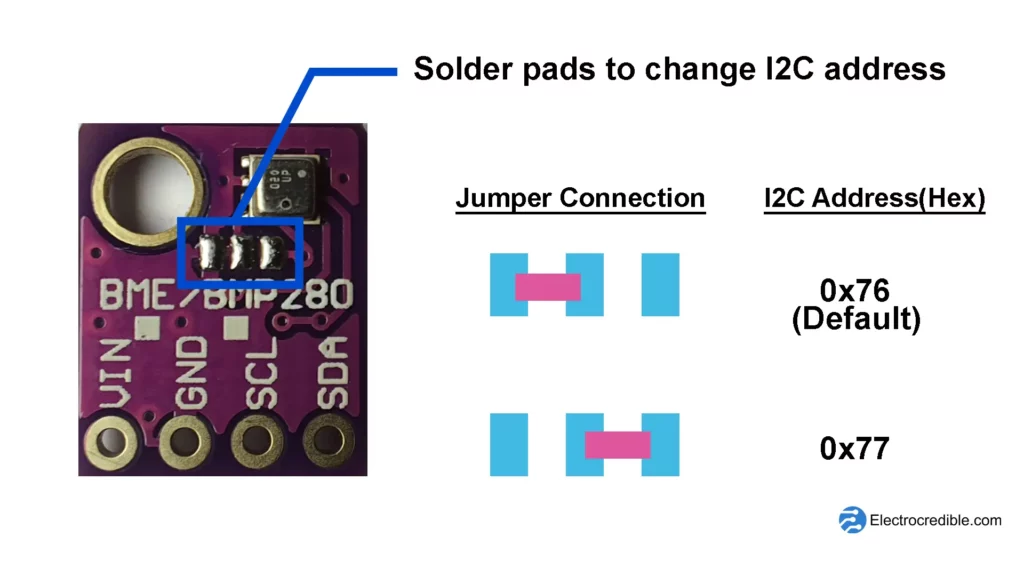
There is a PCB trace connection between the two left jumper pads by default. The default address for the module is 0x76 in hexadecimal or 1110110 in binary. To change the I2C address of BME280, remove the PCB trace connecting the pads on the left and make a new connection between the two pads on the right using solder. The new address will then be 0x77 in hexadecimal or 1110111 in binary.
BME280 With Arduino
The connection diagram below shows how BME280 can be connected with Arduino UNO.
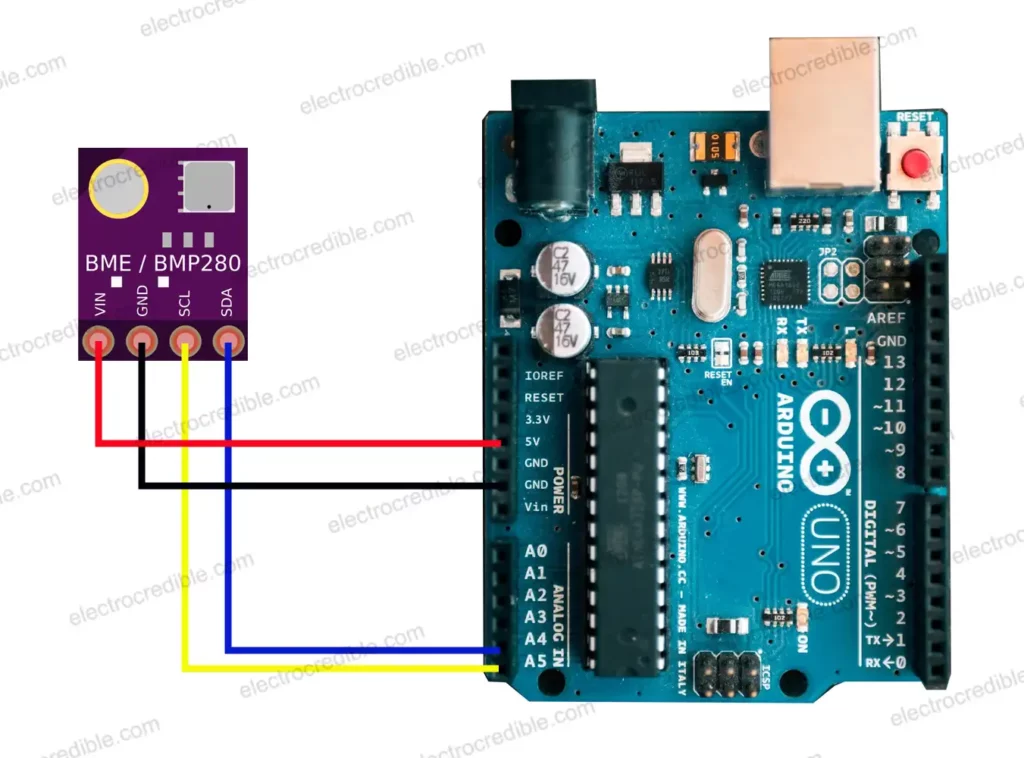
To interface the sensor with Arduino, we can use the Adafruit BME280 library and the following Arduino code.
#include <Wire.h>
#include <SPI.h>
#include <Adafruit_Sensor.h>
#include <Adafruit_BME280.h>

#define SEALEVELPRESSURE_HPA (1013.25)

Adafruit_BME280 bme;
unsigned long delayTime;

void setup() {
    Serial.begin(9600);
    while(!Serial);
    Serial.println(F("BME280 test"));
    unsigned status;
    status = bme.begin(0x76);

    if (!status) {
        Serial.println("Could not find a valid BME280 sensor, check wiring, address, sensor ID!");
        Serial.print("SensorID was: 0x"); Serial.println(bme.sensorID(),16);
        Serial.print("        ID of 0xFF probably means a bad address, a BMP 180 or BMP 085\n");
        Serial.print("   ID of 0x56-0x58 represents a BMP 280,\n");
        Serial.print("        ID of 0x60 represents a BME 280.\n");
        Serial.print("        ID of 0x61 represents a BME 680.\n");
        while (1) delay(10);
    }

    Serial.println("-- Default Test --");
    delayTime = 1000;

    Serial.println();
}

void loop() {
    printValues();
    delay(delayTime);
}

void printValues() {
    Serial.print("Temperature = ");
    Serial.print(bme.readTemperature());
    Serial.println(" °C");

    Serial.print("Pressure = ");

    Serial.print(bme.readPressure() / 100.0F);
    Serial.println(" hPa");

    Serial.print("Approx. Altitude = ");
    Serial.print(bme.readAltitude(SEALEVELPRESSURE_HPA));
    Serial.println(" m");

    Serial.print("Humidity = ");
    Serial.print(bme.readHumidity());
    Serial.println(" %");

    Serial.println();
}Code language: PHP (php)
Read the complete guide to interface BME280 with Arduino to know more on this topic.
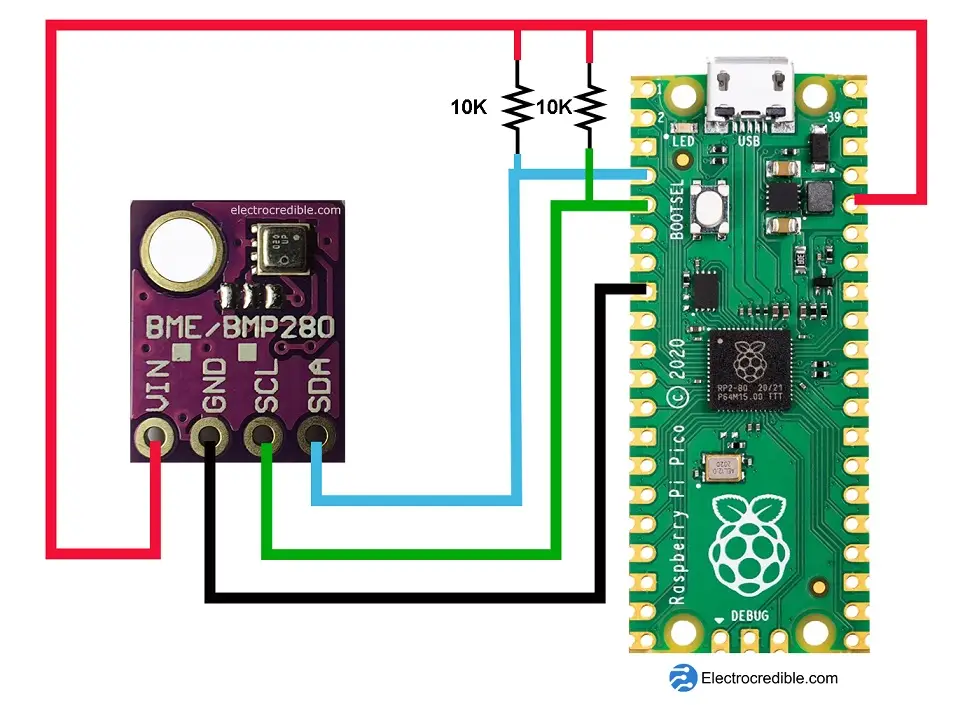
Read BME280 Using MicroPython
We can also use MicroPython code to easily read temperature, pressure, and humidity. The schematic below shows how we can connect BME280 with Raspberry Pi Pico.
Here is the MicroPython script to read BME280 after installing a library for the BME280.
import machine
import time
import bme280
sdaPIN=machine.Pin(2)
sclPIN=machine.Pin(3)
i2c=machine.I2C(1,sda=sdaPIN, scl=sclPIN, freq=400000)
bme = bme280.BME280(i2c=i2c)
while True:
    time.sleep(1)
    t, p, h = bme.read_compensated_data()
    temperature=t/100
    p = p // 256
    pressure = p // 100
    hi = h // 1024
    hd = h * 100 // 1024 - hi * 100
    print ("{}C".format(temperature), "{}hPa".format(pressure),
            "{}.{:02d}%".format(hi, hd))Code language: JavaScript (javascript)
You can read our article Raspberry Pi Pico BME280 Interfacing Guide to see the complete tutorial.
Applications Of BME280
Here are some of the ways BME280 can be used:
- Home automation systems can use BME280 as an environment sensor.
- Mini weather station can be designed using BME280.
- Greenhouse monitoring system can use the temperature and humidity data from BME280.
- Floor change (e.g in an elevator) can be detected using BME280.
BME280 Alternatives
- BMP280-Barometric pressure & temperature sensor.
- BM180- Barometric pressure & temperature sensor.
BME280 Datasheet
If you need additional information, you can access the BME280 datasheet by Bosch Sensortech.
Leave a Reply