This tutorial explains how to create an asynchronous web server with Raspberry Pi Pico W and MicroPython code. An asynchronous web server can serve multiple client requests concurrently without blocking, and the microcontroller can also perform other tasks while waiting for client requests.
MicroPython examples are discussed here to control GPIOs via a web page and to display data from sensors on the web page.

This guide only works for the Raspberry Pi Pico W variant and will not work on the older variant i.e. Raspberry Pi Pico. If you are looking to create a synchronous web server, read our article – MicroPython Synchronous Web Server Guide.
Overview of a Web Server
In the context of embedded systems and IoT, a web server is a specialized software application running on a microcontroller or microprocessor that enables the device to respond to HTTP (Hypertext Transfer Protocol) requests. HTTP is a protocol used for transmitting data on the World Wide Web.
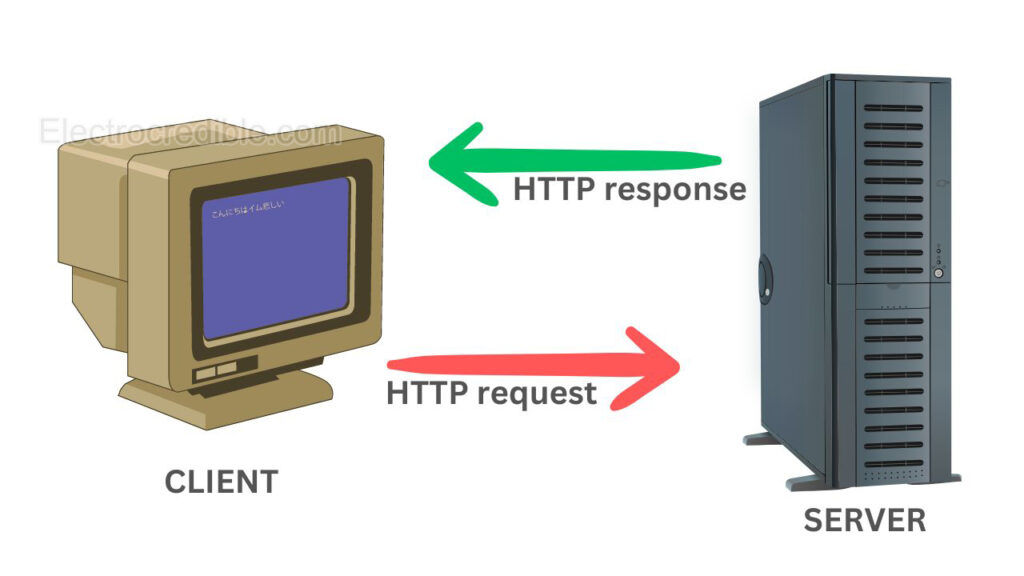
So, a web server running on a microcontroller helps to communicate and exchange information with other devices, typically through a web browser. This can be used for remote monitoring and control. For example, you might access the settings of a smart thermostat or a network-connected sensor through a web browser. Behind the scenes, a web server will handle the communication and serve the requested web pages.
Web Server in Raspberry Pi Pico W
Raspberry Pi Pico W features an Infineon CYW4343 chip with a single-band 2.4 GHz Wi-Fi 4 (802.11n) and Bluetooth 5.1.
There are two Wi-Fi interfaces available:
- Station interface.
- Accesspoint interface.
In the station interface, Raspberry Pi Pico W can connect to a Wi-Fi router. In the Access Point interface, Raspberry Pi Pico W acts as a Wi-Fi hotspot and other devices can connect to it.

Here, we shall discuss examples for both the station and access point interfaces.
We shall be using the asyncio library in MicroPython to run an asynchronous web server. This module allows us to run coroutines which helps to create a non-blocking web server.
Raspberry Pi Pico W Web Server in Station Interface
This web server example will use the station interface in MicroPython, so we have to connect RPi Pico W to a Wi-Fi access point.

Overview of this web server example:
- The web server serves a web page with a GUI (graphical user interface) that has buttons to control an LED (or any GPIO).
- The web server also fetches and displays the readings from the built-in temperature sensor in Raspberry Pi Pico W.
- Separate async methods do the task of controlling the LED and reading the temperature.
- Automatic reconnection attempts to the W-Fi network if the network connection is lost.
MicroPython Code for Web Server
To program Raspberry Pi Pico using MicroPython, you can follow these guides:
- How to program Raspberry Pi Pico using MicroPython code. Thonny IDE and uPyCraft IDE are discussed in this guide.
- How To Program Raspberry Pi Pico on macOS Using Thonny IDE
Before proceeding, ensure that MicroPython firmware has been flashed into your Raspberry Pi Pico W.
Upload the following code to Raspberry Pi Pico W using your preferred IDE.
# Tutorial source: electrocredible.com, Langugage: MicroPython

# Import necessary libraries
import network  # Library for network communication
import socket   # Library for socket programming
import time     # Library for time-related functions

from machine import Pin, ADC
import uasyncio as asyncio     # Asynchronous I/O library

# Initializing onboard LED and temperature sensor
onboard_led = Pin("LED", Pin.OUT, value=0)  # GPIO pin for onboard LED
temperature_sensor = ADC(4)                 # GPIO 4 - connected to the temperature sensor

# Wi-Fi credentials
ssid = 'YOUR_SSID'   # SSID of the Wi-Fi network
password = 'YOUR_PASSWORD'  # Password of the Wi-Fi network

# HTML + CSS for webpage
html = """<!DOCTYPE html>
<html lang="en">
<head>
  <meta charset="UTF-8">
  <meta name="viewport" content="width=device-width, initial-scale=1">
  <title>Raspberry Pi Pico Web Server</title>
  <style>
    html {
      font-family: Arial;
      display: inline-block;
      margin: 0px auto;
      text-align: center;
    }
    h1 {
      font-family: Arial;
      color: #2551cc;
    }
    .button1,
    .button2 {
      border: none;
      color: white;
      padding: 15px 32px;
      text-align: center;
      text-decoration: none;
      display: inline-block;
      font-size: 16px;
      margin: 4px 2px;
      cursor: pointer;
      border-radius: 10px;
    }
    .button1 {
      background: #339966;
    }
    .button2 {
      background: #993300;
    }
  </style>
</head>
<body>
  <h1>Raspberry Pi Pico Web Server</h1>
  <p>%s</p>
  <p>
    <a href="/led/on"><button class="button1">LED On</button></a>
  </p>
  <p>
    <a href="/led/off"><button class="button2">LED Off</button></a>
  </p>
  <p>Temperature: %s°C (%s°F)</p>
</body>
</html>
"""

# Initialize station interface
wlan = network.WLAN(network.STA_IF)

# Function to connect to Wi-Fi network
def connect_to_network():
    wlan.active(True)            # Activate the WLAN interface
    wlan.config(pm=0xa11140)     # Disable power-save mode
    wlan.connect(ssid, password) # Connect to the Wi-Fi network

    max_wait = 10                # Maximum wait time for connection (seconds)
    while max_wait > 0 and not wlan.isconnected():
        max_wait -= 1           # Decrement wait time
        print('waiting for connection...')
        time.sleep(1)           # Wait for 1 second

    if not wlan.isconnected():
        print('Network Connection has failed')  # Print failure message if connection fails
    else:
        print('Connected to the network successfully.')  # Print success message if connection successful
        status = wlan.ifconfig()  # Get network interface configuration
        print('Enter this address in browser-> ' + status[0])  # Print IP address for accessing the web server

# Asynchronous function to handle client requests
async def serve_client(reader, writer):
    print("Client connected")  # Print message when client is connected
    request_line = await reader.readline()  # Read the HTTP request line
    print("Request:", request_line)         # Print the received request
    # Skip HTTP request headers
    while await reader.readline() != b"\r\n":
        pass

    request = str(request_line)        # Convert request to string
    led_on = request.find('/led/on')   # Check if LED ON request is received
    led_off = request.find('/led/off')  # Check if LED OFF request is received
    print('LED on =', led_on)           # Print LED ON request status
    print('LED off =', led_off)         # Print LED OFF request status

    state_message = ""  # Initialize state message
    if led_on == 6:
        print("LED on")          # Print LED ON message
        onboard_led.value(1)     # Turn LED on
        state_message = "LED Turned On"  # Update state message
    elif led_off == 6:
        print("LED off")         # Print LED OFF message
        onboard_led.value(0)     # Turn LED off
        state_message = "LED Turned Off"  # Update state message

    temperature_celsius = await read_temperature()  # Read temperature in Celsius
    temperature_fahrenheit = convert_to_fahrenheit(temperature_celsius)  # Convert to Fahrenheit

    # Generate HTML response with current state and temperature
    response = html % (state_message, "{:.2f}".format(temperature_celsius), "{:.2f}".format(temperature_fahrenheit))
    writer.write('HTTP/1.0 200 OK\r\nContent-type: text/html\r\n\r\n')  # Write HTTP response header
    writer.write(response)  # Write HTML response

    await writer.drain()     # Drain the writer buffer
    await writer.wait_closed()  # Wait until writer is closed
    print("Client disconnected")  # Print message when client is disconnected

# Asynchronous function to read temperature
async def read_temperature():
    temperature_reading = temperature_sensor.read_u16() * 3.3 / (65535)  # Convert ADC reading to voltage
    temperature_celsius = 27 - (temperature_reading - 0.706) / 0.001721  # Convert voltage to temperature
    return temperature_celsius  # Return temperature in Celsius

# Function to convert Celsius to Fahrenheit
def convert_to_fahrenheit(celsius):
    return celsius * 9/5 + 32  # Convert Celsius to Fahrenheit

# Asynchronous main function
async def main():
    print('Connecting to Network...')
    while not wlan.isconnected():  # Continue trying to connect until connected
        connect_to_network()
    print('Setting up webserver...')
    asyncio.create_task(asyncio.start_server(serve_client, "0.0.0.0", 80))  # Start the web server

    while True:  # Loop to continuously check Wi-Fi connection
        if not wlan.isconnected():  # If not connected to Wi-Fi
            wlan.disconnect()       # Disconnect from current Wi-Fi network
            connect_to_network()    # Reconnect to Wi-Fi network
        await asyncio.sleep(0.1)   # Sleep for 0.1 seconds

try:
    asyncio.run(main())  # Run the main asynchronous function
finally:
    asyncio.new_event_loop() #Create a new event loopCode language: Python (python)
You have to change the Wi-Fi credentials according to your network. Replace 'YOUR_SSID' and 'YOUR_PASSWORD'with the credentials for your network.
ssid = 'YOUR_SSID'
password = 'YOUR_PASSWORD'  Code language: JavaScript (javascript)
Steps to Upload Code
Skip to the next step if you are already familiar with uploading MicroPython code.
For Thonny IDE, you can follow these steps to upload code:
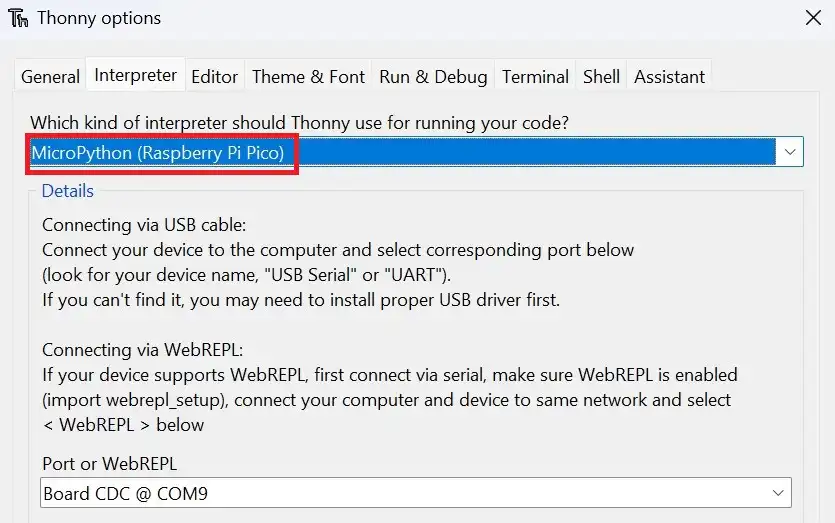
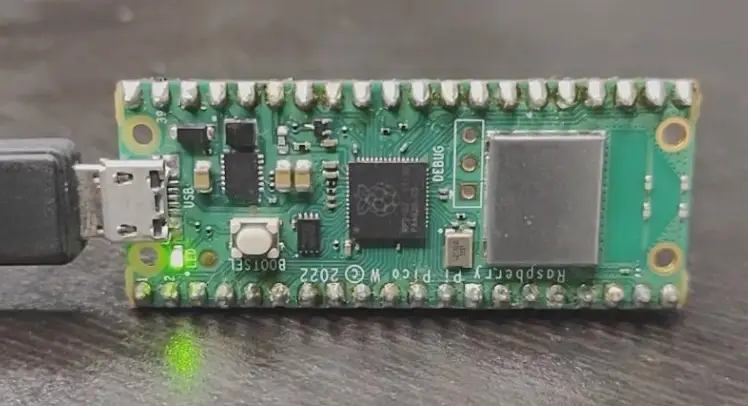
1. With all connections done according to the above schematic, connect the Pico W to your computer using a USB cable. Open Thonny IDE and set the interpreter to use MicroPython on Raspberry Pi Pico W.
2. Go to File>New in Thonny IDE to create a new project.
3. Paste the code for the web server into the new project.
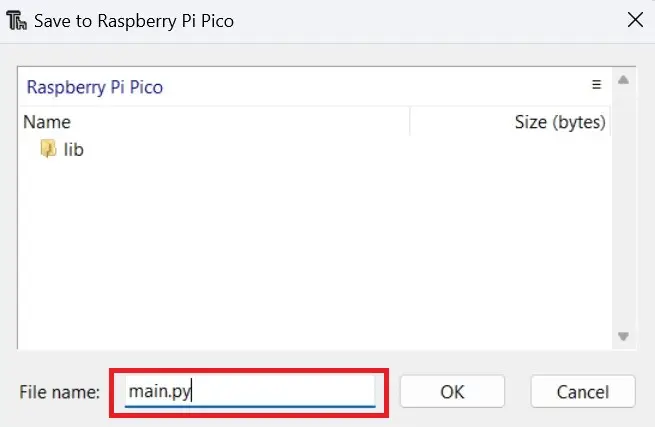
4. Click on File>Save as and select the save location as Raspberry Pi Pico W.

5. Name the code file as main.py.
Controlling GPIO from a Browser
Run the code for the web server. In Thonny IDE, you can do so by clicking the Run icon or by pressing the F5 key.

The shell of Thonny IDE will display the IP address as shown:
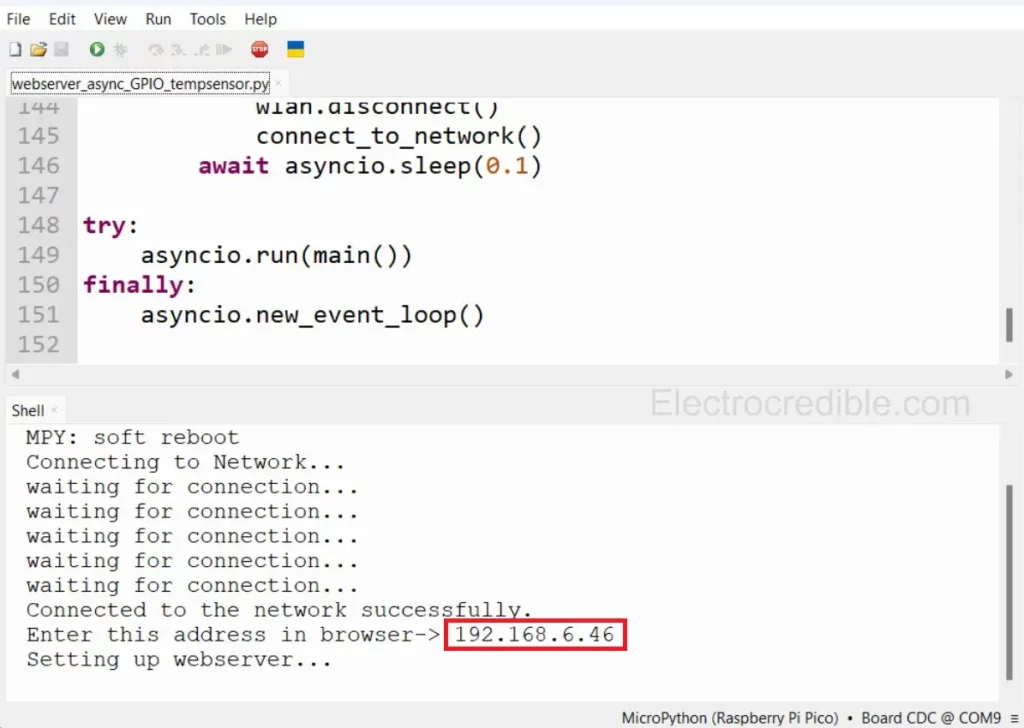
Enter this IP address in the browser of a device(computer/smartphone) connected to the same network.
Your device must now display a UI (User Interface) similar to the screenshot shown below.
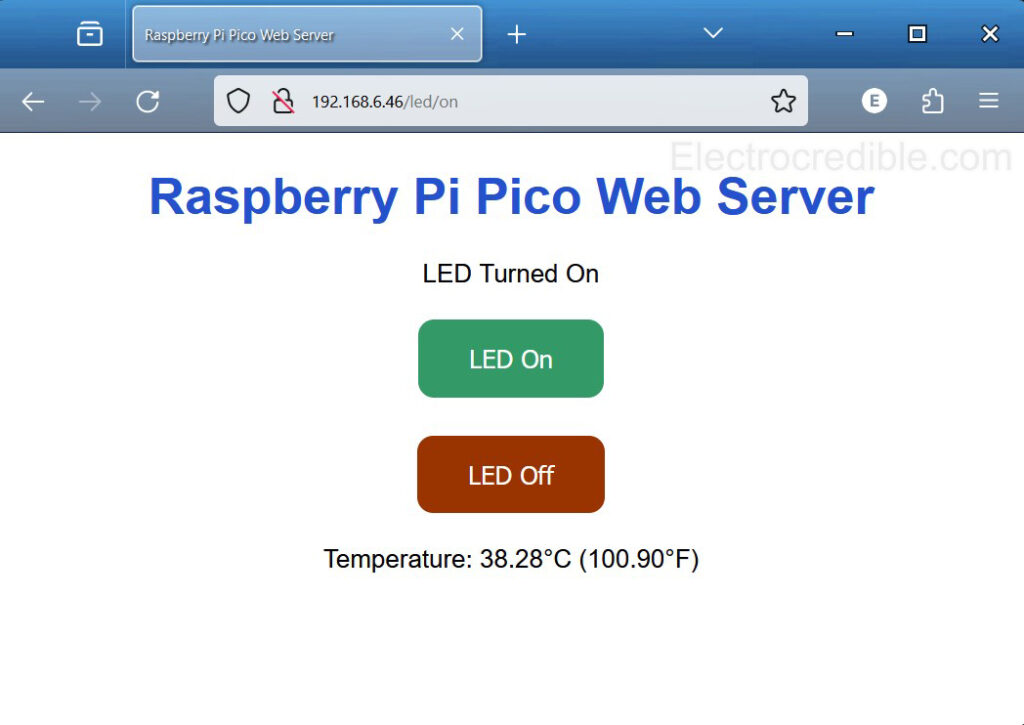
The UI has two buttons for controlling the onboard LED. The status of the LED is shown on the webpage and the internal temperature sensor value is also displayed.
When you click on the “LED On” button, the LED onboard Raspberry Pi Pico W should turn on.
Code Explanation
As the code shares some similarities with the code for synchronous web servers, here we only explain the rest.
Importing Modules
From the machine library, we first import the Pin class for interfacing with the onboard LED and the ADC class to read the built-in temperature sensor.
from machine import Pin, ADC Code language: JavaScript (javascript)Import the uasyncio module that contains functions for the web server.
import uasyncio as asyncio Code language: JavaScript (javascript)Handle Client Requests
To handle incoming client connections, we create an asynchronous function – async def serve_client(reader, writer).
It reads the HTTP request line sent by the client asynchronously using await reader.readline(). The reader parameter represents the input stream from the client.
It then prints the received request line – print("Request:", request_line) on the shell of IDE.
After reading the request line, the function reads and discards the HTTP request headers until it encounters an empty line (\r\n). This is achieved with the while loop.
while await reader.readline() != b"\r\n":
    passCode language: JavaScript (javascript)
The request line is converted to a string – request = str(request_line).
In the following lines of code, we search if the request has /led/on or /led/off which act as commands for the LED. If the request matches, we change the state of the LED and update the state_message variable. This variable will show us the state of the LED on the web page.
    led_on = request.find('/led/on')   # Check if LED ON request is received
    led_off = request.find('/led/off')  # Check if LED OFF request is received
    print('LED on =', led_on)           # Print LED ON request status
    print('LED off =', led_off)         # Print LED OFF request status

    state_message = ""  # Initialize state message
    if led_on == 6:
        print("LED on")          # Print LED ON message
        onboard_led.value(1)     # Turn LED on
        state_message = "LED Turned On"  # Update state message
    elif led_off == 6:
        print("LED off")         # Print LED OFF message
        onboard_led.value(0)     # Turn LED off
        state_message = "LED Turned Off"  # Update state messageCode language: PHP (php)
Then we create an HTTP response with temperature and LED state data and write a response header and HTML response body to the client connection.
response = html % (state_message, "{:.2f}".format(temperature_celsius), "{:.2f}".format(temperature_fahrenheit))
writer.write('HTTP/1.0 200 OK\r\nContent-type: text/html\r\n\r\n')  # Write HTTP response header
writer.write(response)  # Write HTML responseCode language: PHP (php)
In asynchronous programming, when you write data to a stream it gets buffered. It needs to be flushed to ensure it’s sent over the network. The drain() method is used to flush the buffer. By awaiting it, the program ensures that all the data written to the writer is sent before proceeding further.
await writer.drain()Code language: JavaScript (javascript)The wait_closed() method is used to wait for the writer to be closed. Once the connection is fully closed, this line of code will complete, allowing the program to move forward.
await writer.wait_closed()Code language: JavaScript (javascript)Reading a Sensor Concurrently
We store the temperature reading from the built-in sensor using the method read_temperature(). The await keyword allows the program to pause execution at this line until the temperature is read, without blocking the event loop. Once the temperature is obtained, execution continues.
temperature_celsius = await read_temperature()  # Read temperature in Celsius
temperature_fahrenheit = convert_to_fahrenheit(temperature_celsius)  # Convert to FahrenheitCode language: PHP (php)
read_temperature() is an asynchronous function to get the temperature. You can read how temperature conversion code works in our earlier article.
async def read_temperature():
    temperature_reading = temperature_sensor.read_u16() * 3.3 / (65535)  # Convert ADC reading to voltage
    temperature_celsius = 27 - (temperature_reading - 0.706) / 0.001721  # Convert voltage to temperature
    return temperature_celsius  # Return temperature in CelsiusCode language: PHP (php)
We also convert the contained temperature reading to Fahrenheit using the function: convert_to_fahrenheit(celsius).
Main Function
The main function is also asynchronous. asyncio.create_task() creates an asynchronous task. The following code sets up an asynchronous TCP server that listens for incoming connections on port 80 and assigns the serve_client coroutine function to handle those connections.
asyncio.create_task(asyncio.start_server(serve_client, "0.0.0.0", 80)) # Start the web serverCode language: CSS (css)We run the main() function asynchronously using asyncio.run(), and in case of any exceptions, it should create a new event loop.
try:
    asyncio.run(main())  # Run the main asynchronous function
finally:
    asyncio.new_event_loop() #Create a new event loopCode language: PHP (php)
Use Raspberry Pi Pico W as an Access Point for Web Server
Now that we know how to use the station interface let us dive into the access point interface.
Upload the following code to Raspberry Pi Pico W which will create a web server and also create a Wi-Fi access point to which we can connect our devices.
# Tutorial source: electrocredible.com, Langugage: MicroPython

# Importing necessary libraries
import network  # Library for network communication
import socket   # Library for socket programming
import time     # Library for time-related functions

from machine import Pin, ADC  # Importing specific classes from the machine module
import uasyncio as asyncio     # Asynchronous I/O library for microcontrollers

# Initializing onboard LED and temperature sensor
onboard_led = Pin("LED", Pin.OUT, value=0)  # GPIO pin for onboard LED
temperature_sensor = ADC(4)                  # GPIO 4 is connected to the temperature sensor

# HTML + CSS for webpage
html = """<!DOCTYPE html>
<html lang="en">
<head>
  <meta charset="UTF-8">
  <meta name="viewport" content="width=device-width, initial-scale=1">
  <title>Raspberry Pi Pico Web Server</title>
  <style>
    html {
      font-family: Arial;
      display: inline-block;
      margin: 0px auto;
      text-align: center;
    }

    h1 {
      font-family: Arial;
      color: #2551cc;
    }

    .button1,
    .button2 {
      border: none;
      color: white;
      padding: 15px 32px;
      text-align: center;
      text-decoration: none;
      display: inline-block;
      font-size: 16px;
      margin: 4px 2px;
      cursor: pointer;
      border-radius: 10px;
    }

    .button1 {
      background: #339966;
    }

    .button2 {
      background: #993300;
    }
  </style>
</head>
<body>
  <h1>Raspberry Pi Pico Web Server</h1>
  <p>%s</p>
  <p>
    <a href="/led/on"><button class="button1">LED On</button></a>
  </p>
  <p>
    <a href="/led/off"><button class="button2">LED Off</button></a>
  </p>
  <p>Temperature: %s°C (%s°F)</p>
</body>
</html>
"""

# Access Point credentials
ssid = 'pico_webserver'  # SSID of the Access Point
password = 'password'    # Password of the Access Point

def start_ap():
    # Configure as Access Point
    wlan = network.WLAN(network.AP_IF)
    wlan.config(essid=ssid, password=password)

    wlan.active(True)            # Activate Access Point
    wlan.config(pm=0xa11140)     # Disable power-save mode

    status = wlan.ifconfig()
    print('Enter this address in browser-> ' + status[0])  # Print IP address for accessing the web server

# Asynchronous function to handle client requests
async def serve_client(reader, writer):
    print("Client connected")  # Print message when client is connected
    request_line = await reader.readline()  # Read the HTTP request line
    print("Request:", request_line)         # Print the received request
    # Skip HTTP request headers
    while await reader.readline() != b"\r\n":
        pass

    request = str(request_line)  # Convert request to string
    led_on = request.find('/led/on')   # Check if LED ON request is received
    led_off = request.find('/led/off')  # Check if LED OFF request is received
    print('LED on =', led_on)           # Print LED ON request status
    print('LED off =', led_off)         # Print LED OFF request status

    state_message = ""  # Initialize state message
    if led_on == 6:
        print("LED on")          # Print LED ON message
        onboard_led.value(1)     # Turn LED on
        state_message = "LED Turned On"  # Update state message
    elif led_off == 6:
        print("LED off")         # Print LED OFF message
        onboard_led.value(0)     # Turn LED off
        state_message = "LED Turned Off"  # Update state message

    temperature_celsius = await read_temperature()  # Read temperature in Celsius
    temperature_fahrenheit = temperature_celsius * 9/5 + 32  # Convert to Fahrenheit

    # Generate HTML response with current state and temperature
    response = html % (state_message, "{:.2f}".format(temperature_celsius), "{:.2f}".format(temperature_fahrenheit))
    writer.write('HTTP/1.0 200 OK\r\nContent-type: text/html\r\n\r\n')  # Write HTTP response header
    writer.write(response)  # Write HTML response

    await writer.drain()     # Drain the writer buffer
    await writer.wait_closed()  # Wait until writer is closed
    print("Client disconnected")  # Print message when client is disconnected

# Asynchronous function to read temperature
async def read_temperature():
    temperature_reading = temperature_sensor.read_u16() * 3.3 / (65535)  # Convert ADC reading to voltage
    temperature_celsius = 27 - (temperature_reading - 0.706) / 0.001721  # Convert voltage to temperature
    return temperature_celsius  # Return temperature in Celsius

# Function to convert Celsius to Fahrenheit
def convert_to_fahrenheit(celsius):
    return celsius * 9/5 + 32  # Convert Celsius to Fahrenheit

# Asynchronous main function
async def main():
    start_ap()  # Start the Access Point
    print('Setting up webserver...')  # Print setup message
    asyncio.create_task(asyncio.start_server(serve_client, "0.0.0.0", 80))  # Start the web server

    while True:  # Loop indefinitely
        await asyncio.sleep(0.1)  # Sleep for a short period

try:
    asyncio.run(main())  # Run the main asynchronous function
finally:
    asyncio.new_event_loop()  # Create a new event loop if needed
Code language: Python (python)
You can change the SSID and password of the access point by changing the following lines:
ssid = 'pico_webserver' # SSID of the Access Point
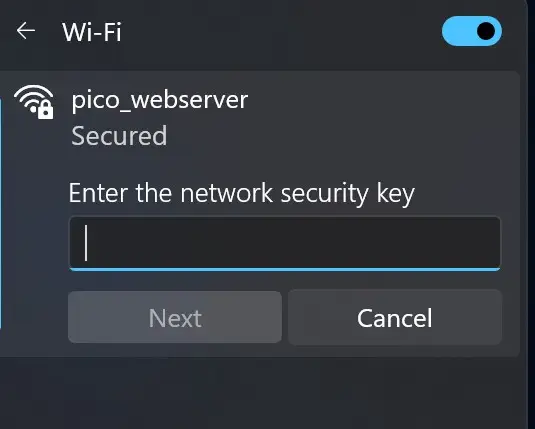
password = 'password' # Password of the Access PointCode language: PHP (php)If you use the default code, you can connect the Wi-Fi network “pico_webserver” from your smartphone or PC. After that, the procedure to access the web server is the same as the method described earlier in this article.
The code for the access point interface differs from the code for the station interface. Let’s see what we changed and how this code works.
Here, we define a new method start_ap() to set up and start the access point.
To configure the network interface as an Access Point we use the network.WLAN() function with the network.AP_IF parameter, indicating that the WLAN interface should be configured as an Access Point. The method wlan.config() sets the SSID and password for the access point.
wlan = network.WLAN(network.AP_IF)
wlan.config(essid=ssid, password=password)
The Access Point is activated using wlan.active(True).
wlan.active(True) Code language: CSS (css)Finally, status = wlan.ifconfig() retrieves the IP address of the Access Point, which we print on the shell of the IDE.
status = wlan.ifconfig()Summary
In this tutorial, we learned to create an asynchronous web server on Raspberry Pi Pico W using MicroPython code. Examples were discussed to control GPIOs or read the value from sensors via the web server. You can use this information to interface various sensors or control multiple devices wirelessly from Raspberry Pi Pico W.
Leave a Reply