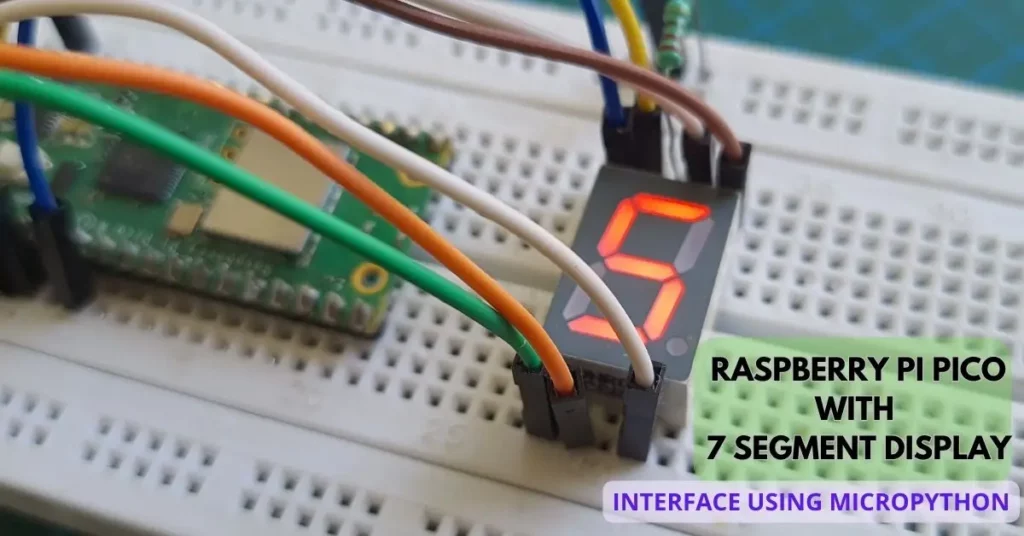
This article will guide you to connect a 7-segment display with Raspberry Pi Pico W and display digits using MicroPython. The component connections and MicroPython code to interface the display are explained in-depth. We also have a guide on interfacing the TM1637 4-digit 7-segment display with Raspberry Pi Pico, which requires fewer wires than connecting individual display segments.
Components Required
- A Raspberry Pi Pico or Pico W.
- A 7-segment display.
- Breadboard and connecting wires.
- USB cable.
- A 220 Ohm resistor( You can also use other values between 100 ohms and 1 kiloohm).
7- Segment Display Pinout and Working
A 7-segment display consists of an LED in each segment. The LEDs in each segment are connected to pins which we can control by digital logic levels. Such displays consist of 8 LEDs – 7 LEDs for each segment of digits, and 1 LED for a decimal point.
Common Cathode 7-segment Display Pinout
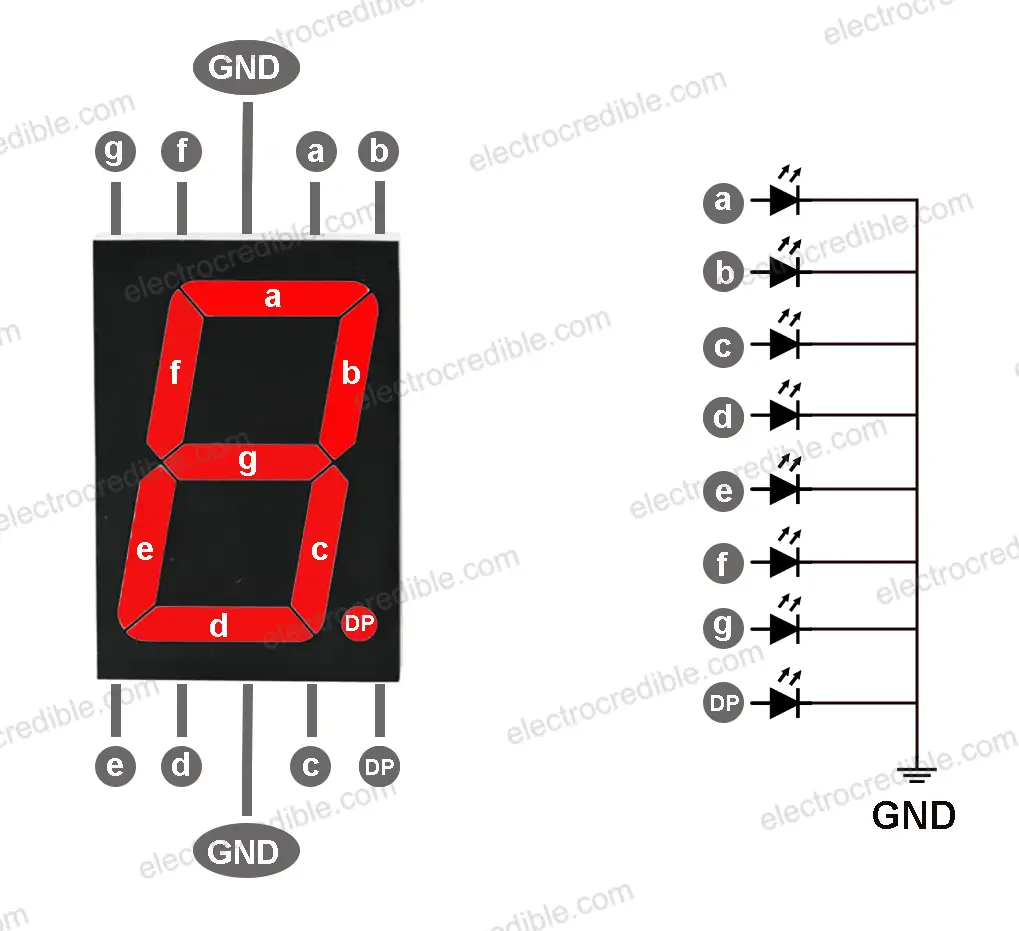
The diagram above shows the pinout and internal schematic of a common cathode 7-segment display. In a common cathode 7-segment display, the LEDs in each segment can be turned ON by sending a positive voltage to the 8 pins of the display which are connected to the anode of each LED. The cathode of all LEDs is connected to the two ground(GND) pins, which are also called the ‘COMMON’ pins.
A segment also shows a Decimal Point (DP) on the lower right corner which proves to be useful in some projects, for example, if you combine multiple 7-segment displays to make a 4-digit display that can display temperature data.
Common Anode 7-Segment Display Pinout
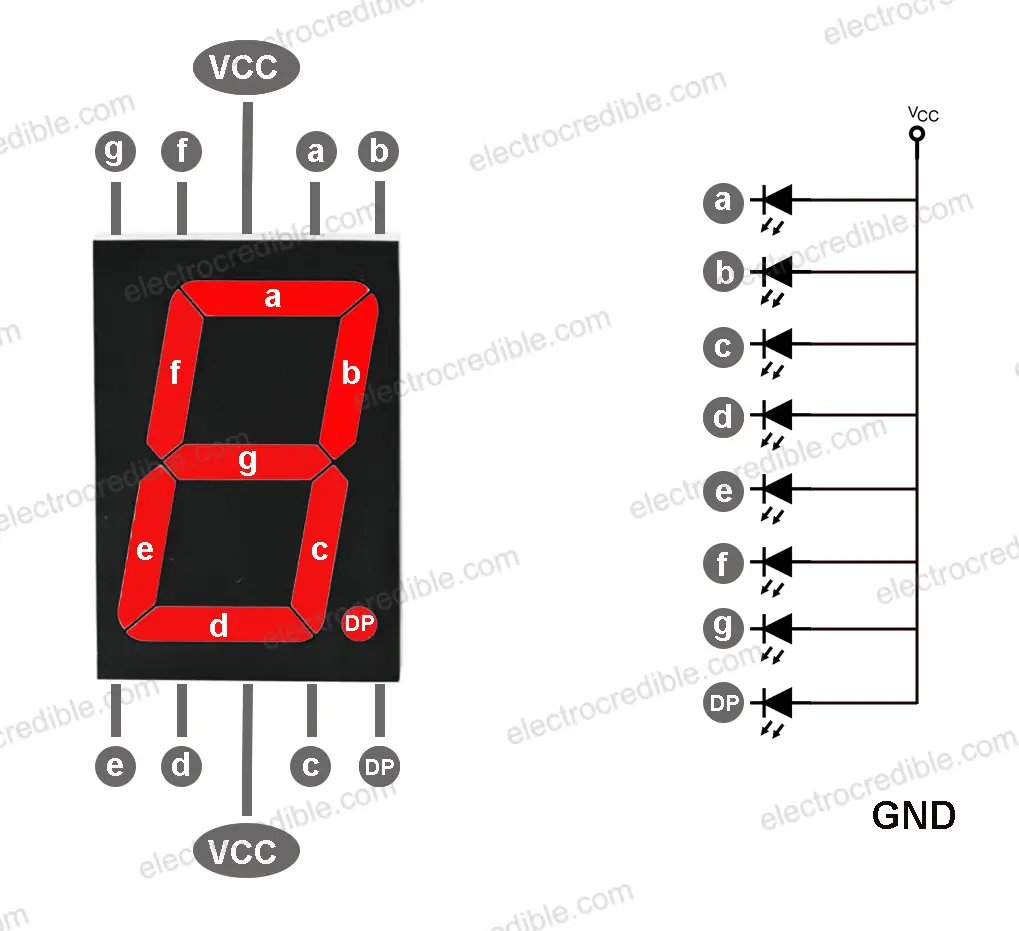
In a common anode 7-segment display, the LEDs in each segment can be turned ON by connecting the 8 control pins of the display to the ground of the power supply. The anode terminal of all LEDs is commonly connected to the two VCC pins.
For both types of displays, we need to connect the LEDs in series with appropriate resistors so that the current to them is limited.
Connection of Raspberry Pi Pico with 7-Segment Display
In this article, we will show the connection of Raspberry Pi Pico with a common cathode 7-segment display.
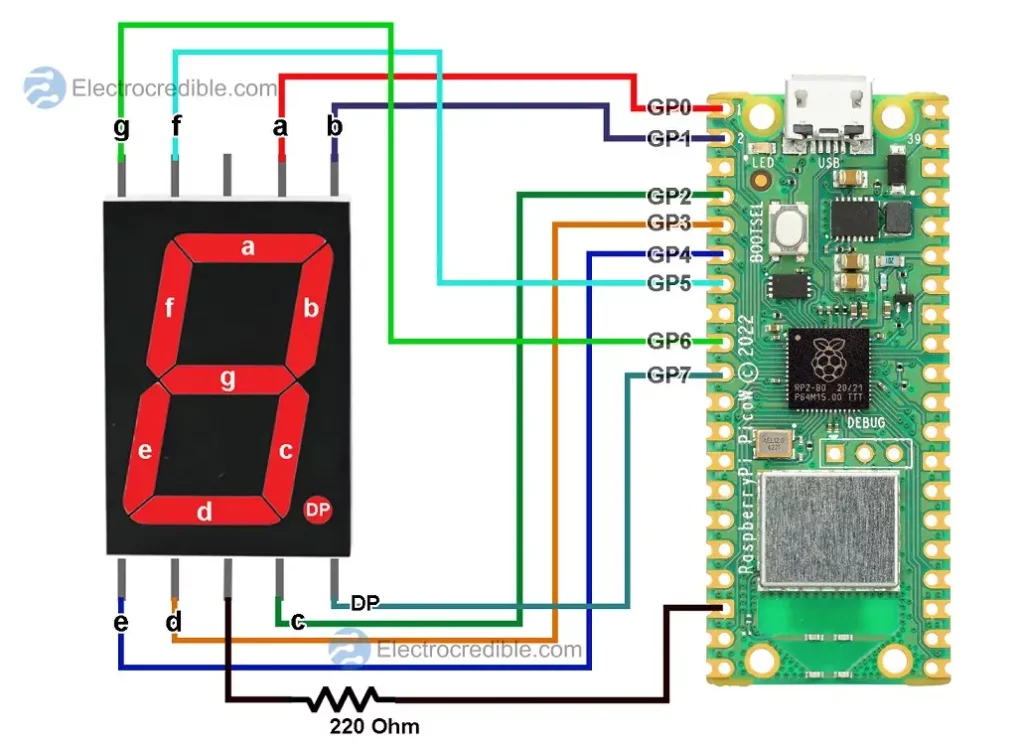
ⓘ The diagram above shows only one resistor connected with the GND pin to limit current to the LEDs. This will cause the brightness of LEDs to vary depending on how many segments are turned ON. For consistent brightness, it is recommended to connect resistors to each pin of the display (the resistor on the GND pin will not be required in such a case).
Connection Details:
| Raspberry Pi Pico Pin | 7 Segment Display Pin |
| GPIO 0 | a |
| GPIO 1 | b |
| GPIO 2 | c |
| GPIO 3 | d |
| GPIO 4 | e |
| GPIO 5 | f |
| GPIO 6 | g |
| GPIO 7 | h |
| GND( Any GND pin onboard) | COMMON(GND) |
The choice of the resistor can vary depending on what is available to you. Resistor values between 220ohm and 1 kiloohm will work fine. The higher the resistance, the less is the brightness of the segments.
You might also find our article on Raspberry Pi Pico W pinout to be helpful while making the circuit.

Using MicroPython with 7-Segment Display & Raspberry Pi Pico.
NOTE: Your Raspberry Pi Pico needs to be preloaded with a MicroPython UF2 file to program it in MicroPython. You can read our getting started guide for Raspberry Pi Pico where we show all steps required to start programming RP2040 in MicroPython. If you are using macOS, follow our guide to program Raspberry Pi Pico on macOS using Thonny IDE.
MicroPython Code to Display a Counter On 7-Segment Display
The steps to upload MicroPython code are explained using Thonny IDE.
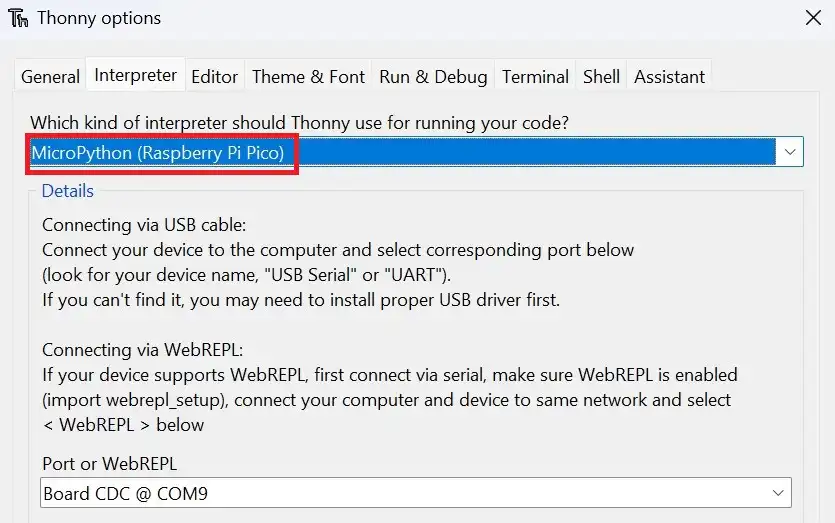
1. With all connections done according to the above schematic, connect the Pico to your computer using a USB cable. Open Thonny IDE and set the interpreter to use MicroPython on Raspberry Pi Pico.
2. Go to File>New in Thonny IDE to create a new project.
3. Paste the following code into the new project.
import machine
import utime
#GPIO pins for 7-segment display segments (a-g)
segments = [
machine.Pin(0, machine.Pin.OUT),
machine.Pin(1, machine.Pin.OUT),
machine.Pin(2, machine.Pin.OUT),
machine.Pin(3, machine.Pin.OUT),
machine.Pin(4, machine.Pin.OUT),
machine.Pin(5, machine.Pin.OUT),
machine.Pin(6, machine.Pin.OUT)
]
# pin states for each digit to display numbers 0-9
number_map = [
[1, 1, 1, 1, 1, 1, 0], # 0
[0, 1, 1, 0, 0, 0, 0], # 1
[1, 1, 0, 1, 1, 0, 1], # 2
[1, 1, 1, 1, 0, 0, 1], # 3
[0, 1, 1, 0, 0, 1, 1], # 4
[1, 0, 1, 1, 0, 1, 1], # 5
[1, 0, 1, 1, 1, 1, 1], # 6
[1, 1, 1, 0, 0, 0, 0], # 7
[1, 1, 1, 1, 1, 1, 1], # 8
[1, 1, 1, 1, 0, 1, 1] # 9
]
#function to display a specific number on the 7-segment display
def display_number(number):
segments_values = number_map[number]
for i in range(len(segments)):
segments[i].value(segments_values[i])
while True:
for number in range(10):
display_number(number)
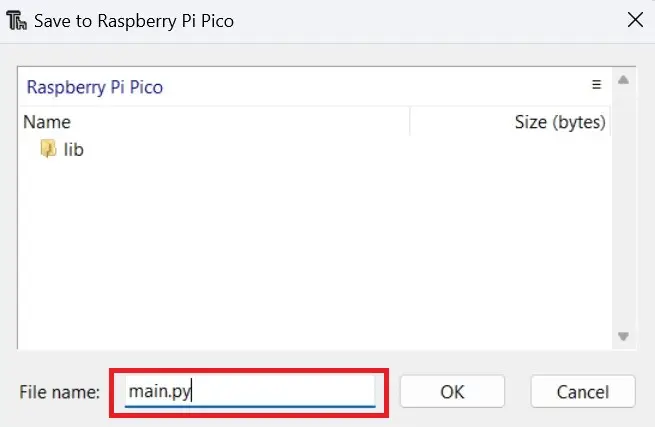
utime.sleep_ms(1000) # Delay between numbersCode language: Python (python)4. Click on File>Save as and select the save location as Raspberry Pi Pico.

5. Name the code file as main.py.
6. Run the code by clicking the Run icon or by pressing the F5 key.

If all the steps were executed successfully, the 7-segment display must now display a counter that counts up from 0 to 9 and loops indefinitely. The demonstration is shown in the GIF below.

7-Segment Display Code Explained
First, we need to import the necessary modules machine and utime for controlling hardware the GPIOs and managing time delays, respectively.
import machine
import utimeCode language: Python (python)
We then define a list called segments that contains seven machine.Pin objects. Each machine.Pin object represents a GPIO pin on the microcontroller, configured as an output pin. These pins are used to control the segments (a-g) of a 7-segment display. The DP segment is not used in this demonstration, so we have not configured the pin associated with it.
segments = [
    machine.Pin(0, machine.Pin.OUT),
    machine.Pin(1, machine.Pin.OUT),
    machine.Pin(2, machine.Pin.OUT),
    machine.Pin(3, machine.Pin.OUT),
    machine.Pin(4, machine.Pin.OUT),
    machine.Pin(5, machine.Pin.OUT),
    machine.Pin(6, machine.Pin.OUT)
]Code language: Python (python)
A 2D list called number_map represents the pin states for each digit (0-9) on the 7-segment display. Each inner list corresponds to a specific digit, and the values in the list represent the state of each segment (a-g) for that digit. For example for the number ‘1’, we need to light up segments ‘b’ and ‘c’, which are connected to GPIO 1 and GPIO 2 respectively. So [0,1,1,0,0,0,0] will light the LEDs in the segments ‘b’ and ‘c’.
number_map = [
    [1, 1, 1, 1, 1, 1, 0],  # 0
    [0, 1, 1, 0, 0, 0, 0],  # 1
    [1, 1, 0, 1, 1, 0, 1],  # 2
    [1, 1, 1, 1, 0, 0, 1],  # 3
    [0, 1, 1, 0, 0, 1, 1],  # 4
    [1, 0, 1, 1, 0, 1, 1],  # 5
    [1, 0, 1, 1, 1, 1, 1],  # 6
    [1, 1, 1, 0, 0, 0, 0],  # 7
    [1, 1, 1, 1, 1, 1, 1],  # 8
    [1, 1, 1, 1, 0, 1, 1]   # 9
]Code language: Python (python)
A function called display_number that takes number as an argument. It retrieves the pin states for the corresponding number from number_map and assigns them to the segments_values list. Then, it iterates over the segments list using a for loop and sets the value of each segment pin based on the corresponding value in segments_values. The items with the value ‘1’ in the list will light up corresponding segments.
def display_number(number):
    segments_values = number_map[number]
    for i in range(len(segments)):
        segments[i].value(segments_values[i])Code language: Python (python)
The main loop runs indefinitely (while True:) and displays each number from 0 to 9 on the 7-segment display. It does this by iterating over the numbers using a for loop. For each number, it calls the display_number function to display that number on the 7-segment display. After displaying each number, there is a delay of 1 second for clear visibility.
while True:
    for number in range(10):
        display_number(number)
        utime.sleep_ms(1000)  # Delay between numbersCode language: Python (python)
Wrapping Up
This article described how to interface a 7-segment display with Raspberry Pi Pico W using MicroPython and how we can make a simple counter. You can use the information in this guide to make many projects such as a simple digital clock using TM1637 7-segment display and Raspberry Pi Pico.
Also, read our other display-related projects:
Leave a Reply