In this article, you will learn to interface a TM1637 4-digit 7-segment display module using MicroPython code and Raspberry Pi Pico W. We shall see various ways to display characters on TM1637 and will also attempt to make a simple clock to display time in 24-hour format.
In a previous article, we described how to interface a 7-segment display with Raspberry Pi Pico, where we connected Raspberry Pi Pico with a 7-segment display as shown below. But interfacing individual 7-segment displays requires a lot of wires (one for each segment).
The TM1637 module makes it easier to interface with 7-segment displays using just 4 wires to communicate with a four-digit display.
Components Required
- A Raspberry Pi Pico or Pico W.
- A TM1637 7-segment display module.
- Breadboard and connecting wires.
- USB cable to transfer code to Raspberry Pi Pico.
Overview of TM1637 7-Segment Display
The TM1637 module is a popular display driver module commonly used to drive 7-segment LED displays. The TM1637 module consists of a driver chip (the TM1637 IC), a set of 7-segment LED display elements, and a colon separating the 7-segment displays.
The driver chip takes care of the low-level control of the LED segments, allowing the user to easily interface with the module using a microcontroller or other compatible devices.
To interface TM1637 with a microcontroller, we require only two data pins (CLK and DIO) and two power supply pins (VCC and GND). The TM1637 module features common anode 7-segment displays.
TM1637 Pinout

Pinout description of TM1637:
| PIN | DESCRIPTION |
| CLK | Clock pin is used to synchronize data through the DIO pin. |
| DIO | Data Input/Output pin is used to transfer data to TM1637. When one bit of data is received by TM1637, it sends an acknowledgement to the controlling device through this pin. |
| VCC | Supply voltage pin(3.3V-5V). |
| GND | Ground pin. |
TM1637 Features
Here are the specifications of the TM1637 Module:
- Supply Voltage: 3.3V to 5V DC.
- Maximum current draw: 80 mA.
- Communication interface: Two-wire interface(CLK, DIO).
- 7-segment size: 0.36 inch.
To learn more about the module, you can refer to its datasheet.
Wiring Raspberry Pi Pico W With TM1637
Connect your Raspberry Pi Pico or Pico W as shown in the wiring diagram below. You can use a breadboard or female-to-female DuPont wires for the connections.

Connection details:
| Raspberry Pi Pico Pin | TM1637 Pin |
| GPIO 0 | CLK |
| GPIO 1 | DIO |
| 3V3OUT | VCC |
| Any of the Ground Pins | GND |
Although we are using GPIO 0 and GPIO 1 in this guide, you can use other GPIOs in Raspberry Pi Pico. To learn more about the pinouts of Pico, read our Raspberry Pi Pico pinout guide.

MicroPython Code For TM1637 7-Segment Display
Raspberry Pi Pico W needs to be flashed with a MicroPython firmware to program it in MicroPython. You can read our getting started guide for Raspberry Pi Pico where we show all steps required to start programming RP2040 in MicroPython.
With all connections done as shown in the diagram above, connect the Pico to your computer using a USB cable. Open your IDE, and paste the following code into a new project.
import tm1637
from machine import Pin
import time
tm = tm1637.TM1637(clk=Pin(0), dio=Pin(1))

#set brightness(0-7)
tm.brightness(5)
# display "10:24"
tm.numbers(10, 24, colon=True)
time.sleep(2)
# display "COOL"
tm.write([0b00111001, 0b00111111, 0b00111111, 0b00111000])
time.sleep(2)
# display "heya"
tm.show('heya', colon=False)
time.sleep(2)
# display "bEEF"
tm.hex(0xbeef)
time.sleep(2)
# display "-123"
tm.number(-123)
time.sleep(2)
# show temperature '24*C'
tm.temperature(24)
time.sleep(2)
#scroll display contents
tm.scroll('scrolling', delay=250)
Code language: Python (python)
Save the script to your Raspberry Pi Pico as main.py or any other name with a “.py” filename extension.
When the code runs, you must see the TM1637 module display showing different characters with a delay of 2 seconds between each change.

TM1637 MicroPython Code Explained
First, we import the necessary modules/libraries. The TM1637 library to communicate with the 7-segment display, the Pin module to set Pico W pins as output pins, and the time module to set delays between code execution.
import tm1637
from machine import Pin
import timeCode language: Python (python)
We then define an instance called tm, and designate the pins 0 and 1 of Raspberry Pi Pico for interfacing with the TM1637 pins CLK and DIO respectively.
tm = tm1637.TM1637(clk=Pin(0), dio=Pin(1))Code language: Python (python)tm.brightness can be set with a value between 1 to 7. Setting it to “1” sets the TM1637 brightness to the lowest, and “7” lights up all LEDs brightly.
tm.brightness(5)Code language: Python (python)The next lines display 2 independent numbers on either side of the colon, with leading zeros. The argument colon can be set to False if you do not want the colon to show between the numbers.
tm.numbers(10, 24, colon=True)
time.sleep(2)Code language: Python (python)
The function write can be used to light up each segment of the LEDs. Its parameters are 8-bit binary numbers where each bit corresponds to one segment of a 7-segment display.
tm.write([0b00111001, 0b00111111, 0b00111111, 0b00111000])Code language: Python (python)To understand the above code better, let us see a 7-segment display with the segments labeled.
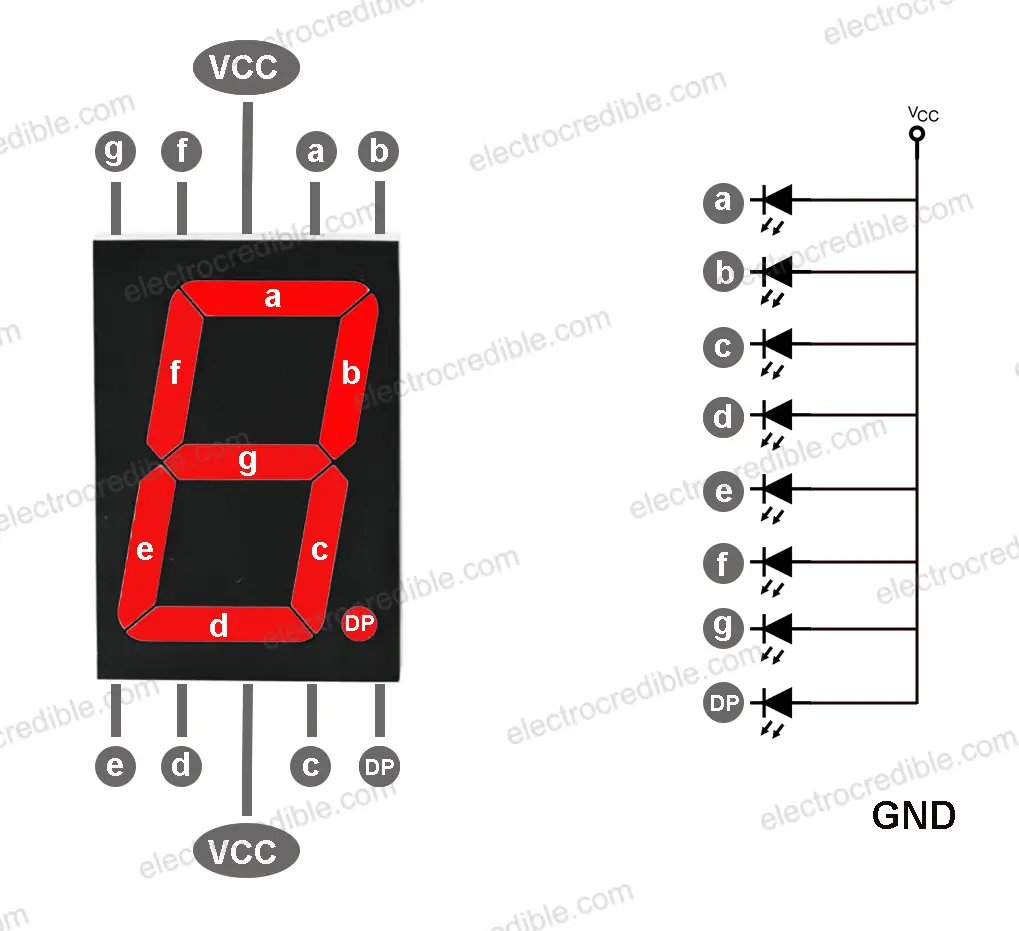
In the function tm.write, the first argument is 0b00111001, which will display the first letter of the word “cool”(i.e. letter c) on TM1637 module. The least significant bit in the argument represents segment ‘a’ and the most significant bit is for segment ‘DP’. So 0b00111001 will light up the segments a, d, e, and f in a 7-segment display. Similarly, the arguments 0b00111111, 0b00111111, and 0b00111000 will display the letters ‘o’, ‘o’, & ‘l’ respectively.
Next, we display a string 'heya' using tm.show function, a hex value using tm.hex , and a negative number using tm.number. The function tm.number can display numbers -999 through 9999 and the numbers will be right aligned.
tm.show('heya', colon=False)
tm.hex(0xbeef)
tm.number(-123)Code language: Python (python)
If the contents you want to display do not fit in the 4-digit segments of TM1637, you can scroll the contents using the scroll() function. The delay argument takes values in milliseconds and it is the time for which a character stays in a segment before scrolling to the left.
scroll('scrolling', delay=250)Code language: Python (python)Also read: Raspberry Pi Pico Temperature, Humidity & Pressure Monitor Using MicroPython
Make a Simple Digital Clock
Now that you have learned the basics of interfacing TM1637, you can make a simple clock using the inbuilt RTC of Raspberry Pi Pico.
MicroPython Code
Copy and run the following code on your Raspberry Pi Pico or Pico W.
from machine import Pin, RTC
import tm1637
import time

tm = tm1637.TM1637(clk=Pin(0), dio=Pin(1))
rtc=RTC()

while True:
    timeTuple=rtc.datetime()
    print(timeTuple)
    tm.numbers(timeTuple[4],timeTuple[5])
    time.sleep(2)
Code language: Python (python)
The code above will display time on TM1637 in a 24-hour format. The shell in Thonny IDE displays the time as shown in the image below.

Here, we create an instance called rtc of the RTC class which is a part of the machine module that we imported earlier. The function rtc.datetime() returns an 8-tuple with the current date and time. The data in the tuple is in the format – (year, month, day, weekday, hours, minutes, seconds, subseconds).
Using the line of code, tm.numbers(timeTuple[4],timeTuple[5]), we display the 5th and 6th tuple to get the time in hours and minutes respectively.
Note that your device needs to be connected to the computer to display the time. Or you can use battery backup and initialize the RTC using rtc.datetime([datetimetuple]) if you want to make a standalone clock. Also, the RTC resets on reboot.
The inbuilt RTC of Pico cannot keep time when powered down. Use external RTC such as the DS1302 RTC with Raspberry Pi Pico.
Wrapping Up
In this article, we discussed how to interface TM1637 with the Raspberry Pi Pico development board. We demonstrated various ways to output characters to the display and also learned to make a simple clock using the inbuilt RTC of Raspberry Pi Pico.
Instead of a 7-segment display, you can also experiment with other displays. Here are some helpful tutorials:
- Raspberry Pi Pico I2C LCD Interfacing Tutorial-16×2 Display Interfacing Using MicroPython.
- Interface Raspberry Pi Pico With OLED Display Using MicroPython.
Did you have success following this guide? Leave your thoughts and queries in the comments below.
Leave a Reply