In this tutorial, you will learn to interface a PIR motion sensor with Raspberry Pi Pico W. We will use MicroPython to detect the signal sent by the motion sensor, and then send an alert via email to notify about motion detection. This project can be used to detect human and animal motion by sensing the infrared radiation emitted.
Overview Of PIR Motion Sensor
A PIR sensor is a motion sensor that can detect changes in infrared radiation emitted by objects within its detection range. Its primary use is in security systems to detect movement and trigger alarms. The sensor’s name, PIR, stands for “Passive Infrared”, which means that it can detect radiation without emitting any itself.
How It Works
A PIR motion sensor detects changes in infrared radiation emitted by objects using a sensor element and control electronics. The module shown below has a Fresnel lens covering the D203S PIR sensor.
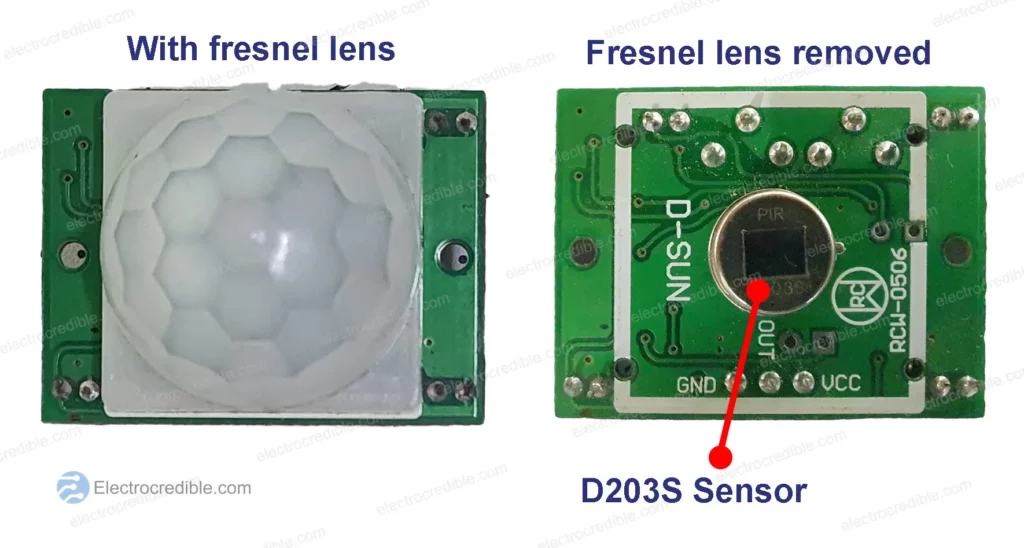
The sensor element (made up of pyroelectric materials) has two halves sensitive to infrared radiation. When an object moves within the detection range, the two halves work together to sense emitted radiation, causing a change in the electrical charge of the pyroelectric material. The control electronics compare signals from both halves to detect motion. The output pin changes its logic state when motion is detected.
Pinout
PIR sensors are generally packaged as a 3-pin module. The Pinout is generally labeled on the back of the PIR sensor. Here is the pinout and component layout of the HC-SR501 PIR motion sensor.

Sensor Adjustments
The trigger mode can be changed by using solder pads as shown in the image above. By default, the center pad was connected to the ‘H’ pad in my module. In the ‘H’ selection, multiple triggers will be caused by constant motion. If the solder pad of the center point is connected to ‘L’, there will be a single trigger for repeated movement within a short time.
Rotating the “Time Delay Adjust” potentiometer clockwise will extend the time that the signal will remain HIGH after movement is detected. The delay time can be set between 1 second to 3 seconds.
Rotating the “Sensitivity Adjust” potentiometer clockwise will increase the sensitivity and range. The detection range extends from 3 meters to 7 meters.
Specification Of PIR Motion Sensor
- Supply voltage: 5V to 20V.
- Output voltage: 3.3V.
- Maximum distance of detection: 7 meters.
- Area of Detection: 110-degree conical area in front of the sensor.
For more details, you can refer to the datasheet of HC-SR501 PIR motion sensor.
Prerequisites & Setup
Components required:
- A Raspberry Pi Pico running MicroPython.
- A PIR sensor.
- Breadboard and connecting wires.
Your Raspberry Pi Pico needs to be preloaded with a MicroPython UF2 file to program it in MicroPython. You can read our getting started guide for Raspberry Pi Pico where we show all steps required to start programming RP2040 in MicroPython.
Schematic- PIR Motion Sensor With Raspberry Pi Pico W
Connect your Raspberry Pi Pico with the PIR motion sensor as shown in the schematic below:

Note that if you are using the HC-SR501 motion sensor, which we are using in this project, the voltage at the output pin is 3.3V when logical HIGH. This is because the onboard voltage regulator steps down the input voltage. So we can interface it with the 3.3V logic-tolerant Raspberry Pi Pico pins without using any additional hardware. However, the sensor module requires a 5V supply voltage. So we connect it to the VBUS pin of Pico where we get 5V.
You can also use our Raspberry Pi Pico Pinout Guide for reference.

MicroPython Code To Detect Motion Using Raspberry Pi Pico
Let us now write a MicroPython script to detect motion using a PIR sensor, and print a statement when movement is detected. We will be using external interrupt in Pico to sense movement. We use the Thonny IDE for demonstration, but you can use any IDE you like. The code is explained in detail in a section below.
If you are using macOS, follow our guide to program Raspberry Pi Pico on macOS using Thonny IDE.
With all connections done as shown in the schematic, connect Raspberry Pi Pico to your computer using a USB cable. Open Thonny IDE, and paste the following code into a new project.
#Code source: electrocredible.com , Language: MicroPython

from machine import Pin
import time

pin = Pin(0, Pin.IN, Pin.PULL_DOWN)
led = Pin("LED", Pin.OUT)
isMotionDetected=False;

def detect_motion(pin):
    global isMotionDetected
    isMotionDetected=True

pin.irq(trigger=Pin.IRQ_RISING, handler=detect_motion)

time.sleep(60)

while True:
    if isMotionDetected:
        isMotionDetected=False
        print("Motion Detected")
        print("timestamp={}". format(time.time()))
        led.on()
        time.sleep_ms(1000)
        led.off()Code language: Python (python)
Run the code by clicking the Run icon or by pressing the F5 key.

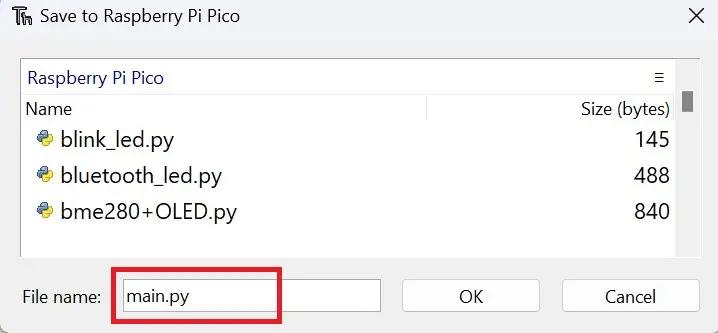
Save the script to your Raspberry Pi Pico.

Save the script as main.py or with any other name with a “.py” filename extension.
You will need to wait for at least 1 minute before you can sense motion. This is because the sensor takes about a minute to start up and adjust to the ambient conditions.
After a minute, wave your hand in front of the sensor. The onboard LED in Pico must light up and the Thonny shell should print the output as shown:

Motion Sensor Code Explanation
We need to first import the machine module and time module. The Pin class is used to interface with the hardware of Pico and the time module helps us to set delays between code execution.
from machine import Pin
import timeCode language: Python (python)
The GPIO 0 of Raspberry Pi Pico is set as an input with pull-down enabled. This means that the pin is pulled down to the ground by an internal onboard resistor. We also define an instance called led so that we can control the onboard LED in Raspberry Pi Pico.
pin = Pin(0, Pin.IN, Pin.PULL_DOWN)
led = Pin("LED", Pin.OUT)Code language: Python (python)
A variable called isMotionDetected is set to False initially. This variable will be toggled when movement is detected by the motion sensor.
isMotionDetected=False;Code language: Python (python)We define a function called detect_motion() that will be called when an interrupt occurs. When this function is called, the isMotionDetected variable is set as True.
def detect_motion(pin):
    global isMotionDetected
    isMotionDetected=TrueCode language: Python (python)
We then attach a rising-edge interrupt to the pin we declared earlier. A rising edge interrupt is triggered when the pin state changes from LOW to HIGH. We set detect_motion() as the function that will be called when an interrupt occurs. Here rising-edge interrupt is used as the PIR sensor pin changes state from LOW to HIGH when motion occurs. Read our article Raspberry Pi Pico Interrupts Using MicroPython to know more about interrupts.
pin.irq(trigger=Pin.IRQ_RISING, handler=detect_motion)Code language: Python (python)We then wait for 60 seconds, as reading the sensor within this time period can result in false signals.
time.sleep(60)Code language: CSS (css)Inside the while loop, we continuously monitor the state of the isMotionDetected variable. If it is True(which is set by the interrupt handling function), then we set it to False so that repeated triggers do not occur. Then, the statement “Motion detected” is printed along with the time of occurrence. (More explanation: MicroPython-time.time())
if isMotionDetected:
        isMotionDetected=False
        print("Motion Detected")
        print("timestamp={}". format(time.time()))Code language: Python (python)
Then, the onboard LED of Pico will light up for 1 second(1000ms) to notify that motion has occurred. You can also use an external LED with a resistor in series connected to a GPIO.
        led.on()
        time.sleep_ms(1000)
        led.off()Code language: Python (python)
Suggested article: Raspberry Pi Pico With DS18B20 Temperature Sensor (MicroPython Guide)
Send Email From Raspberry Pi Pico When Motion Detected
To get email alerts when motion occurs, we can connect Raspberry Pi Pico to Wi-Fi and send email using SMTP.
Setting Up Pi Pico For Email
We need to go through some essential steps to configure email. Please read our article on sending email using Raspberry Pi Pico where we discuss the following:
- Generating an app password in Gmail. This password will be required to login to the SMTP server.
- Installation of MicroPython Module for SMTP. We need to install the ‘umail‘ MicroPython module.
MicroPython Code To Send Email Triggered By Motion Sensor
The app password is not the same as the one you generally use to log in, so please go through the linked articles thoroughly before you proceed. After you have set up an app password and saved the ‘umail’ module to your Pico, you can paste the script below on your IDE.
Note that you have to change the details in the code according to your Wi-Fi network and email. Set the sender name, sender email, sender app password, recipient email, and the subject of your email. Set the ssid to the name of your Wi-Fi network and also enter the password.
ⓘ You are advised not to use your primary email address as the sender’s account. Frequent SMTP requests may cause your email account to become blocked/disabled. The receiving email address can be your personal email ID.
After following all the required steps, run the following code with the changes you made.
from machine import Pin
import time
import umail
import network

pin = Pin(0, Pin.IN, Pin.PULL_DOWN)
led = Pin("LED", Pin.OUT)
isMotionDetected=False;

def detect_motion(pin):
    global isMotionDetected
    isMotionDetected=True

pin.irq(trigger=Pin.IRQ_RISING, handler=detect_motion)

lastTriggerTime=0

# Email details
sender_email = 'example01@gmail.com'
sender_name = 'PiPico'
sender_app_password = 'xxxxcccccxxxxx'
recipient_email ='example02@gmail.com'
email_subject ='Pico Email'

# Your network credentials
ssid = 'MyWiFi'
password = 'MyPassword'

#Connect to Wi-Fi
wlan = network.WLAN(network.STA_IF)
wlan.active(True)
wlan.connect(ssid, password)

# Wait for connection to establish
max_wait = 10
while max_wait > 0:
    if wlan.status() < 0 or wlan.status() >= 3:
            break
    max_wait -= 1
    print('waiting for connection...')
    time.sleep(1)

# Manage connection errors
if wlan.status() != 3:
    raise RuntimeError('Network Connection has failed')
else:
    print('connected')

#initialize SMTP server and login
smtp = umail.SMTP('smtp.gmail.com', 465, ssl=True)

def sendEmail():
    smtp.login(sender_email, sender_app_password)
    smtp.to(recipient_email)
    smtp.write("From:" + sender_name + "<"+ sender_email+">\n")
    smtp.write("Subject:" + email_subject + "\n")
    smtp.write("Alert! Motion Detected")
    smtp.send()
    smtp.quit()
    lastTriggerTime=time.ticks_ms()

time.delay(60)

while True:
    if isMotionDetected:
        isMotionDetected=False
        print("Motion Detected")
        led.on()
        time.sleep_ms(1000)
        led.off()
        print("timestamp={}". format(time.time()))
        if (time.ticks_ms()-lastTriggerTime)>30000:
            sendEmail()
        print("email sent")Code language: Python (python)
When the code runs, there is a delay of 1 minute before motion can be detected. After a minute has passed, you can wave your hand before the sensor and you will receive an email as shown below.

Code Explanation
The additional changes in code will be explained below.
We introduce a variable called lastTriggerTime to avoid sending frequent emails.
lastTriggerTime=0Code language: Python (python)Enter the details of the email accounts you will use to send and receive alerts. Use the app password you obtained by following the instructions above.
# Email details
sender_email = 'example01@gmail.com'
sender_name = 'PiPico'
sender_app_password = 'xxxxcccccxxxxx'
recipient_email ='example02@gmail.com'
email_subject ='Pico Email'Code language: Python (python)
Enter the name and password of your Wi-Fi network.
# Your network credentials
ssid = 'MyWiFi'
password = 'MyPassword'Code language: Python (python)
The following lines of code help us to connect to Wi-Fi. Please go through our article on connecting Raspberry Pi Pico W to the internet if you wish to know more about how this part of the code works.
#Connect to Wi-Fi
wlan = network.WLAN(network.STA_IF)
wlan.active(True)
wlan.connect(ssid, password)

# Wait for connection to establish
max_wait = 10
while max_wait > 0:
    if wlan.status() < 0 or wlan.status() >= 3:
            break
    max_wait -= 1
    print('waiting for connection...')
    time.sleep(1)

# Manage connection errors
if wlan.status() != 3:
    raise RuntimeError('Network Connection has failed')
else:
    print('connected')Code language: Python (python)
An instance called smtp is created to establish communication with the SMTP server.
#initialize SMTP server and login
smtp = umail.SMTP('smtp.gmail.com', 465, ssl=True)Code language: Python (python)
The sendEmail() function does the job of logging in to the SMTP server and sending an email with the body text “Alert! Motion Detected”. The time at which the email is sent is also saved.
def sendEmail():
    smtp.login(sender_email, sender_app_password)
    smtp.to(recipient_email)
    smtp.write("From:" + sender_name + "<"+ sender_email+">\n")
    smtp.write("Subject:" + email_subject + "\n")
    smtp.write("Alert! Motion Detected")
    smtp.send()
    smtp.quit()
    lastTriggerTime=time.ticks_ms()Code language: Python (python)
Inside the while loop, the code checks if 30 seconds (30000ms) have passed since the last email was sent. If yes, then an email is sent when motion is detected. The interval check is done to prevent repeated mail triggers if any error in code occurs.
if (time.ticks_ms()-lastTriggerTime)>30000:
            sendEmail()Code language: Python (python)
Wrapping Up
In this Raspberry Pi Pico motion sensor guide, we discussed how a PIR sensor works and how we can use it to sense motion using MicroPython code. Thank you for reading.
Recommended Article: Measure Distance Using Raspberry Pi Pico & Ultrasonic Sensor (MicroPython)
Leave a Reply