In this tutorial, you will learn to use the onboard Bluetooth on Raspberry Pi Pico W using MicroPython to communicate with an Android app. The steps in this guide describe how to read the status of a pushbutton and send commands to control an LED using an Android app.
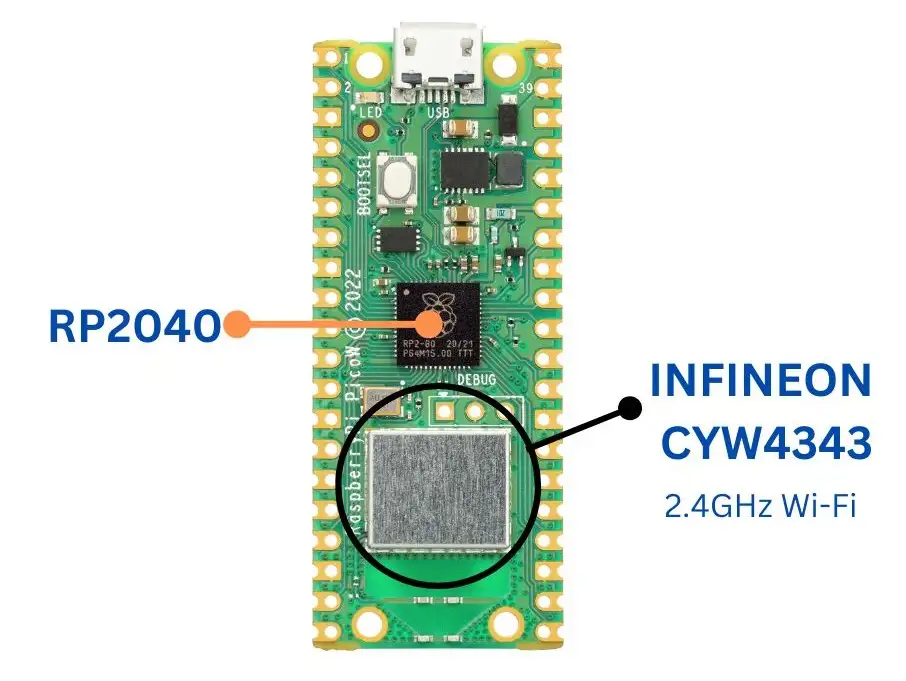
Raspberry Pi Pico W has the Infineon CYW4343 chip onboard, which features a single-band 2.4 GHz Wi-Fi 4 (802.11n) and Bluetooth 5.1. MicroPython modules will help us to easily interface with this chip and communicate with other devices.
The Infineon chip on Raspberry Pi Pico W also has Wi-Fi capability which is discussed in our article Connect Raspberry Pi Pico W to the Internet Using Wi-Fi.
Components Required
- A Raspberry Pi Pico W.
- A pushbutton switch.
- Breadboard and jumper wires.
- USB cable to connect Pico.
Overview of Bluetooth Low Energy(BLE) On Pico W
Bluetooth Low Energy, abbreviated as BLE, is a variant of Bluetooth wireless technology developed with power-saving as its notable feature. Unlike Bluetooth Classic which is always active, BLE can stay in a sleep state when it is not transceiving data. This makes it ideal for use in battery-operated devices such as smartwatches, fitness trackers, and security monitoring devices.
If you would like to use Bluetooth Classic with Raspberry Pi Pico, we have a tutorial where we interface the HC-05 Bluetooth module with RPi Pico.
BLE Communication Topologies
BLE has the following communication topologies:
- Point-to-Point: Communication between two nodes(devices) in a network; server-client communication.
- Mesh Network: Multiple nodes can communicate to each other in this topology.
- Broadcast Mode: A server will broadcast data on the network that can be read by many devices.
BLE States
There are many layers in the BLE architecture. The Link Layer in BLE defines certain states when a device communicates.
- Standby: The device neither transmits nor receives data.
- Initiating: Responds to advertising packets from a particular device to request a
connection. - Advertising: Transmits advertising packets and processes packets sent in
response to advertising packets by other devices. - Connection: In a connection with another device.
- Scanning: Listening for advertising packets from other devices.
- Isochronous Broadcasting: Broadcasts isochronous data packets.
- Synchronization: Listens for periodic advertising belonging to a specific advertising train transmitted by a device.

When in the connection state, a device can be in one of the two roles – the Central role or the Peripheral role. The device that will initiate a connection and transition from the Initiating state to the Connection state assumes the Central role. The device in the Peripheral role will be initially in the Advertising state. When it accepts a connection request from the Central device, it transitions to the Connection state.
In this guide, we will set up Raspberry Pi Pico in the peripheral role and establish point-to-point communication with an Android device via Bluetooth Low Energy.
Control LED using Android App & Raspberry Pi Pico Bluetooth
The following steps will demonstrate how we can control the onboard LED of Raspberry Pi Pico W using data received over Bluetooth from an Android application. Serial communication is emulated using BLE modules in this example.
Step 1: Install the MicroPython UF2 file
First, ensure that you have the correct version of the MicroPython UF2 file installed on Raspberry Pi Pico. You can find the UF2 file on the Raspberry Pi MicroPython documentation page. Download the correct UF2 file for Raspberry Pi Pico W with Wi-Fi and BLE support.
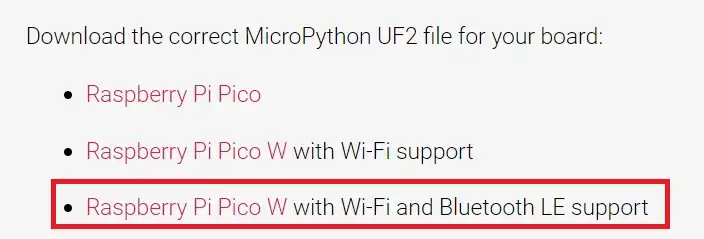
You can also find the latest builds on the MicroPython download page for Raspberry Pi Pico W.
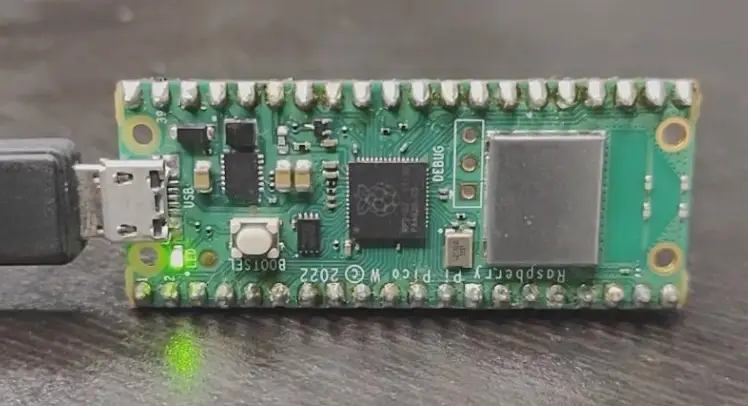
After you have downloaded the file, connect your Raspberry Pi Pico to your computer using a USB cable while pressing the BOOTSEL button. A new drive named RPI-RP2 will be visible in your file explorer. Drag and drop the UF2 file to this drive. When done, the drive will automatically disappear from File Explorer. For more information, visit our getting started guide for Raspberry Pi Pico W.
Step 2: Save Bluetooth Modules to Pico W
We will need to save two MicroPython modules in our RPi Pico to communicate via Bluetooth Low Energy. I will describe the procedure using the Thonny IDE, but you can use other IDEs such as uPyCraft.
Connect your Raspberry Pi Pico W to the computer using a USB cable.
Open a new project in Thonny IDE by going to File>New. Copy the paste the code below.
# Helpers for generating BLE advertising payloads.

from micropython import const
import struct
import bluetooth

# Advertising payloads are repeated packets of the following form:
#   1 byte data length (N + 1)
#   1 byte type (see constants below)
#   N bytes type-specific data

_ADV_TYPE_FLAGS = const(0x01)
_ADV_TYPE_NAME = const(0x09)
_ADV_TYPE_UUID16_COMPLETE = const(0x3)
_ADV_TYPE_UUID32_COMPLETE = const(0x5)
_ADV_TYPE_UUID128_COMPLETE = const(0x7)
_ADV_TYPE_UUID16_MORE = const(0x2)
_ADV_TYPE_UUID32_MORE = const(0x4)
_ADV_TYPE_UUID128_MORE = const(0x6)
_ADV_TYPE_APPEARANCE = const(0x19)


# Generate a payload to be passed to gap_advertise(adv_data=...).
def advertising_payload(limited_disc=False, br_edr=False, name=None, services=None, appearance=0):
    payload = bytearray()

    def _append(adv_type, value):
        nonlocal payload
        payload += struct.pack("BB", len(value) + 1, adv_type) + value

    _append(
        _ADV_TYPE_FLAGS,
        struct.pack("B", (0x01 if limited_disc else 0x02) + (0x18 if br_edr else 0x04)),
    )

    if name:
        _append(_ADV_TYPE_NAME, name)

    if services:
        for uuid in services:
            b = bytes(uuid)
            if len(b) == 2:
                _append(_ADV_TYPE_UUID16_COMPLETE, b)
            elif len(b) == 4:
                _append(_ADV_TYPE_UUID32_COMPLETE, b)
            elif len(b) == 16:
                _append(_ADV_TYPE_UUID128_COMPLETE, b)

    # See org.bluetooth.characteristic.gap.appearance.xml
    if appearance:
        _append(_ADV_TYPE_APPEARANCE, struct.pack("<h", appearance))

    return payload


def decode_field(payload, adv_type):
    i = 0
    result = []
    while i + 1 < len(payload):
        if payload[i + 1] == adv_type:
            result.append(payload[i + 2 : i + payload[i] + 1])
        i += 1 + payload[i]
    return result


def decode_name(payload):
    n = decode_field(payload, _ADV_TYPE_NAME)
    return str(n[0], "utf-8") if n else ""


def decode_services(payload):
    services = []
    for u in decode_field(payload, _ADV_TYPE_UUID16_COMPLETE):
        services.append(bluetooth.UUID(struct.unpack("<h", u)[0]))
    for u in decode_field(payload, _ADV_TYPE_UUID32_COMPLETE):
        services.append(bluetooth.UUID(struct.unpack("<d", u)[0]))
    for u in decode_field(payload, _ADV_TYPE_UUID128_COMPLETE):
        services.append(bluetooth.UUID(u))
    return services


def demo():
    payload = advertising_payload(
        name="micropython",
        services=[bluetooth.UUID(0x181A), bluetooth.UUID("6E400001-B5A3-F393-E0A9-E50E24DCCA9E")],
    )
    print(payload)
    print(decode_name(payload))
    print(decode_services(payload))


if __name__ == "__main__":
    demo()
Code language: Python (python)
Click on File> Save as and then select Raspberry Pi Pico.

Give the file name ble_advertising.py and press OK.
Repeat the procedure and save the code below as ble_simple_peripheral.py to your Pico W.
# This example demonstrates a UART periperhal.

import bluetooth
import random
import struct
import time
from ble_advertising import advertising_payload

from micropython import const

_IRQ_CENTRAL_CONNECT = const(1)
_IRQ_CENTRAL_DISCONNECT = const(2)
_IRQ_GATTS_WRITE = const(3)

_FLAG_READ = const(0x0002)
_FLAG_WRITE_NO_RESPONSE = const(0x0004)
_FLAG_WRITE = const(0x0008)
_FLAG_NOTIFY = const(0x0010)

_UART_UUID = bluetooth.UUID("6E400001-B5A3-F393-E0A9-E50E24DCCA9E")
_UART_TX = (
    bluetooth.UUID("6E400003-B5A3-F393-E0A9-E50E24DCCA9E"),
    _FLAG_READ | _FLAG_NOTIFY,
)
_UART_RX = (
    bluetooth.UUID("6E400002-B5A3-F393-E0A9-E50E24DCCA9E"),
    _FLAG_WRITE | _FLAG_WRITE_NO_RESPONSE,
)
_UART_SERVICE = (
    _UART_UUID,
    (_UART_TX, _UART_RX),
)


class BLESimplePeripheral:
    def __init__(self, ble, name="mpy-uart"):
        self._ble = ble
        self._ble.active(True)
        self._ble.irq(self._irq)
        ((self._handle_tx, self._handle_rx),) = self._ble.gatts_register_services((_UART_SERVICE,))
        self._connections = set()
        self._write_callback = None
        self._payload = advertising_payload(name=name, services=[_UART_UUID])
        self._advertise()

    def _irq(self, event, data):
        # Track connections so we can send notifications.
        if event == _IRQ_CENTRAL_CONNECT:
            conn_handle, _, _ = data
            print("New connection", conn_handle)
            self._connections.add(conn_handle)
        elif event == _IRQ_CENTRAL_DISCONNECT:
            conn_handle, _, _ = data
            print("Disconnected", conn_handle)
            self._connections.remove(conn_handle)
            # Start advertising again to allow a new connection.
            self._advertise()
        elif event == _IRQ_GATTS_WRITE:
            conn_handle, value_handle = data
            value = self._ble.gatts_read(value_handle)
            if value_handle == self._handle_rx and self._write_callback:
                self._write_callback(value)

    def send(self, data):
        for conn_handle in self._connections:
            self._ble.gatts_notify(conn_handle, self._handle_tx, data)

    def is_connected(self):
        return len(self._connections) > 0

    def _advertise(self, interval_us=500000):
        print("Starting advertising")
        self._ble.gap_advertise(interval_us, adv_data=self._payload)

    def on_write(self, callback):
        self._write_callback = callback


def demo():
    ble = bluetooth.BLE()
    p = BLESimplePeripheral(ble)

    def on_rx(v):
        print("RX", v)

    p.on_write(on_rx)

    i = 0
    while True:
        if p.is_connected():
            # Short burst of queued notifications.
            for _ in range(3):
                data = str(i) + "_"
                print("TX", data)
                p.send(data)
                i += 1
        time.sleep_ms(100)


if __name__ == "__main__":
    demo()
Code language: Python (python)
You will also find the code for the two modules shown above on this GitHub page of MicroPython Bluetooth examples.
Step:3 MicroPython Bluetooth Example Code To Control LED
Now paste the following code into a new project on Thonny IDE.
# Import necessary modules
from machine import Pin
import bluetooth
from ble_simple_peripheral import BLESimplePeripheral

# Create a Bluetooth Low Energy (BLE) object
ble = bluetooth.BLE()

# Create an instance of the BLESimplePeripheral class with the BLE object
sp = BLESimplePeripheral(ble)

# Create a Pin object for the onboard LED, configure it as an output
led = Pin("LED", Pin.OUT)

# Initialize the LED state to 0 (off)
led_state = 0

# Define a callback function to handle received data
def on_rx(data):
    print("Data received: ", data)  # Print the received data
    global led_state  # Access the global variable led_state
    if data == b'toggle\r\n':  # Check if the received data is "toggle"
        led.value(not led_state)  # Toggle the LED state (on/off)
        led_state = 1 - led_state  # Update the LED state

# Start an infinite loop
while True:
    if sp.is_connected():  # Check if a BLE connection is established
        sp.on_write(on_rx)  # Set the callback function for data receptionCode language: Python (python)
Run your code by pressing F5 or by clicking on the Run icon. Save it to your Raspberry Pi Pico. Name the script main.py or any other name with a “.py” extension. Code saved as main.py will run automatically when Pico W reboots.
When the script runs, you will see the text “Starting advertising” displayed on the console.
Note: If the IDE shows you an error that the bluetooth module cannot be imported or does not exist, you may have installed the wrong UF2 file to your Pico W.
Step 4: Setting Up Android App
Install the app Serial Bluetooth Terminal from the Play Store which is available for free. Open the app and from the navigation drawer, click on Devices.

Select the Bluetooth LE tab and tap on SCAN. You must now see your device listed as mpy-uart. Select the device name to connect to it.

When the connection is established, you can see the message “Connected” on the Android app. The console in Thonny IDE will also display the text “New connection 64”

Step 5: Toggle the Onboard LED Via Bluetooth App
On the Android app, type “toggle” without the quotes and tap the send icon.

The onboard LED on Raspberry Pi Pico W must change its state from OFF to ON. Sending the command again will toggle its state from ON to OFF.
Also read: Raspberry Pi Pico vs Arduino – Which Board To Choose?

Send Data from Raspberry Pi Pico to Android App Using BLE
The section above demonstrated how we can send data from an Android app to Pico. Now, this part will deal with receiving data on an Android via Bluetooth from Raspberry Pi Pico W. As an example, we will monitor if a pushbutton is pressed and display its status on the console of an Android app.
Step 1: Connect Pushbutton with Raspberry Pi Pico W
Connect a pushbutton between GPIO 0 and any of the GND pins of Raspberry Pi Pico W as shown in the schematic below.

Step 2: MicroPython Example Code To Read Data Over Bluetooth LE
The MicroPython modules, ble_advertising.py and ble_simple_peripheral.py, that we discussed above also need to be preloaded to your RPi Pico W.
Connect Pico W to your computer and upload the following code:
# Import necessary modules
from machine import Pin
import bluetooth
from ble_simple_peripheral import BLESimplePeripheral
import time

# Create a Bluetooth Low Energy (BLE) object
ble = bluetooth.BLE()
# Create an instance of the BLESimplePeripheral class with the BLE object
sp = BLESimplePeripheral(ble)

# Set the debounce time to 0. Used for switch debouncing
debounce_time=0

# Create a Pin object for Pin 0, configure it as an input with a pull-up resistor
pin = Pin(0, Pin.IN, Pin.PULL_UP)

while True:
    # Check if the pin value is 0 and if debounce time has elapsed (more than 300 milliseconds)
    if ((pin.value() is 0) and (time.ticks_ms()-debounce_time) > 300):
        # Check if the BLE connection is established
        if sp.is_connected():
            # Create a message string
            msg="pushbutton pressed\n"
            # Send the message via BLE
            sp.send(msg)
        # Update the debounce time
        debounce_time=time.ticks_ms()
Code language: Python (python)
Run your code by pressing F5 or by clicking on the Run icon. Save it to your Raspberry Pi Pico and name the script main.py or any other name with a “.py” extension.
When the script runs, you will see the text “Starting advertising” displayed on the console.
Step 3: Connect To Android App & Read Data
Similar to the procedure described in the LED controlling section above, we will use the Serial Bluetooth Terminal app. Connect your Android app to Pico W via BLE.
When you press the pushbutton connected to Pico W, you must now see the text “pushbutton pressed” on the console of the Android app.

Wrapping Up
In this Raspberry Pi Pico W Bluetooth guide, we saw how we can send and receive data from an Android app over BLE. You can use this guide to make various projects such as Android app-controlled home lights, Bluetooth-controlled toy cars, remotely control Neopixel LEDs, etc.
Hope you found the article useful. Please leave your thoughts and queries in the comments below.
Also read: Arduino vs MicroPython vs CircuitPython: Which One Will You Choose?
Leave a Reply