In this guide, learn how to save data permanently on the flash storage of Raspberry Pi Pico W using MicroPython. As an example, we will discuss how we can store a variable on the flash of Raspberry Pi Pico W. The information will be stored even when power is removed. If you are trying to save time series data, look into our guide to make a Raspberry Pi Pico W Data Logger.
Unlike some microcontrollers, Raspberry Pi Pico does not feature an onboard EEPROM(Electrically Erasable Programmable Read-only Memory). EEPROM is a form of nonvolatile memory.
Data such as variables are stored in RAM, a form of volatile memory. Volatile memory cannot retain data after power is removed. So, if we want to store data permanently, we will have to use the on-board flash memory of Raspberry Pi Pico W.
Raspberry Pi Pico W features the RP2040 microcontroller which does not have a large built-in flash memory. It has a 16kB internal ROM(read-only memory) that is used for startup routines, boot sequences, and other critical operations.

The Pico W development board has an external 2MB flash memory (Winbond W25Q16JV) on-board. We will use this flash storage to store permanent data between power cycles.
Scenarios where we may require permanent data saved to flash memory:
- To store variables & settings, such as Wi-Fi credentials, sensor calibration values, and user preferences.
- To store and update counter values or track usage statistics. For example, you might save the number of times a device has been powered on.
- To save the last state of variables. For example, recalling the state of a GPIO after reboot.
Prerequisites
- A Raspberry Pi Pico/ Pico W.
- A tactile push button.
- LED and resistor.
- Breadboard and connecting wires.
Your Raspberry Pi Pico needs to be flashed with a MicroPython UF2 file to program it using MicroPython code. You can read our getting started guide for Raspberry Pi Pico where we show all steps required to start programming RP2040 in MicroPython.
If you are using macOS, follow our guide to program Raspberry Pi Pico on macOS using Thonny IDE.
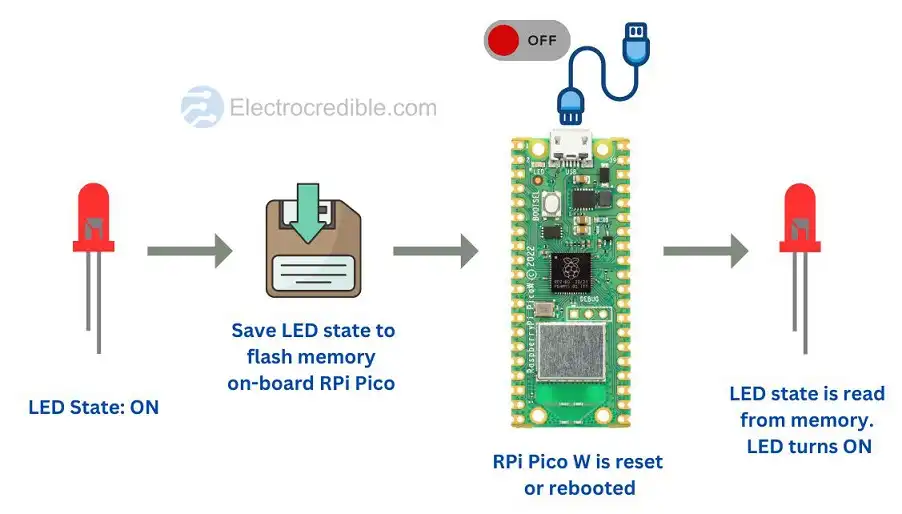
Save LED State to Flash Memory of Raspberry Pi Pico
In the following example, we will connect a tactile pushbutton and an LED to Pico W. The LED will turn ON or OFF when the pushbutton is pressed.
The state of the LED, i.e. whether it is ON or OFF will be saved to the flash memory of Pico W. Even if the RPi Pico W is reset or rebooted, the LED will turn ON or OFF depending on the saved state before being rebooted.
Connection Diagram
Connect your Raspberry Pi Pico to a push-button, an LED, and a current limiting resistor as shown in the figure below.
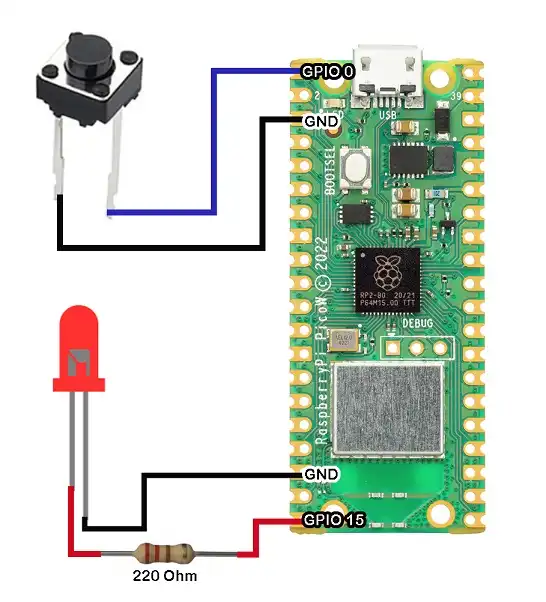
The pushbutton is connected between GPIO0 and GND and an LED in series with a 220 Ohm resistor is connected between GPIO15 and GND. You can also use the onboard LED of Pico if you like.
MicroPython Code to Save JSON Data on Flash Memory of Pico
We will use the JSON (Javascript Object Notation) format for storing data on the flash of RPi Pico. JSON data is represented in name/value pairs(or key/value pairs).
person={'name': "Michael", 'age':37}Code language: JavaScript (javascript)In the JSON example above, the person object literal stores information about an individual named Michael. It provides a way to access and manipulate the person’s name and age in a structured manner. By using the keys 'name' and 'age', you can retrieve the corresponding values "Michael" and “37” respectively.
Open your IDE and create a new file. Copy and paste the code below to the new file.
import ujson as json

led_state = False # inintialize led_state as 0
jsonData = {"stateKey": led_state} # Initialize a JSON literal

try:
    with open('savedata.json', 'w') as f:
        json.dump(jsonData, f)
except:
        print("Error! Could not save")
Code language: Python (python)
Save the file to your Raspberry Pi Pico and name it as data_setup.py.
The code is used to initialize and save a JSON object literal containing the state of an LED. The state is saved as False, i.e. OFF, and this state will be read by the script we shall upload in the next steps.
You can also see the saved file. In Thonny IDE, go to View>Files and then by double-clicking to open the savedata.json file from the sidebar.
MicroPython Code to Read & Write on Flash Memory
Now copy the following code into a new file and save it as main.py on your Raspberry Pi Pico.
import ujson as json
import time
from machine import Pin

button = Pin(0, Pin.IN, Pin.PULL_UP)  # GPIO pin for the button
led = Pin(15, Pin.OUT)  #GPIO pin for LED

debounce_time=0   # variable for button debouncing

#open JSON file and load LED state
try:
    with open('savedata.json', 'r') as f:
        data = json.load(f)
        led_state= data["stateKey"]
except:
    led_state= False
    print("LED state variable not found. Starting with button state as OFF.")

jsonData = {"stateKey": led_state}

# Save LED state to JSON file
def save_led_state(state):
    jsonData["stateKey"]=state
    try:
        with open('savedata.json', 'w') as f:
            json.dump(jsonData, f)
    except:
        print("Could not save the button state variable.")

#Turn LED on/off depending on the state read from JSON file.
led.value(led_state)

#Loop
while True:
    if ((button.value() is 0) and (time.ticks_ms()-debounce_time) > 300):
        debounce_time=time.ticks_ms()
        led.value(not led_state)
        led_state=not led_state
        save_led_state(led_state)
    time.sleep(0.3)
Code language: Python (python)
Run the main.py script.
If you press the pushbutton, the LED should light up. Now if you disconnect USB power from Raspberry Pi Pico and reboot it, the LED must stay turned ON after Raspberry Pi Pico boots up, i.e. it will remember the previous state of LED even when power is withdrawn.
Code Explanation
We import the necessary MicroPython modules: ujson for JSON handling, time for time-related functions, and Pin from the machine module for working with GPIO pins of Pico W.
import ujson as json
import time
from machine import PinCode language: JavaScript (javascript)
GPIO pin 0 is set as an input pin with a pull-up resistor for interfacing a push-button. GPIO pin 15 is set as an output pin for an LED.
button = Pin(0, Pin.IN, Pin.PULL_UP)  # GPIO pin for the button
led = Pin(15, Pin.OUT)  #GPIO pin for LEDCode language: PHP (php)
A variable is initialized to help with button debouncing.
debounce_time=0 The next block of code tries to open a file named “savedata.json” for reading. If the file exists, it loads the data from the file using json.load() and assigns the value of the “stateKey” key to the led_state variable. If the file does not exist or an exception occurs while reading it, the led_state is set as off under the except block.
try:
    with open('savedata.json', 'r') as f:
        data = json.load(f)
        led_state= data["stateKey"]
except:
    led_state= False
    print("LED state variable not found. Starting with button state as OFF.")Code language: PHP (php)
Next, we create a JSON object literal called jsonData with a single key-value pair. The key is “stateKey,” and the value is the current led_state.
jsonData = {"stateKey": led_state}Code language: JavaScript (javascript)Then, we define a function save_led_state(state) to save the LED state to the JSON file. It updates the value of “stateKey” in jsonData with the new state, and then attempts to open the file “savedata.json” for writing. It writes the updated jsonData to the file using json.dump().
def save_led_state(state):
    jsonData["stateKey"]=state
    try:
        with open('savedata.json', 'w') as f:
            json.dump(jsonData, f)
    except:
        print("Could not save the button state variable.")Code language: PHP (php)
The next line sets the initial state of the LED based on the value of led_state. If led_state is True, the LED is turned on (HIGH). If led_state is False, the LED is turned off (LOW).
led.value(led_state)Code language: CSS (css)The while loop runs indefinitely. Inside the loop, it checks if the button is pressed (button.value() is 0) and if enough time has passed since the last button press. If both conditions are met, the LED state is toggled. The LED state is then updated, saved to a JSON file, and the debounce time is updated. The loop repeats with a small delay of 0.3 seconds between iterations.
while True:
    if ((button.value() is 0) and (time.ticks_ms()-debounce_time) > 300):
        debounce_time=time.ticks_ms()
        led.value(not led_state)
        led_state=not led_state
        save_led_state(led_state)
    time.sleep(0.3)Code language: PHP (php)
Conclusion
In this tutorial, we explained how to save JSON data to the flash memory of Raspberry Pi Pico. This information will be helpful to save small data like variables. You may also use external memory such as an EEPROM or a micro SD card for saving a large amount of data.
Leave a Reply