In this tutorial, we will interface the SSD1306 OLED display with Arduino using an Arduino library and I2C communication protocol. We shall take an in-depth look at how to get the most out of the display and use it in various projects. This Arduino OLED display tutorial will be helpful in many projects where you need to view data output, such as data from sensors.
Overview Of SSD1306 OLED Display
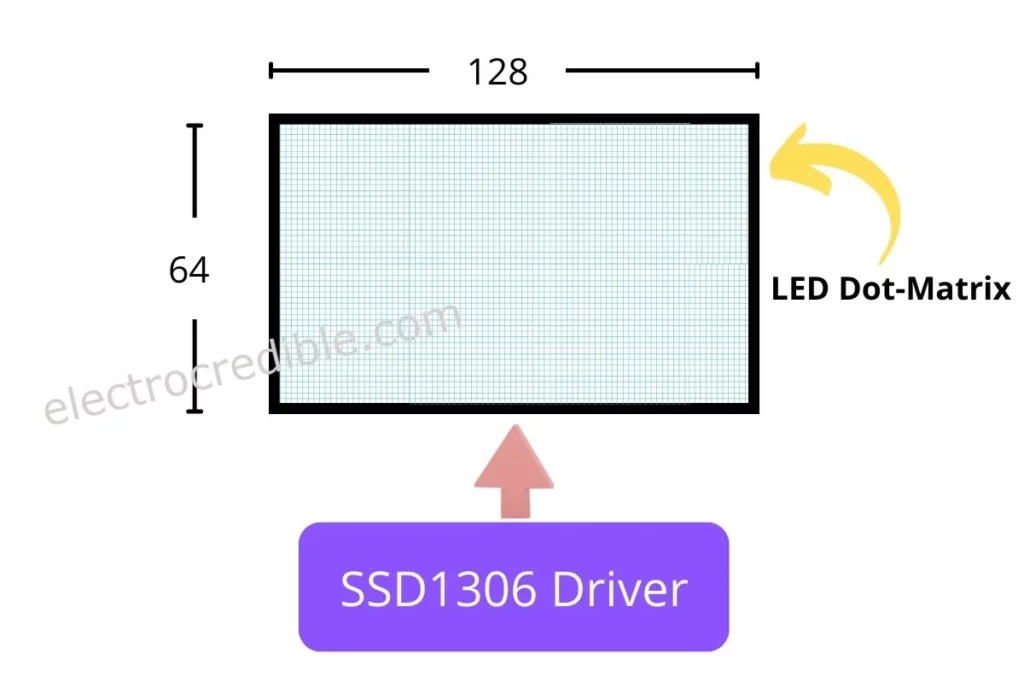
SSD1306 is a controller chip that can control 128×64 dot-matrix diode displays. 128 and 64 refer to the horizontal and vertical pixels respectively i.e there are 128 pixels horizontally on display and 64 pixels vertically, arranged in a rectangular matrix. The SSD1306 has in-built contrast control, display RAM, and oscillator, which helps in reducing the number of external components and power consumption.
Features of SSD1306:
- Power Supply: 1.65V to 3.3V.
- On-chip low-power RC oscillator.
- Communication interface: Parallel interface, 3/4 wire SPI, I2C interface.
- Programmable Frame Rate.
- Operating temperature range: -40°C to 85°C.
Prerequisites For Arduino OLED Display Interfacing
- An Arduino development board(Arduino UNO will be used for demonstration).
- Breadboard and connecting wires.
- SSD1306 OLED display.
- Arduino IDE or PlatformIO.
How To Add OLED Library To Arduino IDE
We shall first install a library from the in-built library manager of Arduino IDE. The library will provide us with functions to easily interface the OLED display with Arduino.
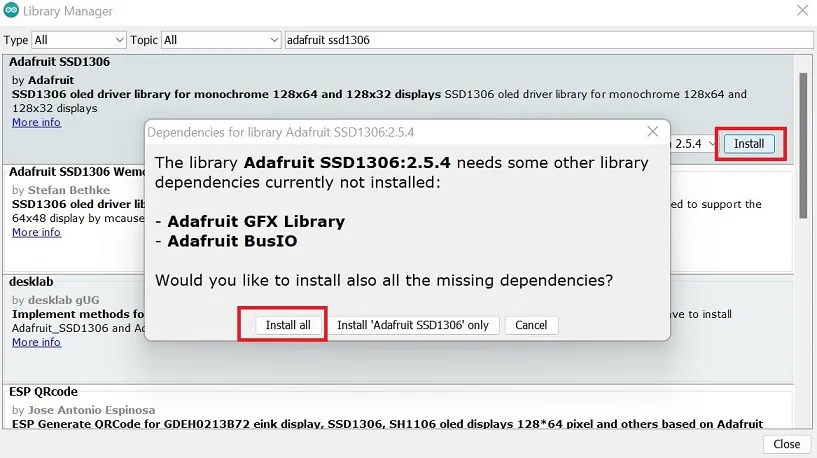
Open Arduino IDE and click on Tools>Manage Libraries.

Type “Adafruit SSD1306” in the search bar. Click on Install button next to the “Adafruit SSD1306” library. In the pop-up that appears, click Install all.

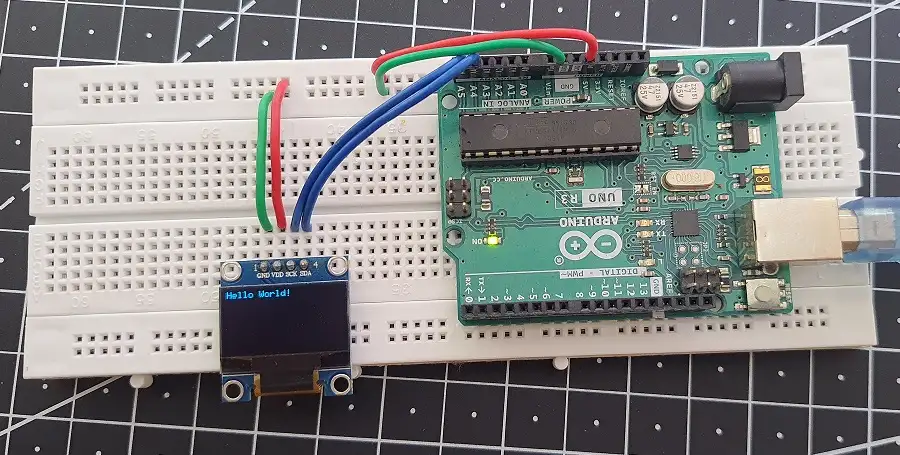
Connection Diagram Of Arduino UNO & OLED Display
Connect your Arduino to the OLED display as shown in the diagram below. Note that in the case of other Arduino boards, the connections will change. In the case of Arduino Mega 2560, the SDA pin is 20 & the SCL pin is 21. In the case of Arduino Leonardo, the SDA pin is 2 & the SCL pin is 3.

Connection Details:
| Arduino UNO Pin | OLED Display Pin |
| 5V | VDD |
| GND | GND |
| A4 | SDA |
| A5 | SCL |
Writing Arduino Code For SSD1306 OLED Display
Adafruit provides example sketches that can help you get started. On Arduino IDE, you can access them by going to File>Examples and then scrolling until you find the option ‘Adafruit SSD1306‘. There you can select the appropriate example for your display size.
Note: By default, #define SCREEN_ADDRESS is set to 0x3D in the example provided by Adafruit. You might need to change it depending on your display hardware. In my case, I changed the display address to 0x3C.
Displaying “Hello World” Text On OLED Display Using Arduino
Let’s try to show some text on our OLED display using a simple sketch. The sketch will show the classic “Hello World!” text on the display. Copy and paste the following code as a new sketch on Arduino IDE.
// Source: Electrocredible.com, Language: Arduino
#include <SPI.h>
#include <Wire.h>
#include <Adafruit_GFX.h>
#include <Adafruit_SSD1306.h>

#define SCREEN_WIDTH 128    // OLED display width
#define SCREEN_HEIGHT 64    // OLED display height
#define OLED_RESET     -1   // Reset pin number, -1 means Arduino reset pin
#define SCREEN_ADDRESS 0x3C // Address may be either 3C or 3d
Adafruit_SSD1306 display(SCREEN_WIDTH, SCREEN_HEIGHT, &Wire, OLED_RESET);

void setup() {
   Serial.begin(9600);

  // SSD1306_SWITCHCAPVCC = generate display voltage from 3.3V internally
  if(!display.begin(SSD1306_SWITCHCAPVCC, SCREEN_ADDRESS)) {
    Serial.println(F("SSD1306 allocation failed"));
    for(;;); // Don't proceed, loop forever

}
}
void loop() {
  display.clearDisplay();             // Clears display buffer
  display.setTextSize(1);
  display.setTextColor(SSD1306_WHITE);
  display.setCursor(0,0);             // Start printing at top-left corner
  display.println(F("Hello World!"));
  display.display();                  //displays the text on screen
}Code language: C++ (cpp)
Click Upload or use the shortcut ‘Ctrl+U’ on Windows. You should now see the letters on your OLED display as shown in the image below.
If you have any queries relating to this Arduino OLED display tutorial, please comment below.
You might also be interested in our other articles that use an OLED display:
Leave a Reply