This tutorial will describe how to upload a program to an Arduino board using PlatformIO. Arduino IDE is one of the most widely used software to program development boards like Arduino, ESP8266, ESP32, and others. It comes bundled with some useful features like a text editor, serial monitor, and multiple language support.
But many characteristics of a powerful IDE are lacking in Arduino IDE. Arduino IDE 2.0 overcomes some of the shortcomings of the older IDE. It introduced new features such as auto code completion, debugging tools, and a serial plotter. But at the time of writing this article, it is still not as powerful as most IDEs used by developers, and I found it to be quite buggy. Before proceeding with this PlatformIO Arduino tutorial, let us first take a brief overview of the PlatformIO IDE.
Why Should We Use VS Code & PlatformIO For Programming Arduino?
Visual Studio Code(VS Code) is a feature-rich code editor made by Microsoft that is supported in Windows, Linux, and macOS. It supports many programming languages such as Python, Java, Ruby, C/C++, and many more. The functionality of VS Code can be extended by using various extensions available from its marketplace. PlatformIO is one such powerful extension.
PlatformIO is an integrated development environment tailored for embedded developers. It supports a wide range of Software Development Kits(SDKs), supports debugging, and includes unit testing, remote development, and many such helpful features. In short, it makes the development process easier. While using different development boards, developers will not have to set up multiple toolchains, IDEs, etc that vary with each microcontroller. Sharing of projects also becomes easy with PlatformIO.
PlatformIO vs Arduino IDE
| Arduino IDE | PlatformIO |
| Does not have a debugger. | Has an integrated debugger. |
| It does not have autocomplete suggestions for code. | Can suggest code as you type. |
| Easy to use. | Has a little learning curve. |
| Does not have embedded Git. | Git integration. |
| Supports C/C++ programming languages. | Supports a wide range of languages such as Python, Java, C/C++, Javascript etc. |
How To Install Visual Studio Code on Windows
- Go to code.visualstudio.com and download VS Code for your Windows PC.
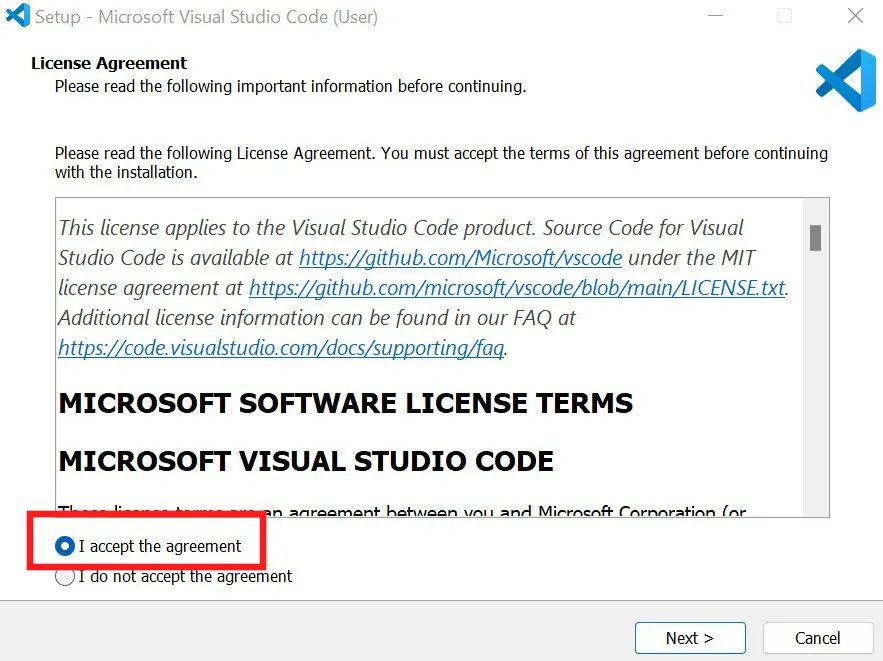
- Open the .exe file after it is downloaded. Click on I accept the agreement on license agreement window. Click Next thereafter.
- Select the folder where VS Code will be installed.
- Set the location for VS Code installation, set the Start Menu folder name, and create a desktop icon in the subsequent steps. You can choose the default options through all these steps. Press Next after each step is completed.

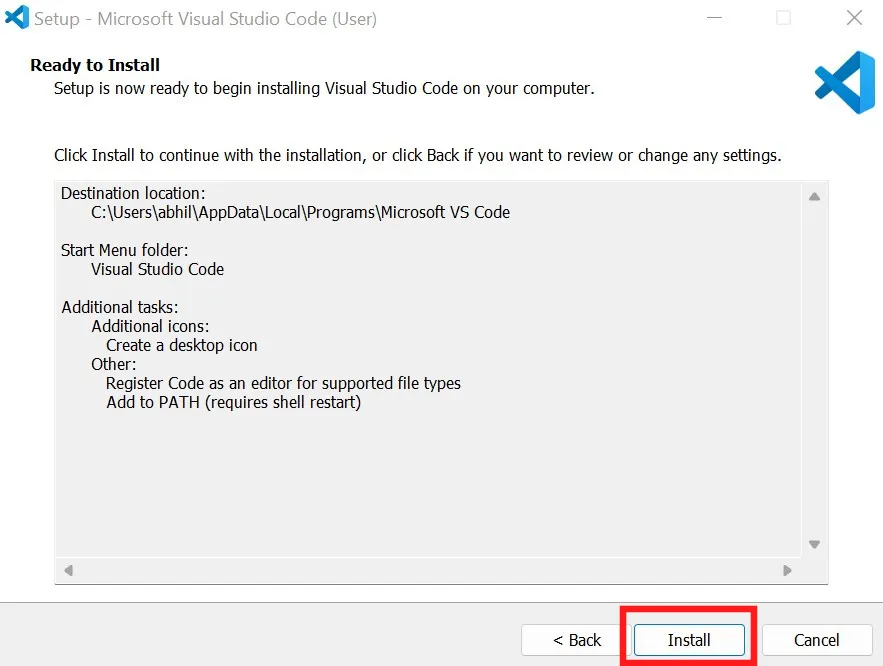
- Click Install to finally install VS Code on your computer. Once you are done installing, click Finish and launch Visual Studio Code.
- You can now click on Finish and run Visual Studio Code.

How To Install PlatformIO For Developing Arduino Programs.
- Click on the extension icon(four squares) on the left toolbar of Visual Studio Code. Alternatively, you can also press Control+Shift+x to access Extensions.
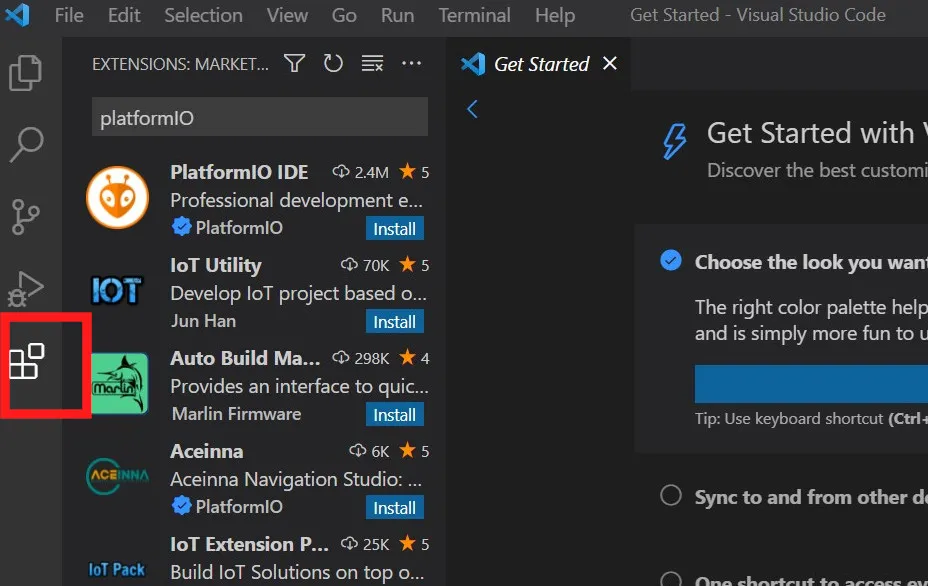
- Search for PlatformIO and click on the Install button next to the text that reads “PlatformIO IDE”. Refer to screenshot 4.
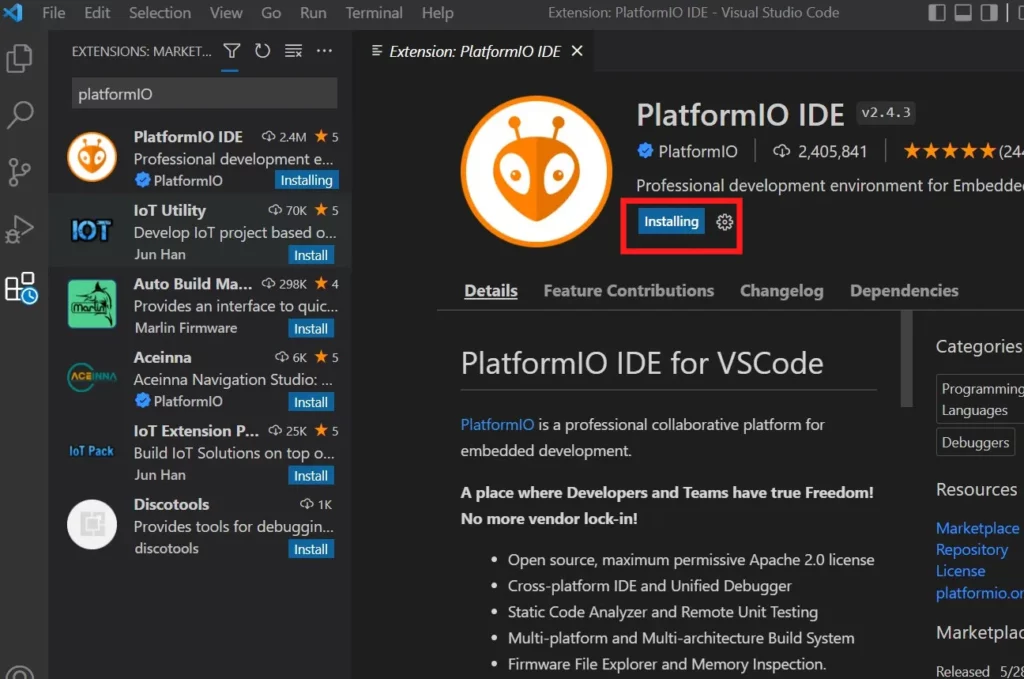
- You’ll notice “Installing” displayed as shown in screenshot 5. Wait for the installation to finish. It may take a few minutes. Once installed, the installing text will disappear and you will have options available to ‘disable’ or ‘uninstall’ the extension.
- Restart Visual Studio Code when installation is done.
Creating Your First Project in PlatformIO IDE
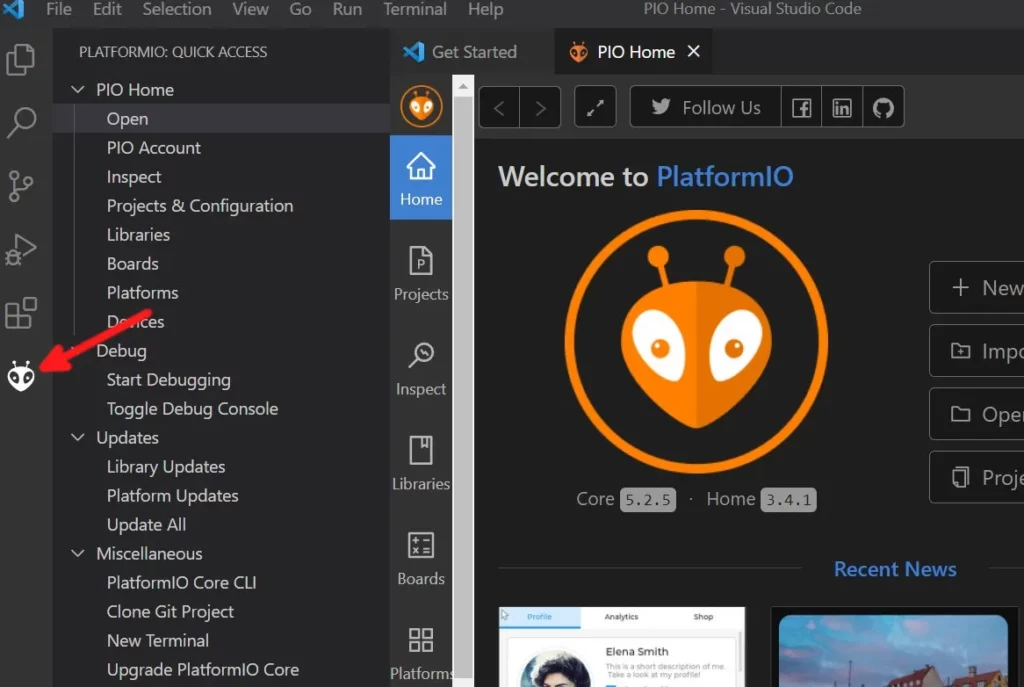
- Click on the PlatformIO icon from the left toolbar of VS Code as shown in screenshot 6.
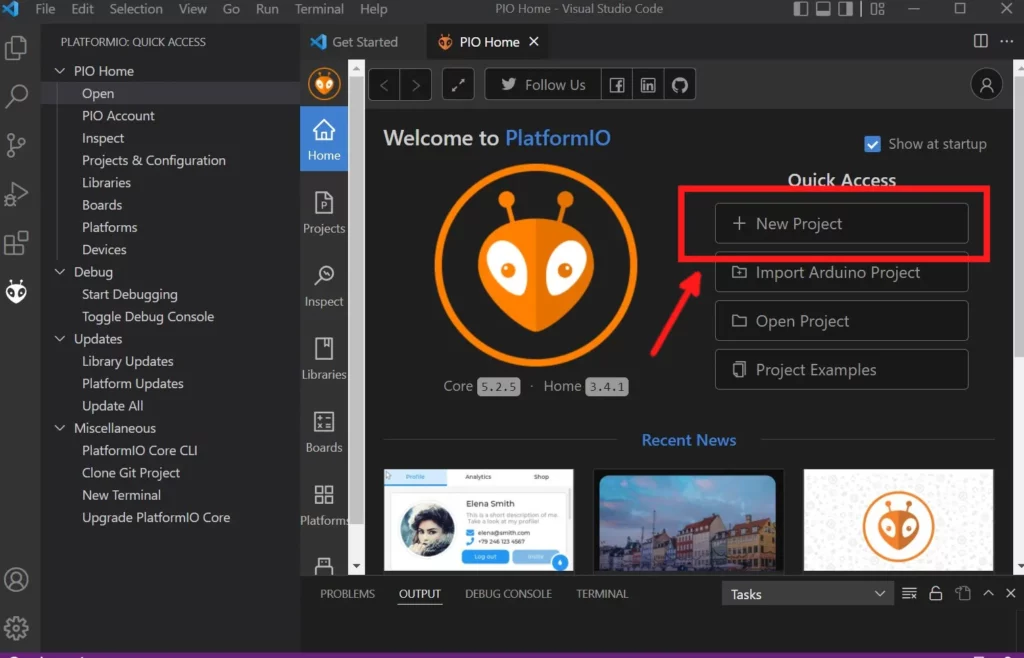
- As shown in the screenshot below, under PIO Home section, click on Open.

- From the options provided, select New Project.
- On the ‘Project Wizard’ window that appears, set the name of the project, select the Arduino board you are using, and select the framework. I’ve named my project BlinkingLED. As I’m using an Arduino UNO board, I selected it in the Board section. The framework is set to ‘Arduino Framework’ by default. When you are done, click on the Finish button.

- Now, you might have to wait for a few seconds as PlatformIO will set up toolchains, frameworks, and SDKs.
- If a popup appears saying “Do you trust the authors of the files in this folder?” Click on “Yes, I trust the authors”.
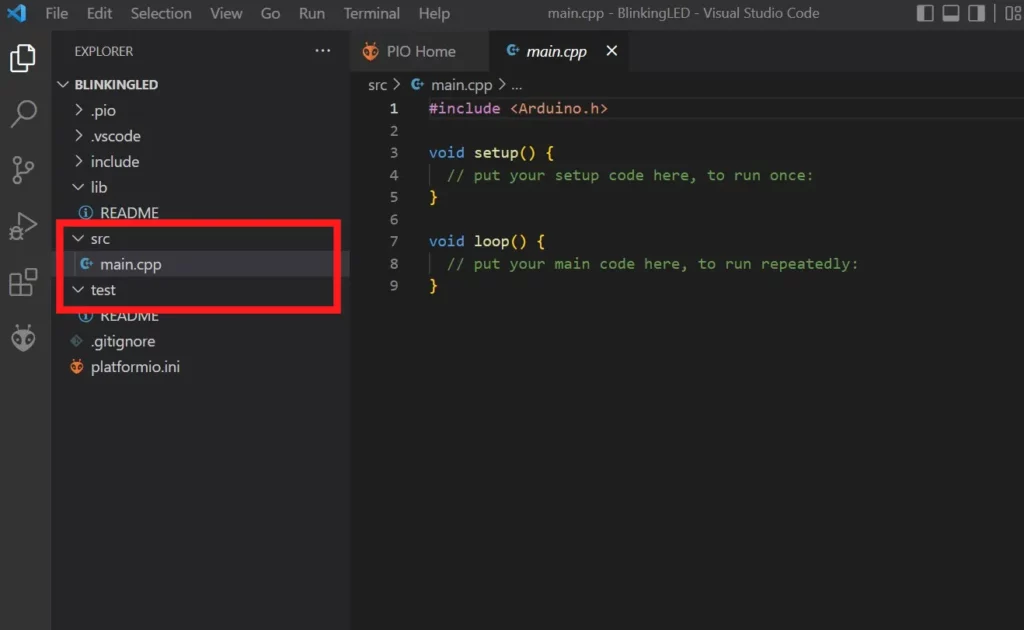
- In the explorer menu on the left, click on src. A dropdown option will appear showing the file main.cpp. Click on it.
- Enter the code as shown below. Refer to screenshot 11. Also, look at the Build and Upload buttons, which we shall use to compile and upload the code to our Arduino.
#include <Arduino.h>

void setup() {
  pinMode(LED_BUILTIN,OUTPUT);    // set digital pin connected to LED as output
}

void loop() {
  digitalWrite(LED_BUILTIN,HIGH); // turn LED ON
  delay(1000);                    //wait for 500 milliseconds
  digitalWrite(LED_BUILTIN,LOW);  // turn OFF the LED
  delay(1000);                    //wait for 500 milliseconds

}Code language: C++ (cpp)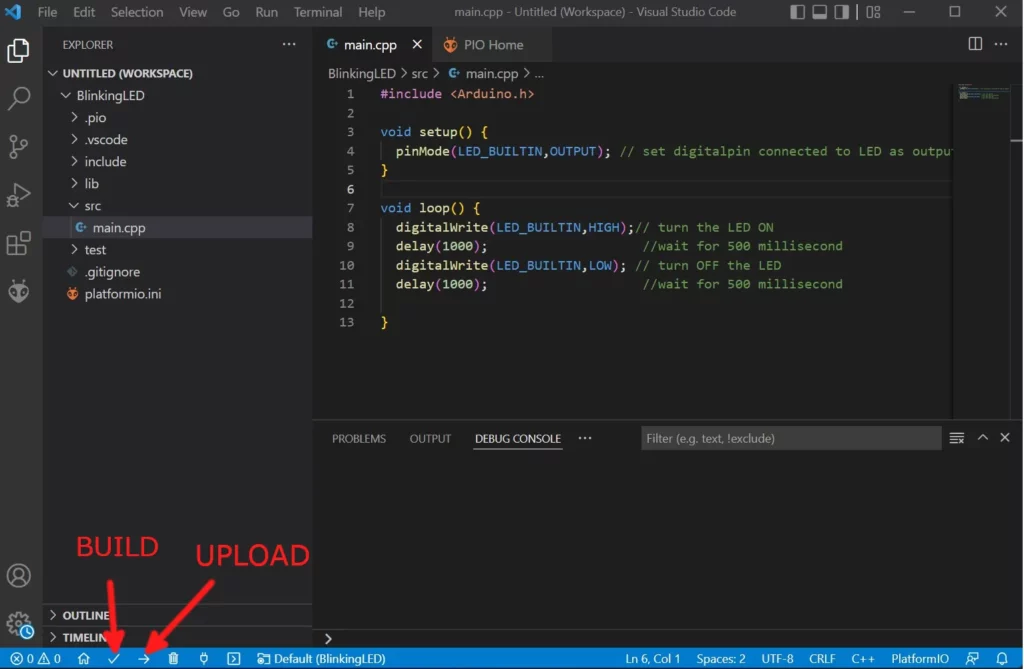
- Click on the Build icon(tick mark) on the lower-left corner of your IDE. After this step, if there is no error in your code, you should see SUCCESS written on the terminal.

- Connect Arduino to your computer. Ensure that your computer detects your Arduino. Search for “Device Manager” on your Windows PC and then go to the ‘Ports’ section and click to expand it. You should see the name of the Arduino that is connected to your PC and its respective port. PlatformIO automatically detects the port of the Arduino board. If you get stuck here, this troubleshooting guide might be helpful for you.

- Now click on the Upload icon(arrow mark) as shown in screenshot 11. If the code successfully uploads, you will see information in the terminal as shown in the screenshot below.
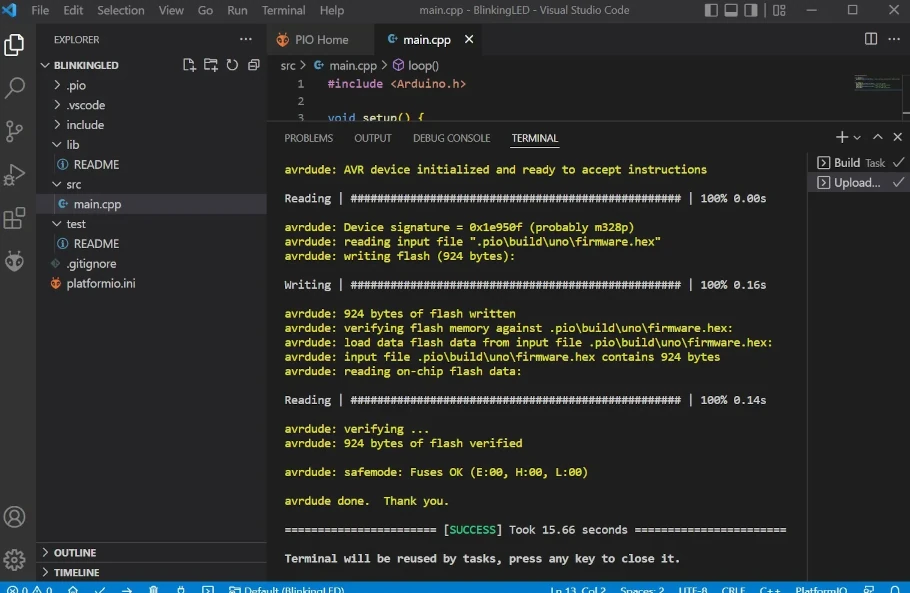
The LED in your Arduino must now start blinking. Try experimenting with the delay times.
How To Add Arduino Libraries In PlatformIO?
PlatformIO supports a lot of libraries of the Arduino ecosystem.
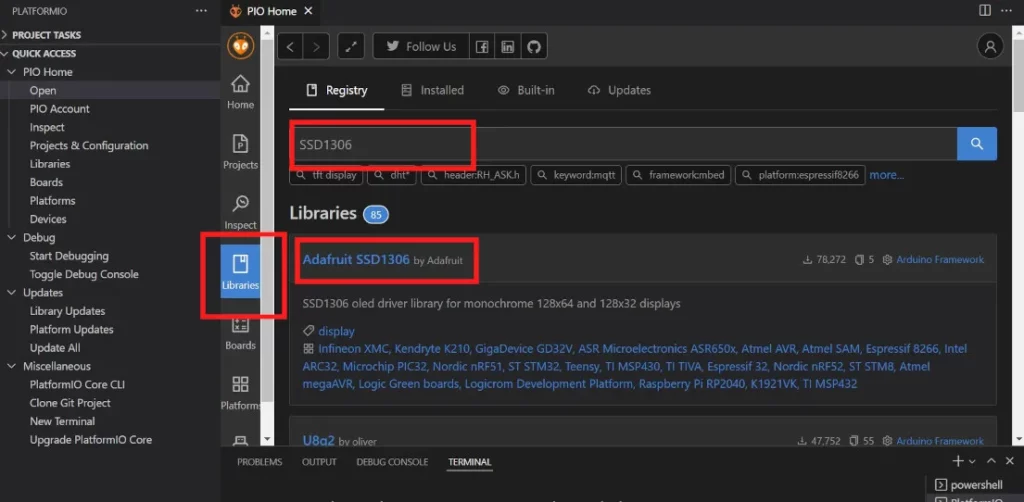
- Click on the PlatformIO icon on the left toolbar of VS Code and go to PIO Home>Open(See screenshot 7). Click on the Libraries option from the mini toolbar.
- On the search bar, search for the library you want to add to your project. For example, I searched for SSD1306 in order to find a library for the SSD1306 OLED display. Click on the library name.
- Click on Add to Project on the next window that appears.
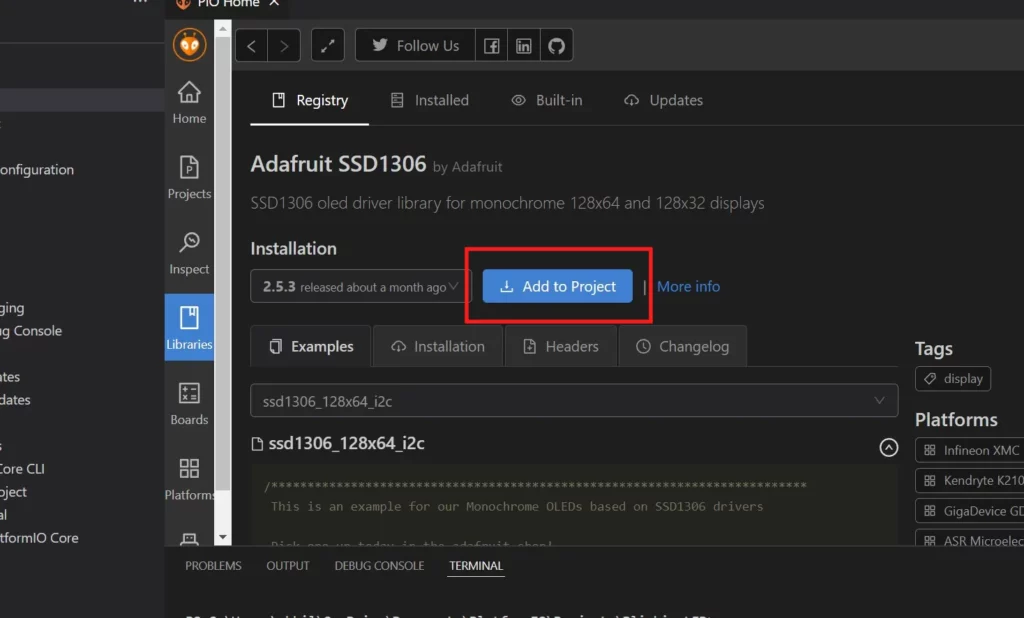
- Click on Select a project section and specify your project from the drop-down list that appears. Now, click on Add.

The library will now be included in your project. Make sure you use the appropriate header files to include the library in your project.
Frequently Asked Questions (FAQs)
Where Is The PlatformIO Serial Plotter Located?
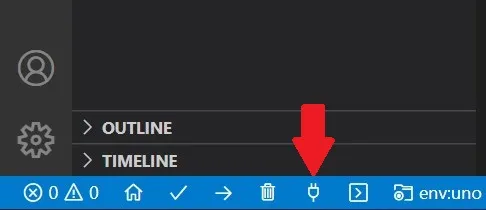
The PlatformIO Serial Plotter is located in the lower-left toolbar of the IDE. See the screenshot below where the icon for the serial monitor is highlighted. Hover your mouse over the icon and it will display “PlatformIO: Serial Monitor”. The output of the serial monitor is shown in the terminal window. You can access the terminal window by using the shortcut (Ctrl+`).
Is PlatformIO better than Arduino IDE?
Arduino IDE is a good choice and is the recommended IDE for beginners. But as project complexity grows, PlatformIO will prove to be more productive and will help you to get things done fast and avoid errors. So, I must conclude that PlatformIO is better than Arduino IDE, although it has a little learning curve.
Wrapping Up – PlatformIO Arduino Tutorial
Although it requires a little time to set up, installing PlatformIO is worth the effort. Moreover, you can use the IDE for other coding projects that may not involve embedded programming, such as web development or app development. I hope this PlatformIO Arduino tutorial was helpful to you.
You can also check out our other useful guides on Arduino:
- Arduino OLED Display Tutorial – Interfacing SSD1306 128×64 Module Using Adafruit Library and I2C
- How To: Arduino- Multiple Buttons On One Analog Pin Using ADC
Please leave your queries and thoughts in the comments below. Thank you for reading.
Leave a Reply