This article will guide you to easily upload Arduino code to Raspberry Pi Pico and Pico W using the Arduino IDE (Integrated Development Environment) version. Step-by-step explanations with images will help you set up Arduino IDE 2.x.x to program Raspberry Pi Pico.
Raspberry Pi Pico & Raspberry Pi Pico W are usually programmed using MicroPython, CircuitPython, and C/C++. The Arduino platform is popular among hobbyists and professionals alike and has hundreds of libraries and evergrowing community support.
Using Arduino code also has the advantage of being faster than MicroPython or CircuiPython.
Install Arduino IDE 2
To install Arduino IDE, visit the official link arduino.cc/en/software. Select the version suitable for your operating system. This guide is explained using the Windows version of the IDE.
ⓘ If you are using Arduino IDE 2.x.x, it is recommended to install Arduino IDE 1.8.x before installing Arduino IDE 2, to prevent driver issues. Also, the Windows store version of Arduino IDE is not recommended as it might not work. Use the Windows EXE installation file or ZIP file from https://arduino.cc/.
Install Raspberry Pi Pico Board on Arduino IDE 2.0
To program Raspberry Pi Pico and Pico W using Arduino IDE, we first need to add information about the board to the IDE.
Adding the Pico Board
1. In Arduino IDE, go to File>Preferences.

2. In the “Additional boards manager URLs” section, enter the following URL.
https://github.com/earlephilhower/arduino-pico/releases/download/global/package_rp2040_index.jsonCode language: JavaScript (javascript)
If you had earlier added URLs for other boards, you can enter each URL in a separate row. Click on the icon next to the URL to expand the URL entry section.
3. Click OK when done. Wait for some time while the IDE downloads the index file.
4. Next, go to Tools> Board> Boards Manager. You may also use the keyboard shortcut Ctrl+Shift+B or click on the Boards Manager icon shown below.
5. Type “Raspberry Pi Pico” in the search field. Scroll till you find the option “Raspberry Pi Pico/RP2040” by Earle F. Philhower. Click on the Install button next to it.

More details on this Arduino port can be found in the Arduino-Pico Github repository.
Wait for the installation to complete. The output monitor of Arduino IDE will notify when the installation completes as shown below.

6. You may close the Boards Manager when installation is finished by clicking on the Boards Manager icon.
Select the Raspberry Pi Pico Board
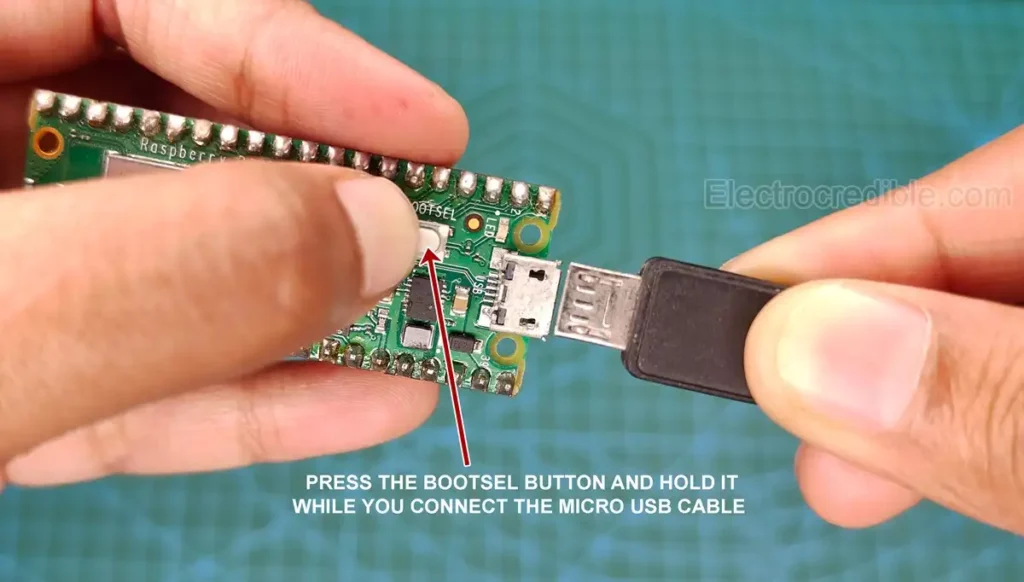
1. Connect Raspberry Pi Pico to your computer by holding the BOOTSEL button on the Raspberry Pi Pico board.
2. Now go to Tools> Board>Raspberry Pi 2040 Boards and select the board that you are using.

The top toolbar must now display the board that you selected.

Set the Port
1. We must let Arduino IDE know about the port to which Raspberry Pi Pico is connected.
2. Go to Tools> Port and select the port that is shown. In my case, the port is shown as “UF2 board.”
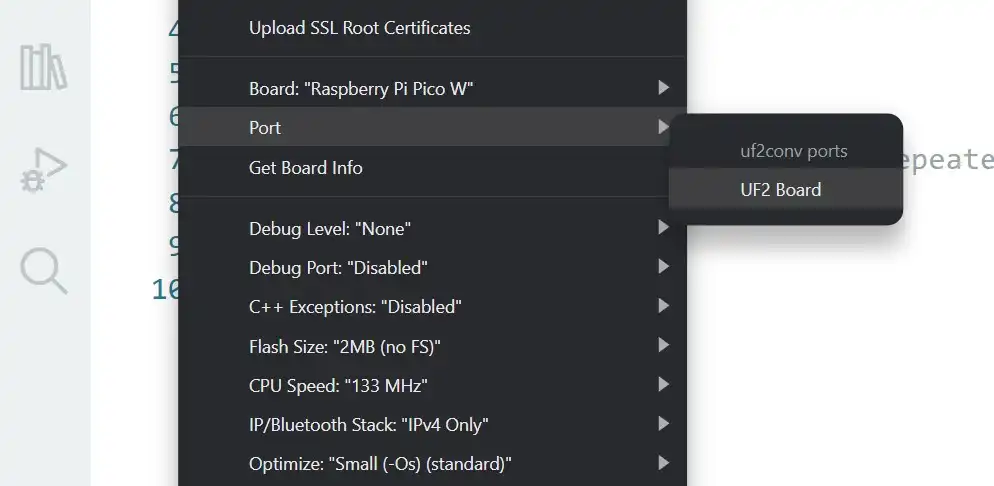
Note: The next time you connect Pico to Arduino IDE, the port name may change.
How To Upload Arduino Code To Raspberry Pi Pico
1. In Arduino IDE, open the code to blink an LED by navigating to File>Examples>Basics>Blink. This code will blink the onboard LED in Raspberry Pi Pico by default.

2. Click the upload icon at the top to upload your code to Raspberry Pi Pico or Pico W.
The following message is displayed in the output terminal when the code is successfully uploaded.

The LED onboard your Raspberry Pi Pico/Pico-W board must now be blinking.

Reconnecting Raspberry Pi Pico to Arduino IDE
Next time when we reconnect the USB cable and Raspberry Pi Pico to our computer or after we restart the IDE, we need not press and hold the BOOTSEL button while connecting.
1. After connecting Pico via a USB cable, click on the Select Board option in the top toolbar.

2. Select the COM port that is shown. Connect only one device at a time so that it is easier to identify the port for Raspberry Pi Pico.
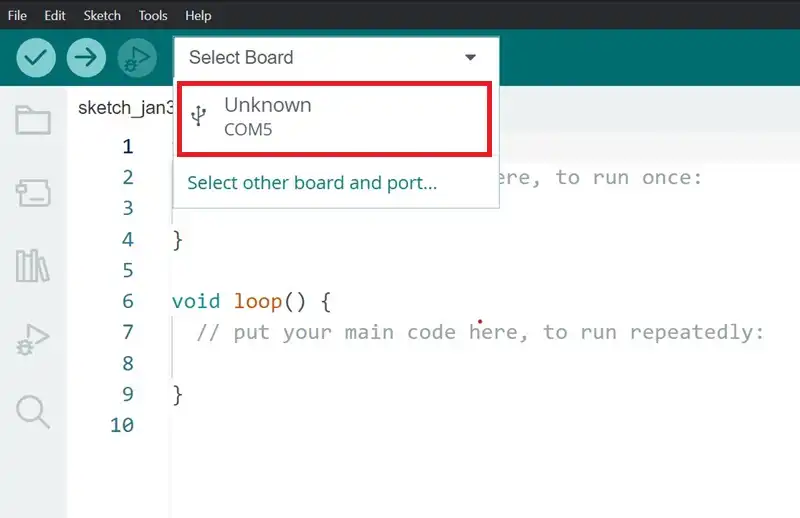
3. Search for “Raspberry Pi Pico” in the BOARDS section and select your board (Pico/PicoW). Press OK when done.

If the port is not displayed or if any error occurs, repeat the process of holding down the BOOTSEL button while connecting the USB cable.
Related: Arduino vs MicroPython vs CircuitPython: Which One Will You Choose?
How to Switch Between MicroPython & Arduino IDE
If you wish to program your Raspberry Pi Pico using MicroPython, you need to flash/re-flash a MicroPython UF2 file to it. Read our guide on how to install the MicroPython UF2 file on Raspberry Pi Pico.
When moving from the MicroPython environment to Arduino, we need to repeat the step of holding down the BOOTSEL button while uploading our first program from the Arduino IDE. Likewise, we need to reflash the MicroPython UF2 file when we move from Arduino to the MicroPython programming environment.
If you are unable to flash new firmware on RPi Pico, you can reset your Pico by following our guide: How To Reset Raspberry Pi Pico & Pico W.
Leave a Reply